Overview
'Advanced Approval by User and Account' (mode 3) supercedes modes 1 and 2. It provides various ways to configure the order approval process, including the options provided by the previous modes as well as more complex approval arrangements required by some companies' business rules. An approval process can be set up against the User, Role or Customer. If multiple approval processes are active, note that User approvals override Customer ones, and Customer overrides any set against Role.
You should decide which Approval Type will be the most suitable for the Customer or User before continuing. The various options are detailed below.
| Approval Type | Description | Requires Approval Groups? | Notes |
|---|---|---|---|
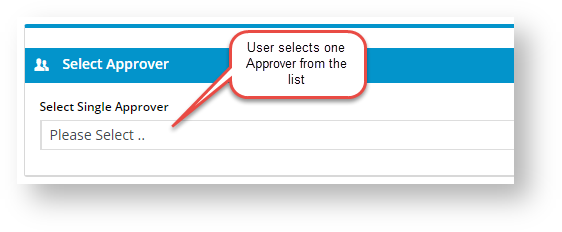
| Single Person User Selected | Allows the ordering User to choose an Approver from a list of valid approvers at Checkout. The user is given order limits for various order functions. For example, a user may have a 'Requisition Limit' of $999999.00, and an 'Order Limit' of $200.00. This user can submit orders up to $200 in value without approval, but any orders $200.01 - $999,999.00 will require approval. Users on the same Customer Code with an 'Approval Limit' greater than the order value will be able to approve the order. If there isn't a user with an appropriate approval limit for the order, an error message that there are no approvers with the correct authority will be displayed to the user. | No |
Can also be set up in Mode 0 if only against a User or in Mode 1 for User in an Account |
| Single Person Auto Selected | Approver is automatically selected from a list of valid Approvers at Checkout. | No | |
| Multi Person User Selected | Allows the User to choose multiple Approvers from a list of valid approvers at Checkout. Only one selected Approver needs to approve the order. | No |
|
| Multi Person Auto Selected | All available Approvers are automatically selected from the Approval Group. All selected Approvers need to approve the order. | Yes | |
| Multi Person Auto Single | All available Approvers are automatically selected from a list of valid Approvers. Only one selected Approver need to approve the order. | No | |
| Multi Person Auto Selected No Group | All available Approvers automatically selected to approve the order. All Approvers need to approve the order. | No | |
| Hierarchical | Allows a hierarchical list of Approvers in an Approval Group to approve an order. All Approvers need to approve the order. | Yes | |
| Hierarchical Customer Budget | Allows a hierarchical list of Approvers in an Approval Group to approve an order. All orders are submitted for approval (even when an order is placed by an approving User in the Approval Group). | Yes | |
| Hierarchical Approval Limits | Allows a hierarchical list of Approvers in an Approval Group to approve an order. Minimum and maximum order amounts are set up for each User in the Group. Approvers are skipped if their range does not include the order amount. | Yes |

Set up an Order Approval Process
1. Enable Advanced Approval by User and Account
Before you can use this order approval mode, your website needs to be set to this option.
To set this:
In the CMS, navigate to Settings → Settings (or while logged into your website: /zSettings.aspx)
Select the Orders tab.
Select the Restrictions and Charges tab.
Find the Use Advanced Order Approval field, then select Advanced Approval By User and Account'
If your site is displaying 'Use Advanced Order Approval' as a checkbox, please get in touch with Commerce Vision and we will update the field to display the dropdown list. However, you can still enable the functionality by ticking the checkbox.
- Click Update to save changes.
2. Decide the level for the Approval Type
Approval Type can be set at the Role, Customer or User level. Note - If multiple Approvals are active, User level settings override Customer level settings. Customer settings override Role settings. E.g., An approval process is set for User A, who has the role of a B2B buyer. A Role level approval process has also been set for B2B buyers. The system will use the Approval set up for User A.
How to set an Approval Type at different levels
Set Approval Type at Role level
NOTE - Role level approvals will be overriden by any active Customer or User approvals.
To set Approval Type at the Role Level:
- While logged into your website, navigate to Roles (usually in Account Selection → Roles) (/zRoles.aspx).
- Click the radio button next to the required Role.
- Click the Functions tab.
- Click Modify.
- Find the field Approval Type and select the required approval type.
- Find the field Is Cancel of Approval Orders Comments Mandatory. Tick if the Approver must enter a reason for rejecting an option.
- Find Enable Cancel of Approval Orders. Tick if the Approver can reject an order.
- Click OK to save.
Set Approval Type at Customer level (without Approval Groups)
NOTE - Customer level approvals are overriden by active User approvals.
To set an Approval Type at the Customer Level:
- While logged into your website, navigate to Customer Maintenance (usually in Account Selection → Customer Maintenance) (/CustomerMaintenance.aspx).
- Search for the required customer account.
- Select the record via radio button.
- Click the Customer Details tab.
- Click Modify.
- Find the field Order Approval Type and select the required approval type.
- Find the field Enable Email Approval. Tick if you want the email sent to an Approver to include links they can click on to quickly Approve and Reject an order.
- Find Required Comments on Email Order Rejection. Tick if the Approver must enter a reason for rejecting an option via the email link.
- Click OK to save.
Set Approval Type at Customer level (with Approval Groups)
NOTE - Customer level approval type is overriden by User settings.
NOTE- Approval Groups must be created for a Customer prior to this step.
To Set Approval Type at the Customer Level with 'Approval Groups':
- While logged into your website navigate to Customer Approvals (usually in Account Selection → Customer Approvals) (/CustomerApproval.aspx).
Note - if this page is unavailable, it has to be added to the menu via the Menu Editor. - Search for the required customer for which you want to set the Approval Group.
- Select the record via radio button.
- Click the Customer Details tab.
- Click Modify.
- Select an Approval Group from the drop-down list.
- Click OK to save.
Set Approval Type at User level (without Approval Groups)
NOTE - This setting will override any Customer or Role level settings.
To Set Approval Type at the User Level:
- While logged into your website navigate to Advanced User (usually in Account Selection → Advanced User Maintenance (/UserMaintenance.aspx).
- Search for the required user and select them via radio button.
- Click Modify.
- Find the field Order Approval Type and select the required option.
- Click OK to save.
Set Approval Type at User level (with Approval Groups)
NOTE - This setting will override any Customer or Role level settings.
NOTE - Approval Groups must be set up for a Customer prior to this step.
To Set the Approval Type at the User Level with 'Approval Groups':
- While logged into your website navigate to Advanced User (usually in Account Selection → Advanced User Maintenance (/UserMaintenance.aspx).
- Search for the required user and select them via radio button.
- Click the Accounts tab.
- Select the required customer FOR which to set the Approval Group.
- On the $Limits tab, click Edit.
- Find the field Approval Group and select from the drop-down list.
- Click Update to save.
Step-by-step guide
Single Person Approvals
Single Person User-selected
To set up Single Person User-selected:
- Navigate to Accounts → Advanced User Maintenance (UserMaintenance.aspx?mode=admin).
- Search for the required User, and select the record via radio button.
- Click the Accounts tab.
- If the user has multiple Customer Codes, select the correct record via radio button.
- On the $Limits tab, click Edit.
- Set the value in the Approval Limit field to the required dollar amount.
- Set the value in the Order Limit field to the required dollar amount.
- Set the value in the Requisition Limit field to the required dollar amount.
- Click the Update button to save changes.
Repeat Steps 1-9 for other users on the account, including users who will have approval authority.
Single Person Auto-selected
This approval type can be set for a User against a Customer account.
To set up Single Person Auto-selected:
- Navigate to Accounts → Advanced User Maintenance (UserMaintenance.aspx?mode=admin).
- Search for the required User, and select the record via radio button.
- Click the User tab.
- Find Order Approval Type and select Single Person Auto-Selected
- Click the Accounts tab, and select the Account required.
- Then on the $Limits tab, click Edit.
- Set the value in the Approval Limit field to the required dollar amount.
- Set the value in the Order Limit field to the required dollar amount.
- Set the value in the Requisition Limit field to the required dollar amount.
- Click the Update button to save changes.
- If the user has other accounts, repeat steps 5-10 for other accounts.
Repeat Steps 1-11 for other users on the account, including users who will have approval authority.
Multi Person Approvals
To set up Multi Person Approval:
- Set the 'Order Approval Type' at the required level (User, Customer, or Role):
- MPU = Multi Person User Selected
- MPA = Multi Person Auto Selected
- MPAS = Multi Person Auto Single
- MPANG = Multi Person Auto Selected No Group
- Then update the User's '$Limits':
- Navigate to 'Accounts' --> 'Advanced User Maintenance' (UserMaintenance.aspx?mode=admin).
- Search for the required User.
- Select the record via radio button.
- Click the 'Accounts' tab.
- If the user has multiple Customer Codes, select the correct record via radio button.
- On the '$Limits' tab, click 'Edit'.
- Set the value in the 'Approval Limit' field to the required dollar amount.
- Set the value in the 'Order Limit' field to the required dollar amount.
- Set the value in the 'Requisition Limit' field to the required dollar amount.
- Click the 'Update' button to save changes.
- Repeat Steps a-j for other users on the account, including users who will have approval authority.
Please Note
Several of the Multi Person approval types require the use of Approval Groups (refer to the table above). Check out our Approval Groups article for information on how to configure these.
Approval Hierarchies
When using Hierarchical approval types, 'Approval Groups' must be used. See Approval Groups for further information.
To Set up Hierarchical Approval:
- Set up the 'Approval Group' at either the Customer or User level.
- Set the 'Order Approval Type' at the required level (User, Customer, or Role) to 'H'.
To set up Hierarchical Customer Budget Approval:
- In the CMS, navigate to Settings → Settings.
Select the 'Orders' tab.
Select the 'Restrictions and Charges' sub-tab.
Set 'Use Advanced Order Approval' to 'Advanced Approval By User and Account'.
- Click 'Update' to save changes.
- Set up the 'Approval Group' at either the Customer or User level.
- Set the 'Order Approval Type' at the required level (User, Customer, or Role) to 'HC'.

To set up Hierarchical Approval Limits:
- Set up the 'Approval Group' at either the Customer or User level.
- Set the 'Order Approval Type' at the required level (User, Customer, or Role) to 'HAL'.
Related help