Overview
Ribbons are an eye-catching way to highlight specific products to users browsing your site. BPD includes several ribbons out of the box, as well as the ability to upload your own ribbon images for use on products throughout your site.
This guide will show you how to:
- Enable Ribbon Maintenance on your BPD site
- Assign a Ribbon to a Product
- Upload your own Ribbon image.

Step-by-step guides
1. To Enable Ribbon Maintenance on your site:
- Login to the CMS.
- Navigate to Settings --> Website Features.
- Edit the Online Product Maintenance feature.
- Ensure 'Enable Maintenance of Ribbon Flag' is ticked.
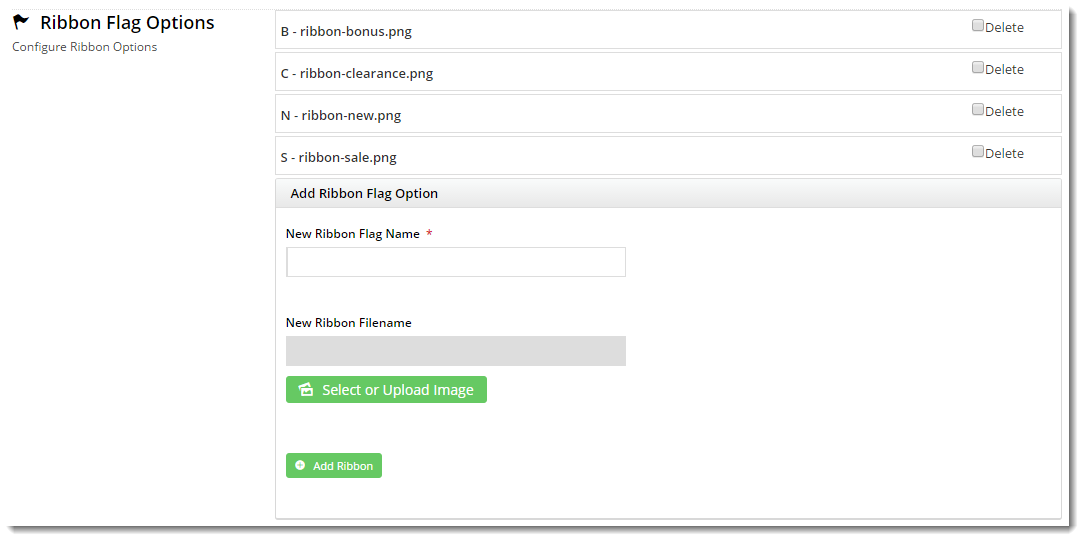
- Verify that the Ribbon Flag Options section now appears on the page, with the default BPD ribbons loaded.
- Click 'Save'.

2. To Assign a Ribbon to a Product
- In the CMS, navigate to Products & Categories --> Product Maintenance.
- Search for the required product and click 'Edit'.
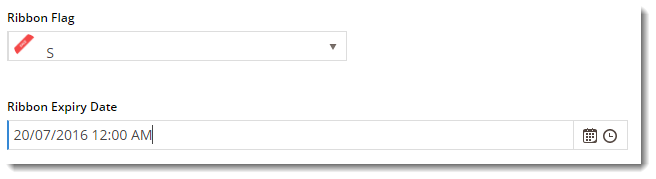
- In the Product Information section, locate the Ribbon Flag dropdown selector.
- Select the required ribbon for the product.
- Set a Ribbon Expiry Date, if required. On this date, the ribbon will be cleared from the product. (from version 3.84+)
- Click 'Save'.
- View the product on your website in another browser (or incognito window) to verify the ribbon appears correctly.

3. To Upload a New Ribbon image:
- In the CMS, navigate to Settings --> Feature Management.
- Configure the Online Product Maintenance feature.
- In the Ribbon Flag Options section, enter a name for the new Ribbon.
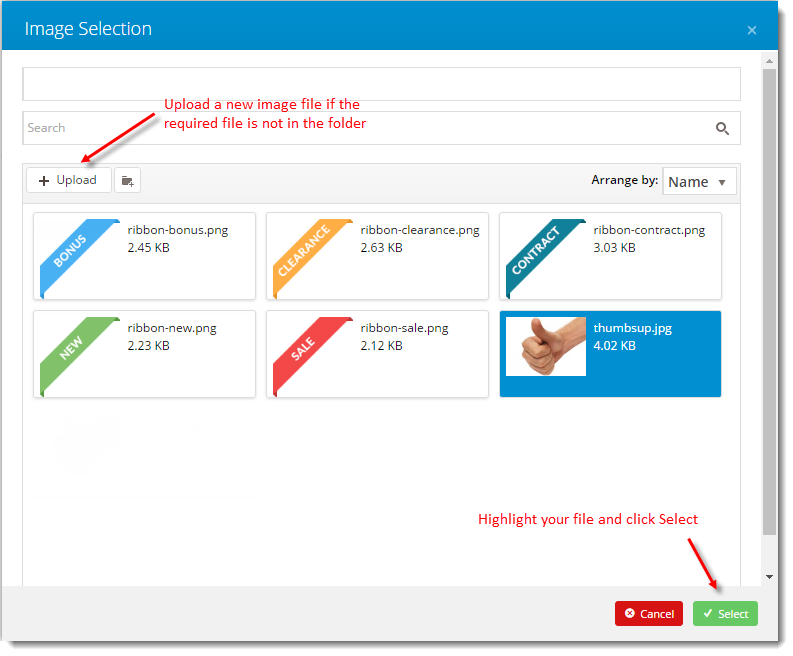
- Click 'Select or Upload Image'.
- Select the required image file from the folder, or click '+Upload' to add a new one.
- Highlight the required file and click 'Select'.
- The selected ribbon image should now be displayed, along with the name you entered.
- Click the 'Add Ribbon' button.
- The new ribbon should appear in the list, with the ribbon name and image file name displayed.
- Click 'Save' at the top of the page to save your newly added ribbon.


The new ribbon will now appear in the Product Maintenance screen, ready to add to a product.
Additional Information
--
| Minimum Version Requirements |
|
|---|---|
| Prerequisites |
|
| Self Configurable |
|
| Business Function |
|
| BPD Only? |
|
| B2B/B2C/Both |
|
| Ballpark Hours From CV (if opting for CV to complete self config component) |
|
| Ballpark Hours From CV (in addition to any self config required) |
|
| Third Party Costs |
|
| CMS Category |
|
Related help