| Excerpt | ||
|---|---|---|
| ||
Edit Customer settings on your website. |
| Table of Contents |
|---|
Overview
Almost all customer details are maintained in the ERP (e.g., PRONTO) and integrated to the website. However, there are some settings on the website which override some role and system based ones.
These are maintained by Administrators via the Customer Maintenance screen accessible in the CMS or when logged in on your website.
Step-by-step guide
Update Customer Details
| Warning |
|---|
Any changes made to Delivery Addresses that are integrated from the ERP (e.g., PRONTO) will be overridden on the next integration. |
To update a Customer's details:
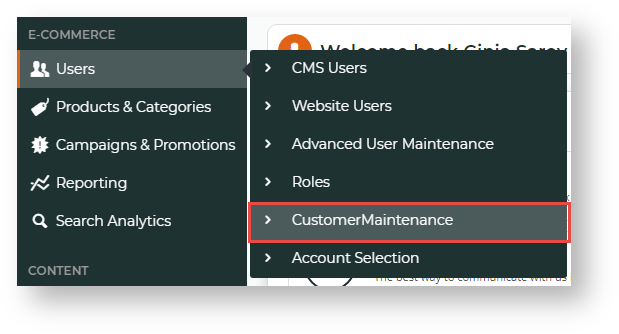
- In the CMS, navigate to Users → Customer Maintenance (or while logged in on the website: Accounts → Customer Maintenance (/CustomerMaintenance.aspx)).
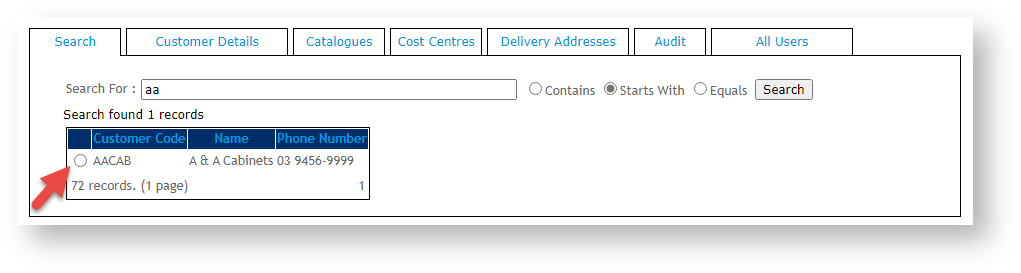
- Use the Search tool to find the customer you want to update.
- Select the radio button for the Customer.
- To view current details for the Customer, click the Customer Details tab.
- Click Modify.
- Update customer settings and values as required.
- To save changes, click OK.


Assign access to Custom Catalogues
A custom catalogue is a set of products that have been grouped together for a specific purpose, customer, user, and are accessible only to subset of users. Custom Catalogues can be assigned at the user or customer level. When access to a custom catalogue is granted at the customer level, all users on that account will have access to that catalogue.
| Info |
|---|
Approval, Order or Requisition limits for a catalogue must be set at the user level. See Updating a user's order limits. |
To add custom catalogue access for a customer:
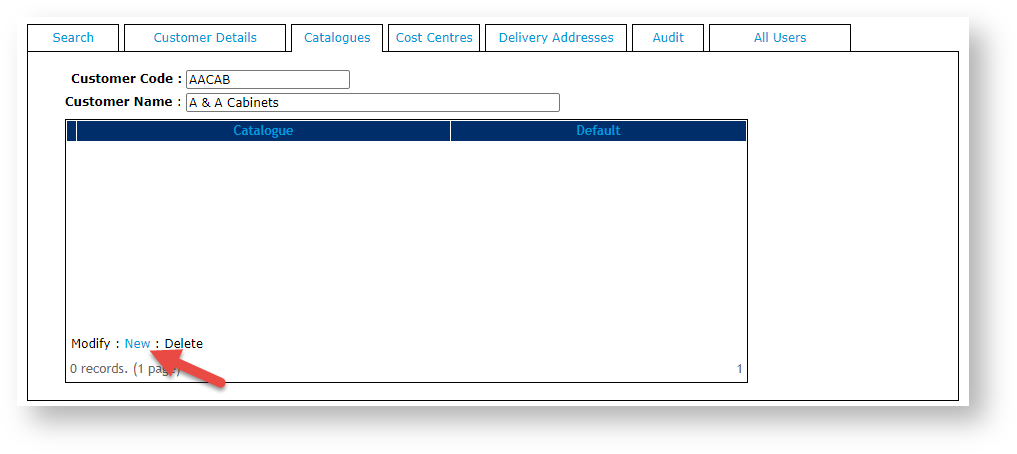
- In Customer Maintenance, find the Customer, then select the Catalogues tab. Any current catalogues for the customer will be listed.
- Click New.
- Select an available catalogue from the drop-down list.
- If this catalogue is to default when a user in this customer account first logs in, tick the Default checkbox.
- To save this access, click OK.


Maintain Customer Cost Centres
| Multiexcerpt | ||
|---|---|---|
| ||
Cost centres are used in the context of a company's budget practices. They are maintained at the Customer level and shown on all orders for customers who have cost centres enabled. The cost centre is selected on each line item of an order before checkout. |
Creating and assigning Cost Centre Codes to customers or users are now accessible in the CMS. Although you can still create and add cost centres through the old Customer Maintenance functionality, it is recommended that the Cost Centre settings via Feature Settings be used. See Cost Centres.
Maintain Customer Delivery Addresses
A Customer may have several delivery addresses for a user to chose from when placing orders. These delivery addresses can be set up in the ERP (PRONTO) and integrated automatically. If the delivery addresses are not maintained in the ERP, they can be maintained online in Delivery Addresses in Customer Maintenance.
To add a new Delivery Address:
- In Customer Maintenance (/CustomerMaintenance.aspx), find the customer, then click the Delivery Addresses tab.
- Click New.
- In Name, enter a name/description for the new delivery address.
- In the Address and Post Code lines, enter the address.
- In Instructions, enter any delivery instructions for this address.
- To save the address, click OK.

| Warning |
|---|
Any changes made to Delivery Addresses that have been integrated from the ERP (PRONTO) will be overridden on the next integration. |
| Excerpt | ||
|---|---|---|
| ||
Customer AuditingAny changes made to a customer via the website's Customer Maintenance page are recorded for Auditing purposes. The following information is recorded when a change is made:
|
Add Warning Notes
Warning notes can be added in Customer Maintenance and displayed when the record is selected for editing. The warning note can be used to display any business rules that may apply to the customer such as, 'Do not activate or modify - Contact Igor on 1234567 for more details.' Below is an example:
First, enable Warning Notes:
- In the CMS or on the website, navigate to Settings → Settings (/zSettings.aspx).
- On the General tab, find and tick the Enable Customer Warning Note checkbox.
- To save the setting, click the Update button.
Now, add a Warning Note:
- In the Customer Maintenance screen (/CustomerMaintenance.aspx), search for the required customer.
- Click the Customer Details tab.
- Click Modify.
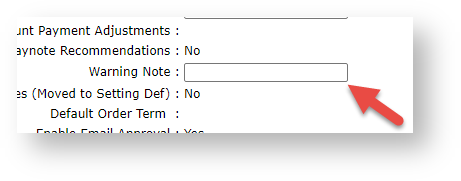
- In the Warning Note field, enter the warning text.
- To save it, click OK.
| Info |
|---|
Warning Notes are available from version 3.51 onwards. |
Maintain Customer Users
In Customer Maintenance, the All Users tab displays all users attached to that customer account. The user's login ID, first name and surname are displayed, along with the approval limit, order limit and requisition limit. Click the Edit button to access the 'Advanced User Maintenance' page, where user details and settings specific to this Customer can be edited. 
Related help
| Content by Label | ||||||||||||||||||||
|---|---|---|---|---|---|---|---|---|---|---|---|---|---|---|---|---|---|---|---|---|
|
| Content by Label | ||||||||
|---|---|---|---|---|---|---|---|---|
|