Customer Self Service allows for the option of store pickup for customers ('click and collect') during checkout. Where there are many different pickup locations available, the feature is often referred to as 'Click & Collect'.In addition to configuring your site to offer store pickup, the various warehouses or store locations need to be enabled in order to be presented as an option To offer this option, your site needs to be configured correctly, and available warehouses and store locations enabled so that they are selectable during checkout.
This guide details how to set up a new Store Location (and maintain existing locations) for sites on our Best Practice Design (BPD) framework.
| Note |
|---|
Please note that the Store Pickup functionality is not compatible with Live Freight. If your BPD site uses Live Freight and you are interested in implementing Store Pickup functionality, please contact us to discuss customisation options. |
...
Create a New Store Location
- In the CMS, navigate to Settings → Store Locator.
- Select the 'Store Locator' tab.
- Click 'New'.
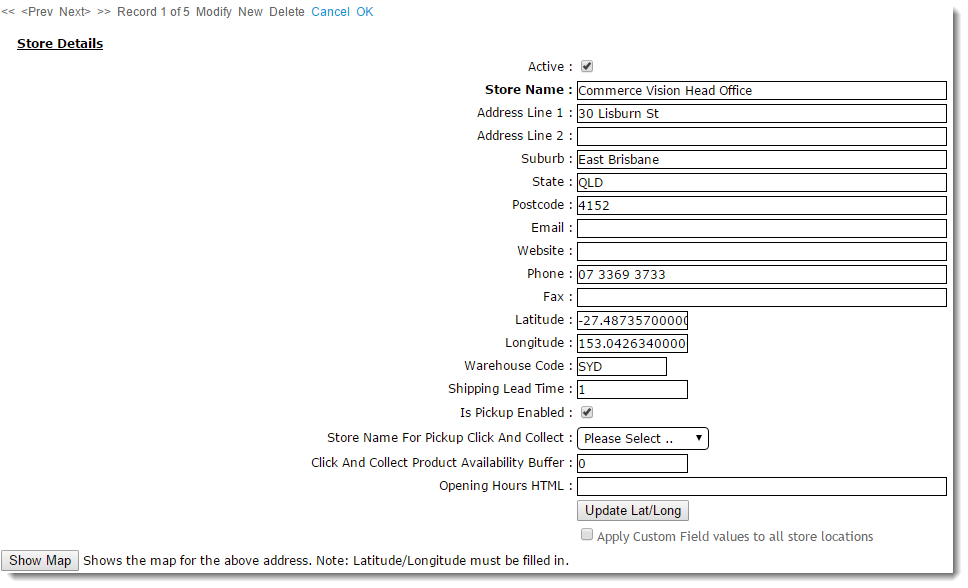
- Populate Enter the Store Name, Address, and contact fields.
- Populate Enter the 'Latitude' and 'Longitude' values (this site may be helpful - http://www.latlong.net/)
- Populate Enter the 'Warehouse Code' - PRONTO warehouse value.
- Populate Enter the 'Shipping Lead Time' - the number of days required to process and ship an order from this warehouse from when it is first submitted.
- (Optional - tick ) Tick 'Is Pick-up Enabled' to activate this location for Click & Collect.
- (Optional - ) Set the 'Store Name For Pickup Click And Collect'. - sets This provides an alternate pickup warehouse for this location (e.g. in some cases, a default warehouse may be ok for delivery, but not , if it is suitable for pickup. In this instance, an alternate warehouse is used).Optional - You can also set this alternative warehouse to default instead of the store location. See CV Support for details.)
- (Optional) Set the 'Click And Collect Product Availability Buffer' - . This is an optional product buffer value specific to this warehouse, overriding and overrides the value in System Settings.
- Click 'OK' to to save.
...
Maintain Pickup Warehouses / Store Locations
- In the CMS, navigate to Settings → Store Locator.
- Search for the required store or click 'Search' to display all current records.
- Select the required store record. The 'Store Details' tab will load.
- Click 'Modify'.
- Tick or untick the setting labelled 'Is Pick-up Enabled', as required.
- Click 'OK' to save.
- The 'Is Pick-up Enabled' setting will integrate to the PRONTO 'StoreLocation' table for the edited Warehouse Code/Store Location.
- Click OK to save.
| Tip |
|---|
If you're implementing Store Pickup functionality for the first time, contact us to verify your site's pickup availability calculation is correct. |
Related
...
help
| Content by Label | ||||||||||||||||||
|---|---|---|---|---|---|---|---|---|---|---|---|---|---|---|---|---|---|---|
|