...
| hidden | true |
|---|
...
This guide covers the process for User Creation using the Postman for Chrome tool. There are add-ons available for other browsers, but this guide will show examples using Postman.
Use this guide to troubleshoot network connectivity and password / credential issues.
Guide
This guide covers what you have to do in the process to set up the User Creation API.
Prerequisites
- URL (will be provided to you)
- Username
- Password
...
- API testing app / browser add-on:
- Postman (Chrome) -
...
...
...
...
...
1.
...
Sample
| Warning |
|---|
You need to replace the clientId and clientSecret values below in the getToken() function with the values provided by Professional Services. |
| Warning |
|---|
This is not meant to be used as is, but is just an example including how you might cache the token and retry on token expiry etc. |
| Code Block | ||
|---|---|---|
| ||
function clearToken() {
    sessionStorage.removeItem('api_type_ebf530f9-083c-43a1-bf93-cd47a853495b');
    sessionStorage.removeItem('api_token_ebf530f9-083c-43a1-bf93-cd47a853495b');
}

function getToken() {
    // Use Cached authorization token information if available
    //

    var type = sessionStorage.getItem('api_type_ebf530f9-083c-43a1-bf93-cd47a853495b');
    var token = sessionStorage.getItem('api_token_ebf530f9-083c-43a1-bf93-cd47a853495b');

    var result = $.Deferred();

    if (type != null && token != null) {
        result.resolve({
            type: type,
            token: token
        });

        return result.promise();
    }

// TODO replace these values with your clientId and client secret values
    var clientId = '<replace>';
    var clientSecret = '<replace>';

    var auth = btoa(clientId + ":" + clientSecret);

    // Get and Cache new authorization token.
    //

    $.ajax({
        url: 'https://justinw-office.commercevision.com.au/api/token',
        method: 'post',
        headers: {'Authorization': 'Basic ' + auth},
        data: { 'grant_type': 'client_credentials' }
    }).then(function(response) {
        type = response.token_type;
        token = response.access_token;

        sessionStorage.setItem('api_type_ebf530f9-083c-43a1-bf93-cd47a853495b', type);
        sessionStorage.setItem('api_token_ebf530f9-083c-43a1-bf93-cd47a853495b', token);

        result.resolve({
            type: type,
            token: token
        });
    });

    return result.promise();
}

function createUser(user) {
    function createOptions(tokenInfo) {
        return {
            url: 'https://justinw-office.commercevision.com.au/api/User',
            method: 'post',
            headers: { 'Authorization': tokenInfo.type + ' ' + tokenInfo.token },
            contentType: 'application/json',
            data: JSON.stringify(user)
        };
    }

    var prom = $.Deferred();

    // Get token (cached or retrieve) and make call. On failure due to token having expired, retrieve
    // a new token and retry.
    //

    getToken().then(function(token) {
        $.ajax(createOptions(token))
            .done(function(response) {
                prom.resolve(response);
            })
            .fail(function(response) {
                if (response.status == 401) {
                    clearToken();

                    getToken().then(function(token) {
                        $.ajax(createOptions(token))
                            .done(function(response) {
                                prom.resolve(response);
                            })});
                    return;
                }

                console.error(response);
            });
    });

    return prom.promise();
}

createUser({
    "EmailAddress" : "user-does-not-exist",
    "FirstName" : "user-name",
    "Surname" : "user-surname",
    "PhoneNumber" : "0419 000 000",
    "NotifyEmailAddress" : "someone@somedomain.com",
    "CustomerCodes" : [
        "046008",
        "046018"
    ],
    "SendWelcomeEmail": false
}).done(function(response) {
// TODO do something with the response here
    console.log(response);
}); |
Related help
...
Get Authorisation Token
Before any API call is made, an authorisation token must be created. To retrieve the authorisation token and code to the API call endpoint, you will need the following:
- The ClientID and ClientSecret: Commerce Vision will provide these to you
1. Open your Postman app.
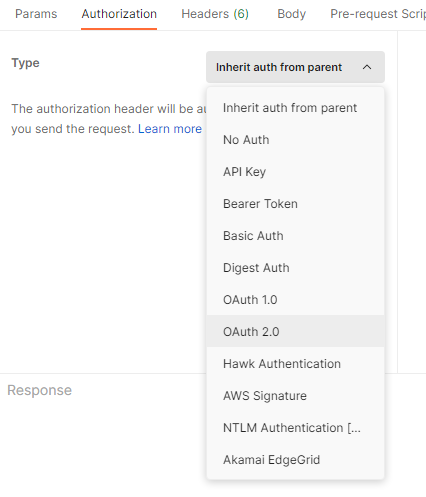
2. Click the Authorization tab.
3. In Type, select OAuth2.0.
4. Go to Configure New Token.

5. In Token Name, enter a name of the token.
6. In Grant Type, select Client Credentials.
7. In Access Token URL, enter the URL (given to you).
8. Enter the Client ID and Client Secret provided to you.
9. In Client Authentication, select Send as Basic Auth header.
10. Click Get New Access Token to get the token.
The response is an object with two fields:
- Token Type: this is the authorisation type that is needed for the api calls (should be 'bearer' usually)
- Access Token: this is the actual token
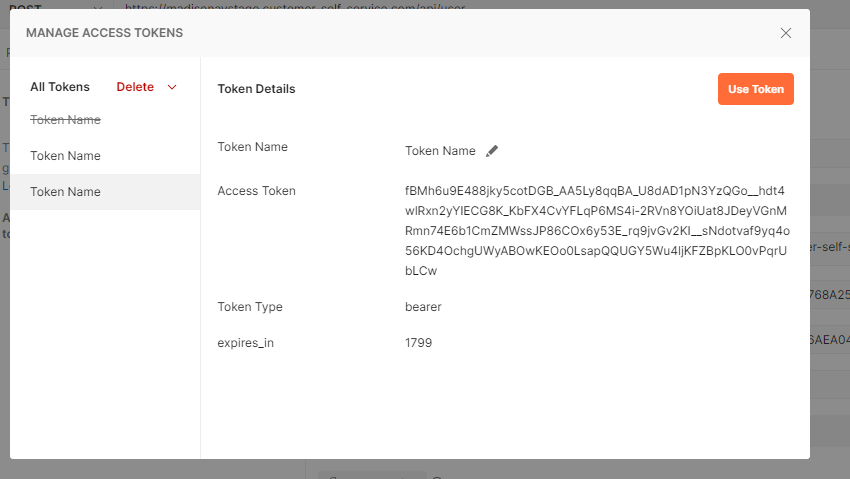
11. Click Use Token.
2. Make the API call
You will need:
- The Token API endpoint: /api/token
- The API endpoint: /api/user
The Token Type and Access Token you created are needed to make the API call. The API endpoint requires use of the token type and token in the authorisation header.
1. Set the request type to POST.
2. Enter the URL (domain name) and then add /api/user

3. On the Body tab, select Raw, then JSON. The API request will return the payload in JSON.
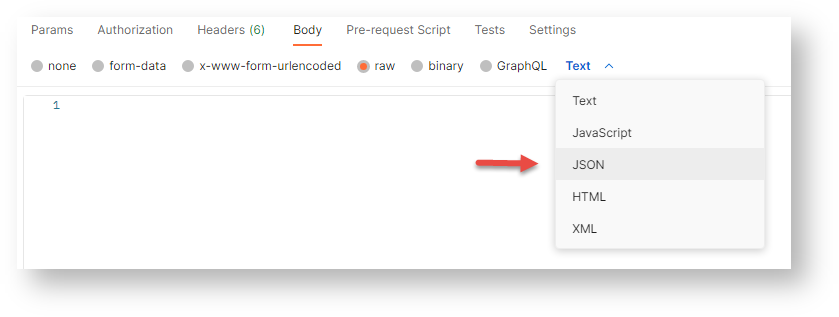
4. Add this sample in the body.
|
5. Click Send.
NOTE - The response object should contain a response that allows you to see whether the call succeeded and whatever response information the call will return. All responses should contain "Success" and may contain "Message" (it should have the field but might have no content depending on the service). All other fields on the response object are endpoint specific.
If the user does not exists, a new user will be created. If you have selected for a Welcome email to be sent ("SendWelcomeEmail": true), this should have been sent.