...
- In the CMS, navigate to Settings → Checkout Messages.
- Click New.
- In Message, enter the message to be displayed to the user.
- Use Sort Code/Mask to define a product category:
- enter the sort code for one category of products,
- enter '%' for ALL products in all categories,
- wildcards for multiple categories, i.e., 'SX123%', or
- leave blank if using an 'Override Query'.
- For Is Plain Text?:
- Tick for the message to be displayed in plain text with no applied formatting.
An example is the default message:Untick for the message formatting to be rendered by any HTML tags added. Most HTML element properties will be guided by your site style. Formatting allows content to visually stand out more and be customised to suit purpose.
Expand
title Click here for a basic guide to formatting your messages... Imagine how you want your message to look. You may want some parts to stand out more than others. Or for a certain sentence to appear bigger than others. Or want to add some white space between certain sections.
Add HTML tags
Each HTML tag is a special word or letters surrounded by angle brackets, < and >. In most cases, you put the text you want to format between opening and closing HTML tags.
Each HTML tag is a special word or letters surrounded by angle brackets, < and >.The tags with the included text is called an HTML element. For example, if we add a word 'IMPORTANT' to the default message and want to bold it, we put the bold opening and closing tags before and after the word: <b>IMPORTANT</b>. A closing tag has a forward slash '/' before the special word/letter and the closing angle bracket.
The whole thing '<b>IMPORTANT</b>' is an HTML element.

A few tags elements don't need opening and closing tags. The most useful may be <br/>, which puts a line break where it appears. Suppose we want a break after 'Here's a sample message.'
Nesting tagselements
You can keep one HTML element inside another HTML element.
List of useful HTML tags
Here are some basic HTML tags you can use to style your checkout messages. Play around with formatting options to achieve the look you want.
Function HTML tag Example Grouping Content <div></div> Headings <h1></h1>
<h2></h2>
<h3></h3>
Paragraph <p></p> Lists Define the List type, then each list item is contained within <li></li>
Unordered list (no special order or sequence for items in list. Default: listed items to start with a bullet point. <ul></ul>
Ordered list. Default: listed items are numbered. <ol> </ol>
Typeface <b>bold</b>
<i>italics</i>
<u>underline</u>
Centering text <center></center>
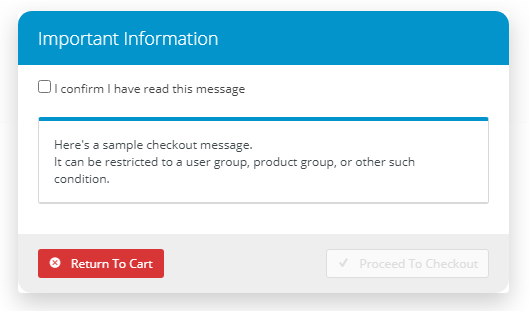
- For Requires User Confirmation:
- Tick to display a checkbox that the user must tick before being allowed to continue
- Untick for the message to display without confirmation from the user
Enter an 'Override Query' if required. NOTE - This field works together with Sort Code/Mask. See Defining the criteria for checkout messages below.
Info An override query is used to define alternative criteria to be met before the message is displayed to the user.
The following tables can be used:
ProntoSalesOrder
ProntoSalesOrderLine
Customer
ProductAn example would be:
product.conditioncode = 'T'
See more examples below.
- For Applies to Mode, set whether the message applies to B2B, B2C or both user roles.
- (For classic sites only. Leave blank for BPD sites.) For the Top Template (displayed below the message), select the required template, if applicable.
- (For Pronto only.) For Field Group Name, select the fieldgroup that is defined on the prontosalesorder table to be displayed along with the message.
- (For classic sites only. Leave blank for BPD sites.) For the Bottom Template (displayed below the message), select the required template, if applicable.
To save these changes, click OK.


...