Overview
| Excerpt |
|---|
Information-rich product pages can help drive sales, but in some cases, not all data is captured by the ERP. Luckily, Customer Self Service websites on the BPD framework can include custom fields as part of standard web product maintenance. |
Uses for custom fields might include:
- product or category-related freight information for oversized items
- special features or benefits, such as certification logos
...
A) Create the new custom field.
B) Edit a product (or productscategory) to include the new data.
C) Add the new product field widget to the Product Detail and/or Product List templates.
The guides below will outline the steps required to implement a custom product field.
Step-by-step guide
A) Create a New Custom Field:
- Login to the CMS.
- Navigate to to 'Advanced Content' → 'Custom Fields'. Click 'Products'.
- Select the table you wish to add your custom field to (e.g. Categories, Products, Users). In this example, we'll add our field to the Products table.
- The page will load, displaying existing displaying any existing custom fields from for the Products table you selected.
- Click the 'Add New Custom Field' button.
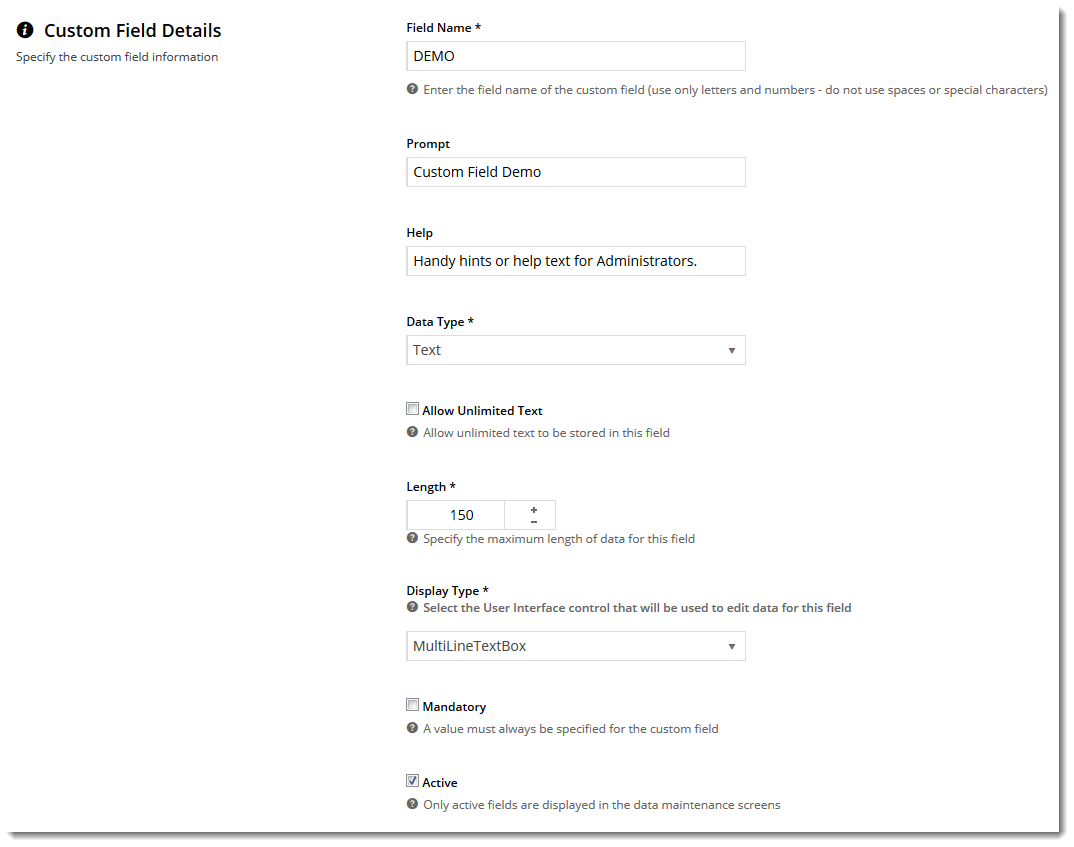
- Populate the Custom Field Details as specified:
- Field Name - a code to associate with this field in the database. Alphanumeric only, with no spaces or special characters.
- Prompt - the field prompt/title which displays to Administrators on the Product Maintenance screen.
- Help - additional information which displays to Administrators on the Product Maintenance screen.
- Data Type:
- Text - alphanumeric characters, including spaces, special characters, and html.
- Integer - whole numbers
- Decimal - numeric data including fractional components
- DateTime - calendar dates and times
- Boolean - 2 values, e.g. True/False
- Allow Unlimited Text (for data type 'Text' only) - ticking this box removes the character limit from the field.
- Length (for data type 'Text' only) - where unlimited data has NOT been allowed, this sets the maximum field length.
- Display Type - the interface which displays to Administrators on the Product Maintenance screen. Options here will change depending on the Data Type selected earlier. Possibilities include TextBox, DropDownList, and DateTimePicker.
- Mandatory - ticking this box makes the custom field required in Product Maintenance.
- Active - ticked by default. Leave as is.
- Click 'Save' to create the custom field.


B) Edit a product (or productscategory) to include this new data:
- Navigate to 'Products & Categories' --> → 'Product Maintenance' (or 'Category Maintenance' if you added the new field to the Category table).
- Search for the required product (or category) by Product Code or Description.
- Click the 'Edit' button against the product.
- Scroll to the 'Custom Fields' section.
- Edit the data as required.
- Click 'Save'.

...
C) Add the custom field widget to the Product Detail and/or Product List Item templatesrequired page template:
- Navigate to 'Content' --> 'Standard Pages'.
- Select the 'Product Detail' or 'Product List Item' template as required (this example will the page template you'd like to display the custom field on. In this example we'll use the Product Detail template)..
- Custom Product fields are commonly displayed on the Product Detail Template.
- Custom Category fields are commonly displayed on the Product List Template.
- Locate the appropriate zone for the custom field widget. The optimal location will depend on site layout, but common placements include 'Zone MainRight' or 'Zone Bottom'your layout.
- Click the 'Add Widget' button.
- Select Search for the required widget (for example 'Product Field' or 'Category Field' from the drop-down listwidget).
- Click the 'Add' button.
- Drag the widget to the desired sequence in the widget list, if required.
- Click the 'Edit' button to configure options. A modal window will appear.
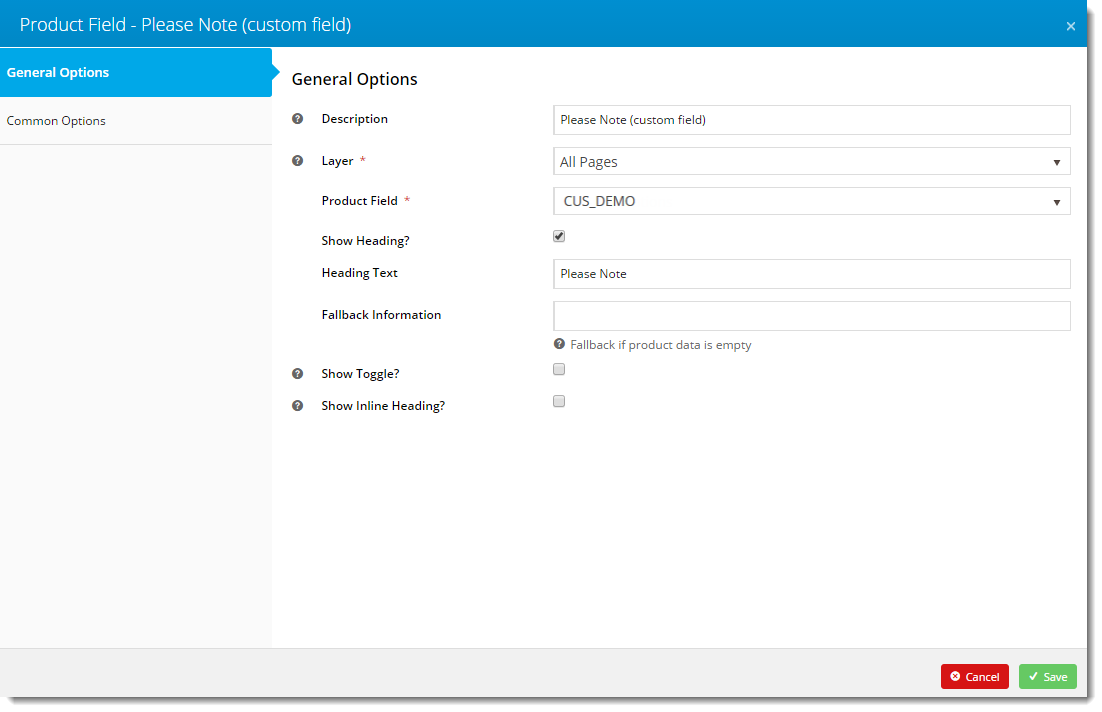
- Configure the widget as required:
- Description - a descriptive reference for the Administrator on the layout page. This does not display on the front-end website.
- Layer - this widget can be rendered conditionally based on role or customer, or displayed under all conditions (All Pages).
- Product Field - select the new custom field from the drop-down list. The format will be the Field Name prefaced with 'CUS_'.
- Show Heading - tick this box to include a heading for this widget.
- Heading Text - the heading text displayed to the end user.
- Fallback Information - default text can be entered, to be displayed against products with no data in this field.
- Show Toggle - allows the content to be hidden by default, and displayed when the user clicks on the Heading.
- Show Inline Heading - allows the heading to be displayed in line with the field content (ignored when toggle is in use).
Show On Mobile - when ticked, this field will display on mobile devices, when unticked the field will be excluded.- Click 'Save'.

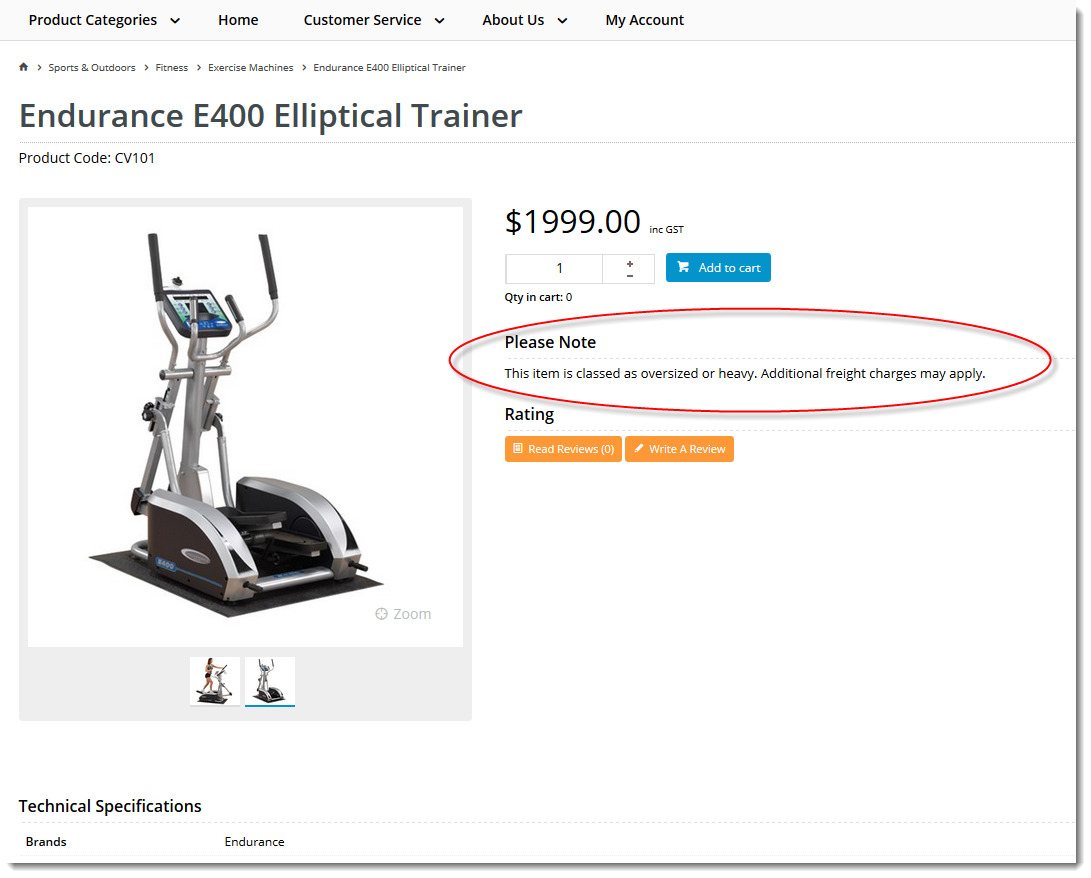
The custom field widget will now render on the relevant product template.
Related articles
| Content by Label | ||||||||||||||||||
|---|---|---|---|---|---|---|---|---|---|---|---|---|---|---|---|---|---|---|
|