...
| Multiexcerpt | ||
|---|---|---|
| ||
| Group products into multiple categories while designating the same product as optional or compulsory in each category. |
Step-by-step guide
1. In the CMS, navigate to Settings → Feature Management.
2. Locate Cluster LineType Maintenance and click Configure.

3. Click Add New Line Type.
4. A Line Type is a header to which you will add products.
5. We are going to create some Category Clusters to put compulsory and optional products in based on the school year. Therefore, we will create two (2) line types: Compulsory and Optional.
6. Enter a name for Line Type, HTML Prefix, and HTML Suffix.

7. Click Save & Exit and repeat for the Optional Line Type.

8. Navigate to Product & Categories → Cluster LineType Maintenance.
Anchor
step8 step8
9. You will see the ones you just created in the Settings → Feature Management.
10. Navigate to Products & Categories → Category Maintenance.
11. We need to create a Category Cluster.
12. Type in the name of your new Category and click Create.
Tip You don't have to add the category cluster to the top-level categories.

13. The system will create the category and add it to the bottom of the category list. Click Edit.

14. To turn a category into a category cluster, change Enable Cluster to Yes.

15. Click Save & Exit.
16. The category changes from 0 products to 0 clusters.

17. We will now build our Cluster; hover over Options and select Cluster.

18. We will add a header called Compulsory.
19. In the Description field, type the name of your heading.
20. Then select the Type as Compulsory. Click Add None Product.

21. Repeat the steps to create an Optional Products header with Type as Optional.

22. Now we need to add some products to each section. In the Product Search field, type in the name of a product and click Add Product.

23. The system will position the product at the end of the list. Simply drag and drop it under a heading. In our example, we are adding our first product to our compulsory list.

24. Repeat for all the products you want to add to this Cluster Category.

25. For each product in the Compulsory list, those that customers must purchase, click Edit and tick Is Compulsory. You can also set a Suggested Quantity.

26. You can also configure a choice between products. For instance, we are going to allow people to choose either Sight Words Readers (CV187) or Sight Words Flash Cards (CV186).
27. To distinguish those products from the other compulsory products, we will create a new Line Type Header called Choose One. If you forget how to do that, refer to step 8 and click Add New Line Type.
28. Navigate back to our Category Cluster: Products & Categories → Category Maintenance. Hover over options next to your cluster and select Cluster.
29. Type a description: Choose One Compulsory with a type of Choose One.
Tip The header does not have to have the same name as the Cluster Line Type.
30. Add your new heading just before the Optional Products heading.
31. Drag your two products under the new heading. In our example, those products are CV186 and CV187.

We need to tell the system that the customer can buy CV186 or CV187, but they don't have to purchase both.
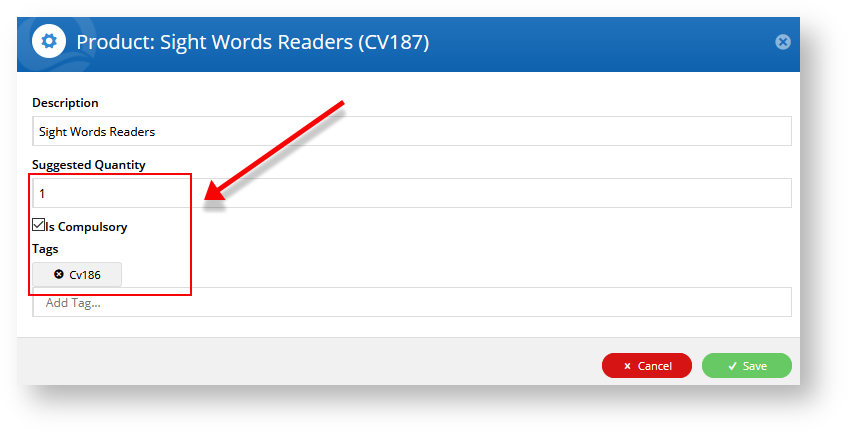
32. Click Edit next to CV187.
33. Tick Is Compulsory and set Suggested Quantity to 1.
34. In the Add Tag... field, type in CV186 and hit return. This tells the system that CV186 is CV187's partner product.
Note You must hit return so the tag displays above the Add Tag... field with a little x next to it.
35. Save your changes.
36. Click Edit next to CV186.
37. Tick Is Compulsory and set Suggested Quantity to 1.
38. In the Add Tag... field, type in CV187 and hit return. This tells the system that CV187 is CV186's partner product.
39. Save your changes.
40. Click Save to save the changes to your Category Cluster. The system will advise you that you will need to refresh the Cache Management.
41. Save and Exit and navigate to Settings → Cache Management.
42. Next to Product Cache, click Clear Cache.
43. When the process completes, click Close.
Let's test the new Cluster Category.
Head to your website.


Additional Information
| Multiexcerpt | ||
|---|---|---|
| ||
| Minimum Version Requirements |
| |||||
|---|---|---|---|---|---|---|
| Prerequisites |
| |||||
| Self Configurable |
| |||||
| Business Function |
| |||||
| BPD Only? |
| |||||
| B2B/B2C/Both |
| |||||
| Ballpark Hours From CV (if opting for CV to complete self config component) |
| |||||
| Ballpark Hours From CV (in addition to any self config required) |
| |||||
| Third Party Costs |
| |||||
| CMS Category |
|
Related articles
| Content by Label | ||||||||||||||||||
|---|---|---|---|---|---|---|---|---|---|---|---|---|---|---|---|---|---|---|
|
...