Overview
| Multiexcerpt |
|---|
| MultiExcerptName | Feature Overview |
|---|
|
| Excerpt |
|---|
The Google Trusted Stores program is designed to boost consumer confidence when shopping online. Displaying the GTS badge can assist a business in reaching new customers, as well as improve sales and increase average order size. |
|
Google Trusted Stores assures the consumer of:
...
Google Analytics and Tag Manager accounts are normally configured by Commerce Vision on implementation of your site. Once you have access to these, it should be a quick process to create accounts for Merchant Centre and Trusted Stores as well.
| Info |
|---|
|
| See Prerequisites and Additional Info below! |
Step-by-step
...
guide
- Follow the above links to create Merchant Centre and Google Trusted Store Accounts. Note your account ID for each.
- Login to Google Tag Manager
- Click 'New Tag'.
- Choose 'Google Trusted Stores' as the Product type.
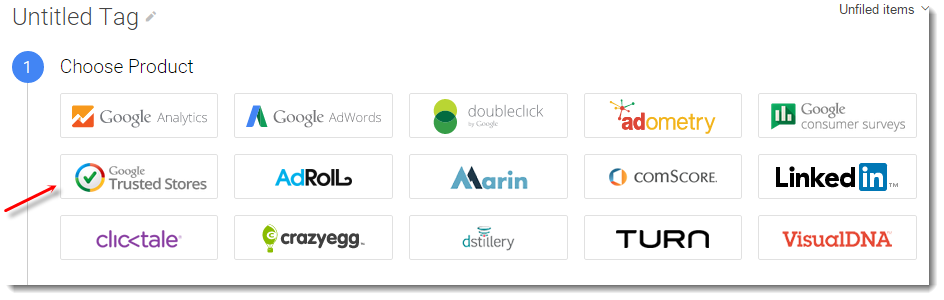
- Configure the Tag as follows (fields not listed here may be left blank):
- Store ID = Your Google Trusted Stores ID
- Locale = must be 'en_AU' (case-sensitive)
- Google Shopping Account ID = Your Merchant Centre ID
- Google Shopping Country = AU
- Trusted Stores Badge Position = Bottom Right or Bottom Left

- Click 'Continue' to set firing rules.
- Click 'All Pages'.
- Click 'Create Exceptions'.

- Select 'Stage Site' from the list of existing triggers (or create if required).
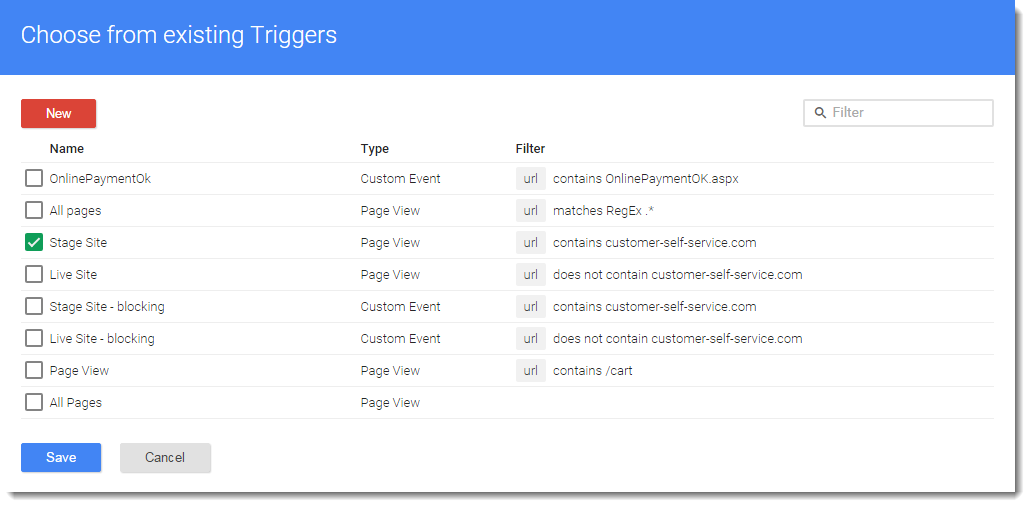
- Click 'Save'.
- Click 'Create Tag' to finish.
Next, update the site's Google Merchant Settings:
- Login to CSS as an Administrator.
- Navigate to 'Settings' (/zSettings.aspx).
- Scroll to the 'Google Merchant Settings' section of the General tab.
- Tick the flag to 'Enable Google Trusted Stores'.
- Update the 'Default Shipping Lead Time' = The number of days required to process and ship an order from when it is first submitted.
- This value will be the fallback in cases where the Shipping Lead Time is not set at the warehouse level. It should be an average across all shipping warehouses.
- Update the 'Default Delivery Lead Time' = The number of days required for the carrier to deliver an order to its destination (not including the 'Default Shipping Lead Time').
- This value will be the fallback where an individual freight carrier does not have lead time data entered; it should be an average across all carriers/zones.

- Click 'Update' to save changes.
Then, update the Shipping Lead Time for each store or warehouse:
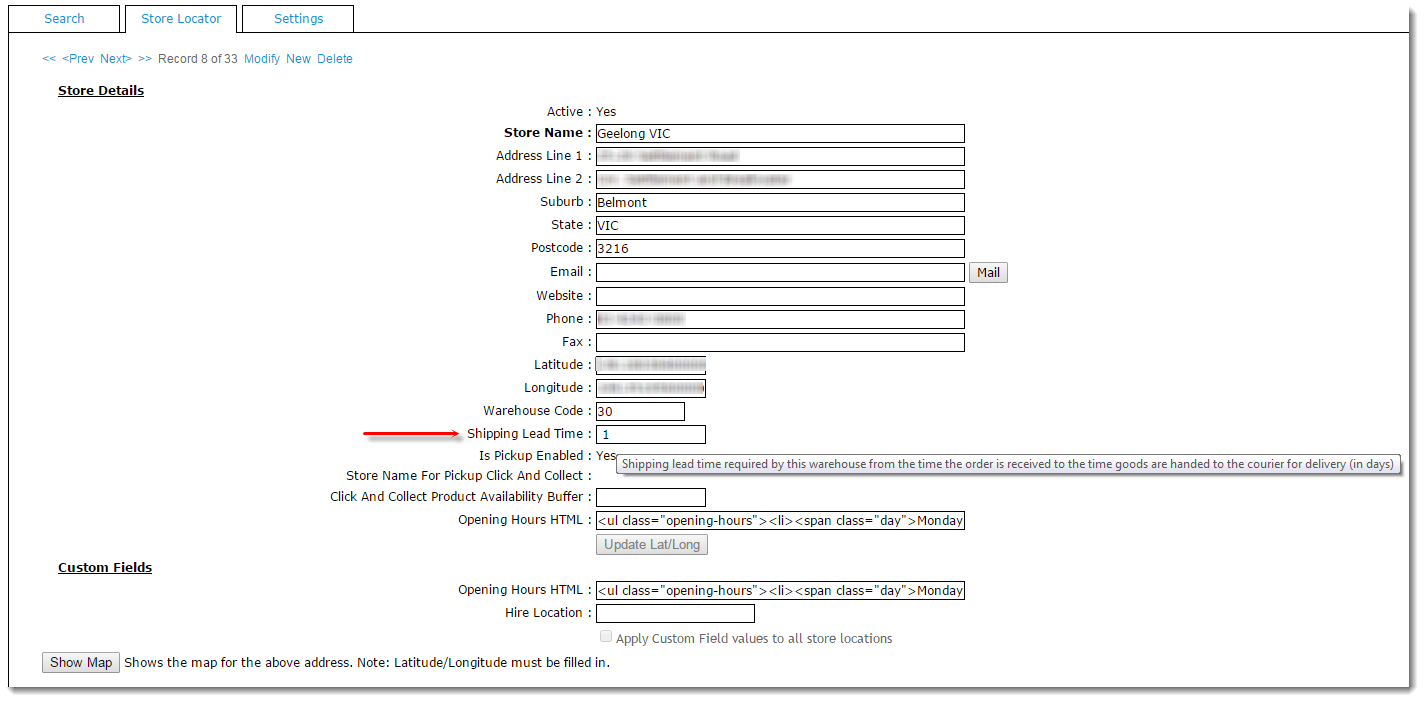
- Navigate to 'Store Locator Maintenance' (/StoreLocatorMaintenance.aspx).
- Click the 'Store Locator' tab. The first Location in the list will display.
- Click 'Modify'.
- Update the 'Shipping Lead Time' = The number of days required to process and ship an order from when it is first submitted.
- This should be a reasonable estimate of how long it takes from receipt of the order to handing goods to the carrier, for this particular warehouse.
- Click 'OK' to save.
Finally, if using Standard Freight, ensure your Charging Zone records include accurate lead times:
- Navigate back to 'Settings' (/zSettings.aspx).
- Click the 'Freight' tab.
- On the Standard Freight tab, select the first Carrier code.
- Click the 'Charging Zones' link.
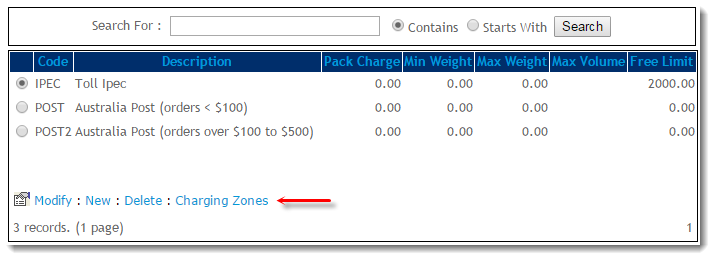
- With the first Charging Zone record selected, click 'Modify'.
- Update the 'Delivery Lead Time' for this zone. This value will override the 'Default Delivery Lead Time' previously updated in Google Merchant Settings.
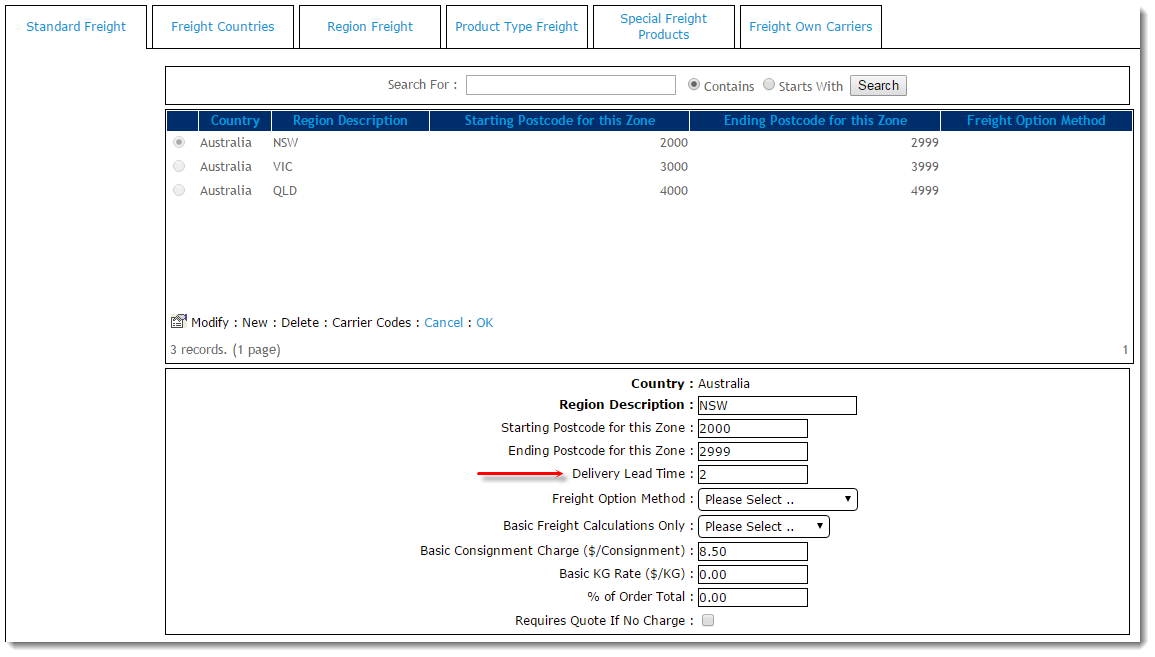
- Click 'OK' to save.
- Repeat for the remaining zones in the list.
- When all zones for this carrier are complete, click 'Carrier Codes' to return to the main carrier table.
- Select the next Carrier Code in the list and click 'Charging Zones'.
- Update lead times for all of this carrier's zones.
- Repeat for all remaining carriers.
New Charging Zone records may be required to account for varying lead times to different regions. E.g. if all of Australia is currently covered by one zone, it may need to be broken up into more specific zones. Contact Commerce Vision if further assistance is required.
| Note |
|---|
|
Accurate lead times are important! Google will follow up with your customers, checking that delivery and service were in line with expectations. If the feedback is negative, you will be removed from the Trusted Stores program. |
...
- Login to Google Trusted Stores
- Select your account from the list of existing Trusted Stores accounts.
- In the 'Shops' table, click 'View' against the relevant website.
- Follow Google's instructions on how to add the required javascript code snippet to your site. Google refers to this process as 'Shop integration'.
- Next, click 'Test' to validate the shop integration code. Google provides instructions on testing and browser requirements.
- Your results should look something like the screenshot below. The warnings are simply optional/extra functionality (click to expand for more information).
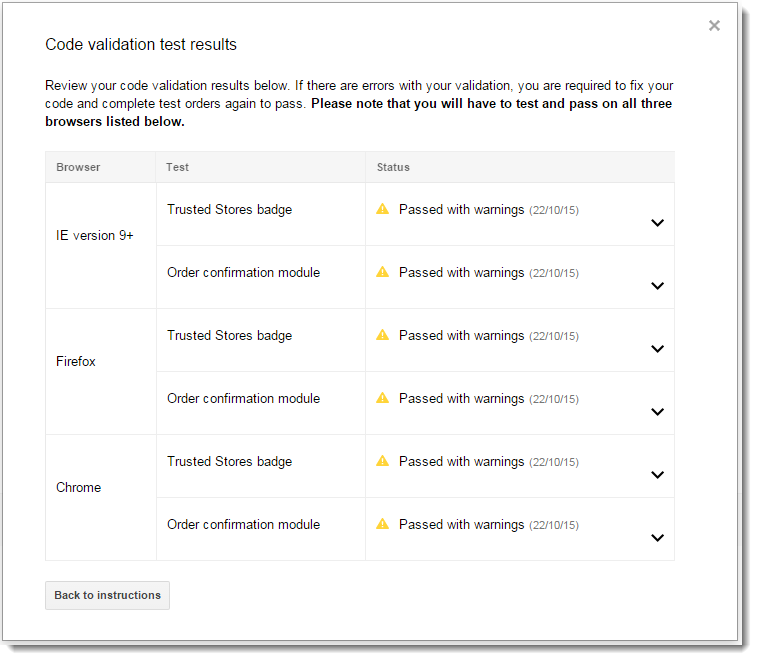
- If you have passed all of the browser tests, you are now in Google's qualification period. If any tests have failed, review and correct the issue and re-test.
| Tip |
|---|
|
Don't forget to cancel/refund live orders placed during the testing phase. |
...
Additional Information
| Multiexcerpt |
|---|
| MultiExcerptName | Additional Info |
|---|
|
| Google Trusted Stores cannot be implemented or tested on a Stage site, as Google requires the live URL and an SSL certificate in order to proceed. If you are not yet on BPD please contact the Commerce Vision Support team so they can discuss your options with you. |
| Multiexcerpt |
|---|
| hidden | true |
|---|
| MultiExcerptName | Feature Title |
|---|
|
Google Trusted Stores |
| Minimum Version Requirements |
| Multiexcerpt |
|---|
| MultiExcerptName | Minimum Version Requirements |
|---|
| 3.81.13 |
|
|---|
| Prerequisites |
| Multiexcerpt |
|---|
| Sites must process 600 orders within a 3 month period in order to qualify. If your site does not average 200 orders per month, it may not pass the qualification period. |
|
|---|
| Self Configurable |
| Multiexcerpt |
|---|
| MultiExcerptName | Self Configurable |
|---|
| Yes |
|
|---|
| Business Function |
| Multiexcerpt |
|---|
| MultiExcerptName | Business Function |
|---|
| Marketing |
|
|---|
| BPD Only? | |
|---|
| B2B/B2C/Both |
| Multiexcerpt |
|---|
| MultiExcerptName | B2B/B2C/Both |
|---|
| Both |
|
|---|
| Ballpark Hours From CV (if opting for CV to complete self config component) |
| Multiexcerpt |
|---|
| MultiExcerptName | Ballpark Hours From CV (if opting for CV to complete self config component) |
|---|
| 2 |
|
|---|
| Ballpark Hours From CV (in addition to any self config required) |
| Multiexcerpt |
|---|
| MultiExcerptName | Ballpark Hours From CV (in addition to any self config required) |
|---|
| Contact CV Support |
|
|---|
| Third Party Costs |
| Multiexcerpt |
|---|
| MultiExcerptName | Third Party Costs |
|---|
| n/a |
|
|---|
| CMS Category |
| Multiexcerpt |
|---|
| MultiExcerptName | CMS Category |
|---|
| Settings → Settings |
|
|---|
...
Related
...
help
| Content by Label |
|---|
| showLabels | false |
|---|
| max | 5 |
|---|
| spaces | KB |
|---|
| showSpace | false |
|---|
| sort | modified |
|---|
| reverse | true |
|---|
| type | page |
|---|
| excludeCurrent | true |
|---|
| cql | label = "kb-how-to-articlegoogle" and type = "page" and space = "KB" |
|---|
| labels | kb-how-to-article |
|---|
|