...
| Excerpt | ||
|---|---|---|
| ||
Assign multiple Customer accounts to a User. |
This guide provides Administrators with instructions on how to assign multiple Customer Accounts to a User. The task can be accessed in the CMS or when logged into your website.
Step-by-step guide
- Login as an Administrator.
- Depending on how your site is configured, you may have access to any of the the two User Maintenance pages, Advanced User Maintenance or User Maintenance. Navigate to whichever one is available to you.
- For the User Maintenance page
a. Search for User in the search box then select them by clicking on the radio button adjacent to their record shown in the grid.
b. Now click the 'MultipleAccounts' button. This will show all the Customer accounts currently assigned to the User.
c. Click New, then enter the Customer Code of the new account you wish to assign to the User, complete any other fields as desired, then click the 'OK' button.
d. Use the 'Delete' button to remove any selected Customer from use for the User. Alternatively, Click 'Modify' to change any of the available settings associated with the User for a particular Customer.
For the Advanced User Maintenance page
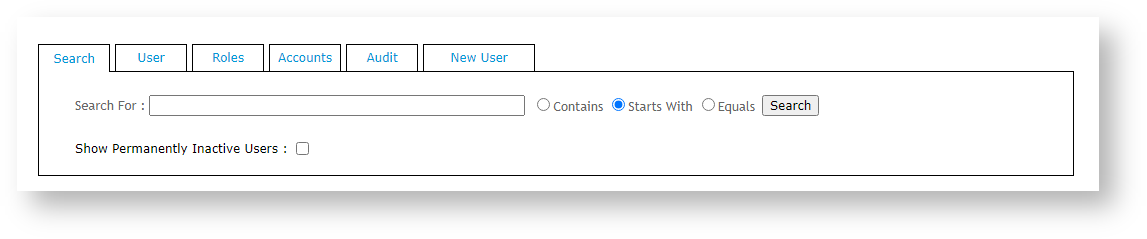
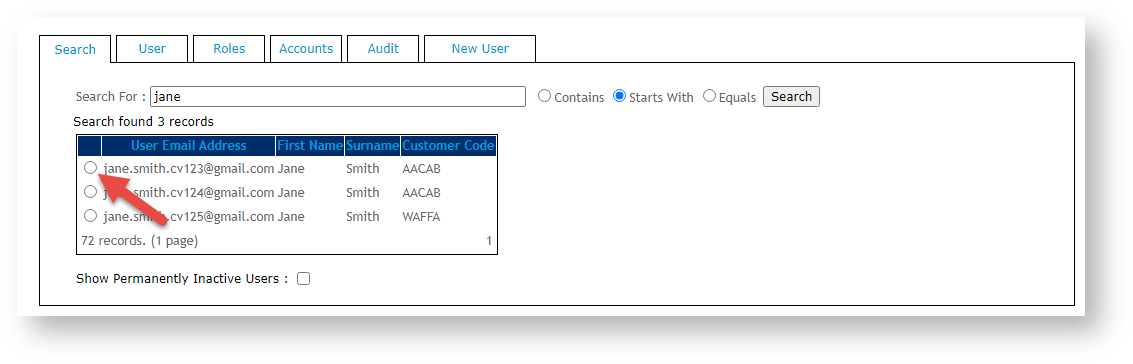
a. Search for User in the search box when on the 'Search' tab then select them by clicking on the radio button adjacent to their record shown in the grid. You will automatically be switched to the 'User' tab.
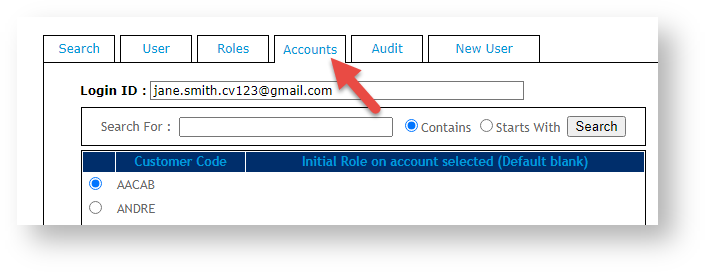
b. From here click the 'Accounts' tab.
c. Click 'New', then either enter the Customer Code directly or alternatively you can perform a search by clicking the search button next to the text box "Customer Code". This will cause a dialogue to display in which you can enter details of the Customer to search for. e.g. the Customer Code, or part of the Customer name.When you have performed your search, you can just select the desired Customer record from the search results. This will close the search dialogue and place the selected Customer Code into the text box.
d. Complete any other fields as desired, then click the 'OK' button.
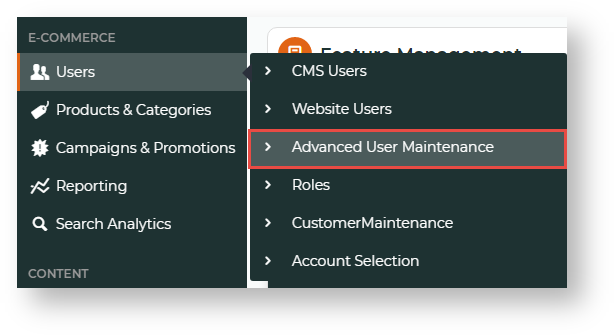
e. Use the 'Delete' button to remove any selected Customer from use for the User. Alternatively, Click 'Modify' to change any of the available settings associated with the User for a particular Customer.In the CMS, navigate to Users → Advanced User Maintenance. (You can also access this page while logged into your website as well through the 'Account Selection' menu.)- In the Search box, start entering the user, then click Search.
- In the list of found users, click the radio button for the targetted user. Their account details will automatically display.
- Click the Accounts tab. Customer accounts currently linked to the user are displayed.
- Click New located at the bottom of the page.
- Enter the details of the Customer account to be assigned.
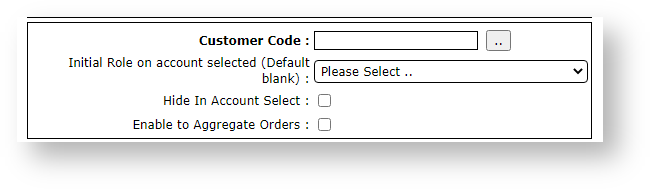
- Customer Code: enter the Customer Code of the Customer account. You may also look up the Customer Code by clicking on
- Initial Role on account selected (Default blank): select the initial Role when the user first logs into this account. Leave blank if the user only has one Role.
- Hide in Account Select: tick to hide this user while in the account.
- Enable to Aggregate Orders: tick if this user will have this function.
- Click OK to save the additional Customer for this user.

Use User Import
Another approach if your site is configured to
...
import details of multiple Customer / User combinations via a *.csv file.
...
This is available through the User Import page
...
and makes use of the
...
User Deletion section at the bottom of the page
...
. You should see
...
instructional text adjacent to the
...
Upload button with
...
the following text
...
:
'Enter or browse for the flat file containing your User Deletion CSV file to be imported.'
This can be used to delete users OR to add user customers, The deletion can be used if you just supply your *.csv records with only a singe field of the 'User Id' per line, Otherwise, to add Customers to
...
Users for existing users create a .csv file with the records containing 2 fields: User Id and Customer Code.
e.g.
someone@mycompany.com.au,AAAA
someone@mycompany.com.au,BBBB
someone@mycompany.com.au,CCCC
someone@mycompany.com.au,DDDD
someoneELSE@mycompany.com.au,BBBB
someoneELSE@mycompany.com.au,DDDD
- b. Click the 'Choose File' button next to the text "User Deletion Document to upload".
c.- Navigate to the location of your .csv file and select it.
- d. Click the 'Import Now' button to process the file. The results will be displayed along with any error messages.
Related help
| Content by Label | ||||||||||||||||||
|---|---|---|---|---|---|---|---|---|---|---|---|---|---|---|---|---|---|---|
|