| Excerpt | ||
|---|---|---|
| ||
Maintain Users and Roles on your website. |
| Panel | ||||||||||||
|---|---|---|---|---|---|---|---|---|---|---|---|---|
| ||||||||||||
|
...
| Panel | ||
|---|---|---|
| ||
|
...
| Anchor | ||||
|---|---|---|---|---|
|
| Panel | ||
|---|---|---|
| ||
|
| Anchor | ||||
|---|---|---|---|---|
|
...
| Info |
|---|
There is a system setting to determine whether a confirmation request is displayed when deleting a user. The setting is called 'Show Confirm On Grid Delete/Remove' and is found under the 'General' Tab in 'Settings'. |
| Anchor | ||||
|---|---|---|---|---|
|
| Panel | ||
|---|---|---|
| ||
|
...
| Anchor | ||||
|---|---|---|---|---|
|
| Panel | ||
|---|---|---|
| ||
|
...
| Anchor | ||||
|---|---|---|---|---|
|
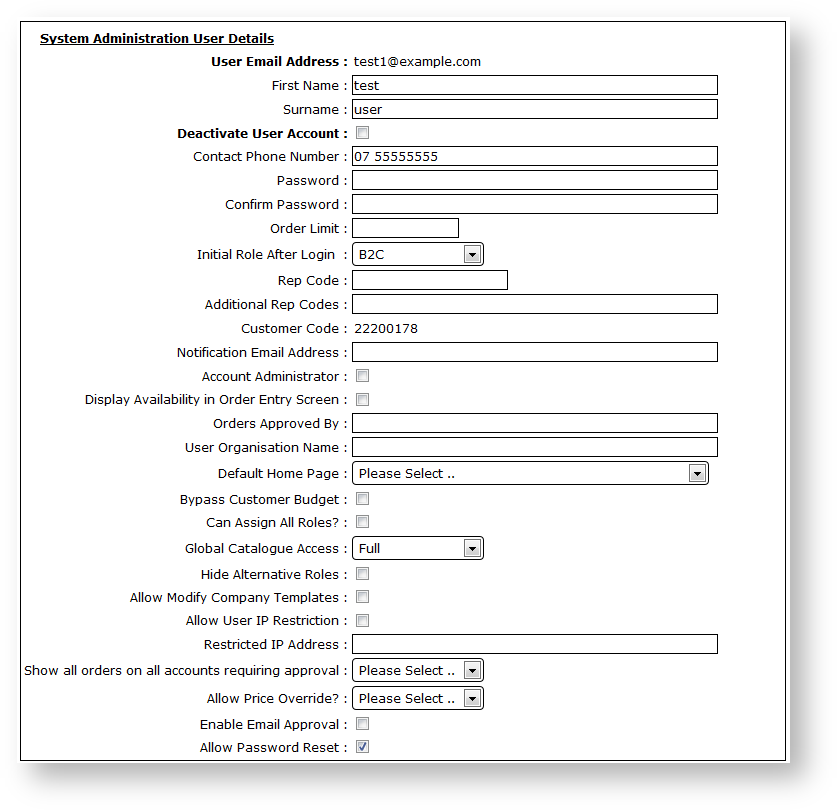
User Details
Setting | Description |
|---|---|
User Email Address | This is the user's login ID. It is also used as the email address to which any system-generated emails are sent. |
First Name | The user's first name. This data may be used to personalise certain screens and emails within the system. |
Surname | The user's surname. This data may be used to personalise certain screens and emails within the system. |
Deactivate User Account | When ticked, deactivates the user's account. A deactivated user cannot log in. |
Contact Phone Number | The user's work, home, or mobile phone number. |
Password | The user's password (not displayed due to security reasons). |
Confirm Password | The user's password repeated. Used when updating passwords to confirm the password has been typed correctly. |
Order Limit | The maximum dollar amount allowable for the user's orders before approval is required. |
Initial Role After Login | The role the user will operate on once they have successfully logged in. |
| Rep Code | The user's Rep Code, enabling access to order tracking, user favourites for users linked to that code. Mainly for use in Commerce Vision's Mobile Application Framework. |
| Additional Rep Codes | Additional Rep Codes to which the user should have access (codes separated by semicolon). |
Customer Code | The customer code to which the user is attached. |
| Notification Email Address | The email address to which any system-generated emails are sent (if the user's login ID is not a valid email address or the user prefers a different address be used.) |
Account Administrator | When ticked, allows the user access to administer other users attached to the same account. |
Display Availability in Order Entry Screen | Overrides system and role settings for displaying product availability. |
Orders Approved By | The email address of the user who approves this user's (Over Limit) orders. |
User Organisation Name | Use this field to override the company name displayed at the top of the Printer Friendly statement view. |
Default Home Page | This is used to define a custom page for use as the landing page when the user logs in. |
Bypass Customer Budget | This will bypass the customer's budget if the customer budget function is active. |
Can Assign All Roles | This is used to let 'Account Administrator' users assign any role to their account's users. |
| Global Catalogue Access | Full - The user will have full access to browse and order from the Global Catalogue. ViewOnly - The user will have full access to browse the Global Catalogue, but will be unable to Add to Cart, or submit orders. Denied - The user will have no access to the Global Catalogue. |
Hide Alternative Roles | When ticked, hides the list of roles the user has access to (if more than one). |
Allow Modify Company Templates | When ticked, allows the user to modify any Company order templates that have been created by other users on the same account. |
Allow User IP Restriction | Allows a user to first log in from a non-specified IP address if the user is restricted but not specified. |
Restricted IP Address | Set the allowed IP address from which this user can log in. |
Show All Orders On All Accounts Requiring Approval | When viewing orders to be approved, all orders from all accounts the user can approve will be displayed. |
| Allow Price Override? | Whether the user is allowed to override the price of a product (Rep use only). |
| Enable Email Approval | When ticked, enables links within approval emails, allowing for one-click order approval or rejection. |
| Allow Password Reset | When ticked, allows user to change passwords in the 'My Account' screen. |
...
| Anchor | ||||
|---|---|---|---|---|
|
...
| Panel | ||
|---|---|---|
| ||
|
| Anchor | ||||
|---|---|---|---|---|
|
Multiple Role Access
Users are assigned an initial role on which they operate after login. If the user requires access to more than one role, the role is added to the user through 'User Maintenance'. The user will then have the option to choose roles once logged in. For more information on roles see Role Maintenance.
| Panel | ||
|---|---|---|
| ||
|
...
| Panel | ||
|---|---|---|
| ||
|
| Anchor | ||||
|---|---|---|---|---|
|
...
| Panel | ||
|---|---|---|
| ||
|
Related
...
help
| Content by Label | |||||||||||||||||||||||
|---|---|---|---|---|---|---|---|---|---|---|---|---|---|---|---|---|---|---|---|---|---|---|---|
|
