
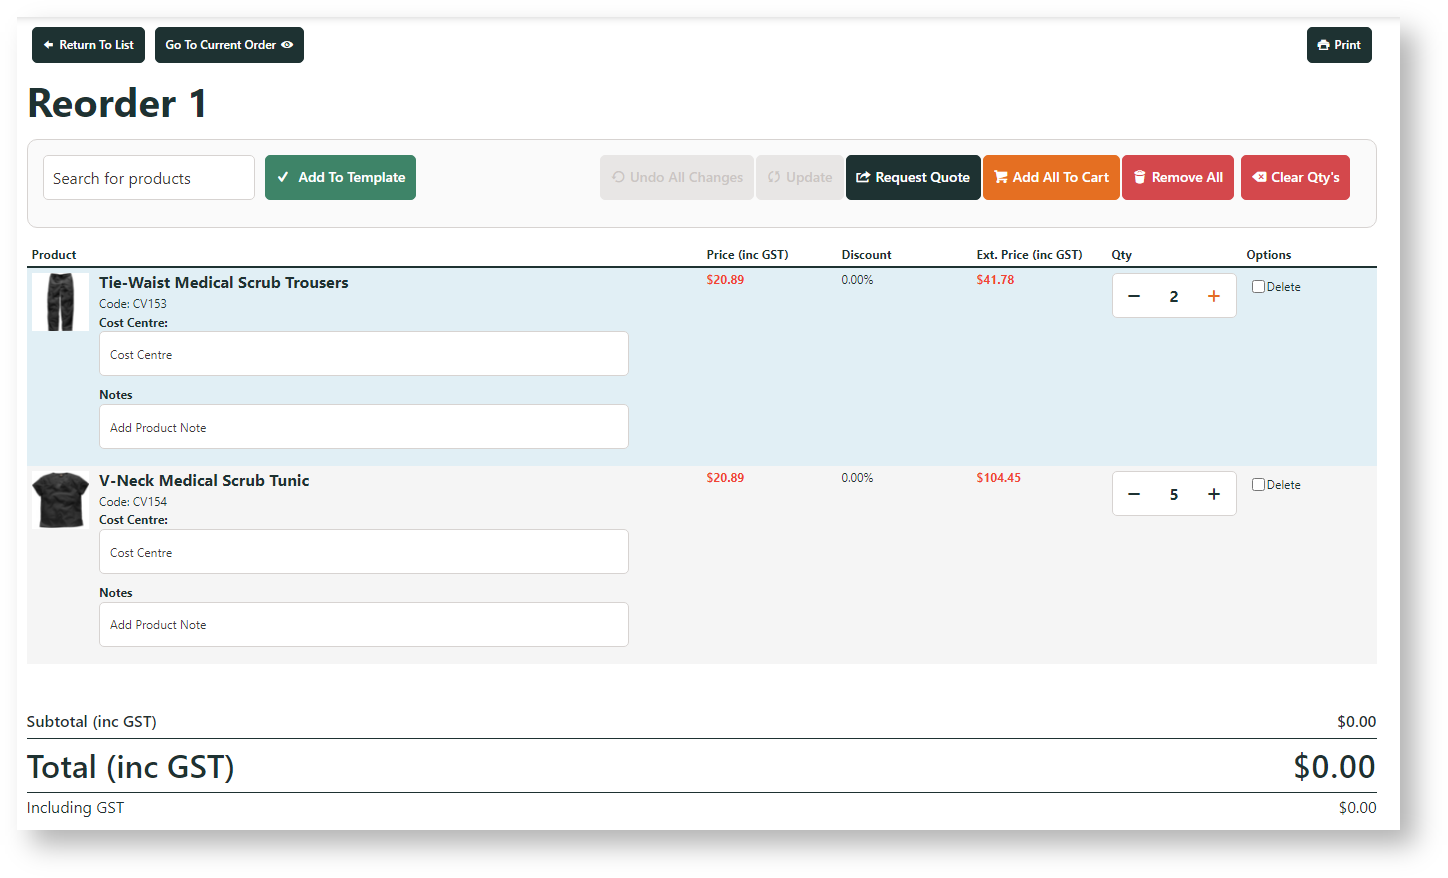
. The template looks similar to a shopping cart. But it contains saved order lines of selected products, each with a set reorder quantity, last checked price, and any system (ERP) discount (if enabled). Depending on how the basic template has been set up for the Customer or User, other fields such as for cost centre information and notes, may also be included.
| Panel | |
|---|---|
On this page:
|
Set up Order Template Maintenance
This step may have been implemented by Commerce Vision. If you can see the 'Template Maintenance' and 'Order Templates' menu items, go to Create an Order Template.
| Note | ||||
|---|---|---|---|---|
| ||||
The following These two pages need to be added to the as an Administrator's menu in both the Website and CMS. See our guides item on your website and in the CMS. Add to the website first, then in the CMS. For instructions, see: Add a New Menu Item and Add a page to the CMS menu for instructions.
|
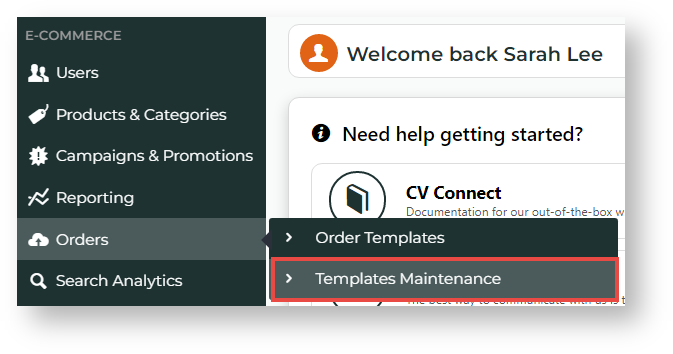
Once the pages are added, you can access Template Maintenance on the CMS navigation menu. You can also access it while logged into the website. NOTE - The locations of menu items will depend on where they have been added. In the example, they have been added to the 'E-Commerce' submenu in the CMS.
| Anchor | ||||
|---|---|---|---|---|
|
Create an Order Template
This step is for Admin users to create and upload an order template. If a Role for a Customer has been enabled for Order templates are csv files that have to be createdTemplates, applicable users can create their own order templates.
At the backend, an order template is created and uploaded through a CSV file. The first row of the CSV file will list the fields you need must contain the field names needed for the template. Each subsequent additional row contains a data, e.g.,product, quantity, user, customer, etc, for the reorder template. Some fields are mandatory. If not present, the upload will display an error.
You can download this example template with all mandatory fields and add data rows as needed. You can also add optional fields to it.
View file name Order_Template_1.csv height 250
Example![]()
This is an example with all mandatory fields and two rows of data.

| Info | ||
|---|---|---|
| ||
Mandatory fields To create an order template, create a comma-delimited csv file with the following fields: ProntoSalesOrderLine.SolLineType, SoCustCode, SoCustReference, SoUserIdCode, CompanyTemplate, AllowTemplateBillTo, ProntoSalesOrderLine.StockCode, ProntoSalesOrderLine.SolOrderedQty Optional fields ProntoSalesOrderLine.CostCentreCode, ProntoSalesOrderLine.SolLineDescription, UserRoleWhenOrderTemplate |
Field Descriptions:
Optional fields:
|
|

| Info | ||
|---|---|---|
| ||
Contact Commerce Vision to implement this non-standard note input feature. Once implemented, you can add whole order note lines in various places on the page. They can also be used for inserting breaks or as headings in the template. To create a whole order note line (instead of a product line), override the normal product line processing using the following format. They can also be used for inserting breaks or as headings in the template. Instead of a product (stock) line, enter the following: |
Import an Order Template
You must have the order template CSV file ready for upload.
- In the CMS, navigate to Orders → Order Templates. (NOTE - 'Order Templates' may have been named something else, e.g., 'Import Templates'.)
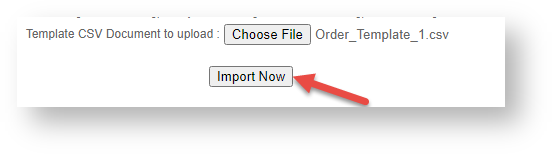
- To upload the order template csv file, click Choose File.
Once the file is selected, to import the template, click- At the bottom of the page, select either New/Replace existing template (default) or Append to existing template. 'New/replace' will overwrite a template with the same name. 'Append' will add any new rows to the existing file.
- Click Import Now.
Success and/or error messages will be displayed in the dialogue box on completion of the import.


| Tip |
|---|
There are actually two file formats accepted by the import program. The format shown above will include a note input area within each product line. However, some organisations prefer the note lines to be separate to the product lines. To achieve this, simply add a column at the start of the file for ProntoSalesOrderLine.SoILineType (N for Note line, S for Stock line). |
Maintain an Order Template
Once a template has been uploaded, it can be edited in the CMS
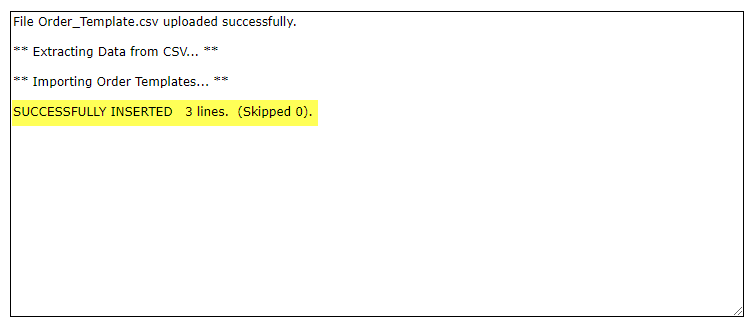
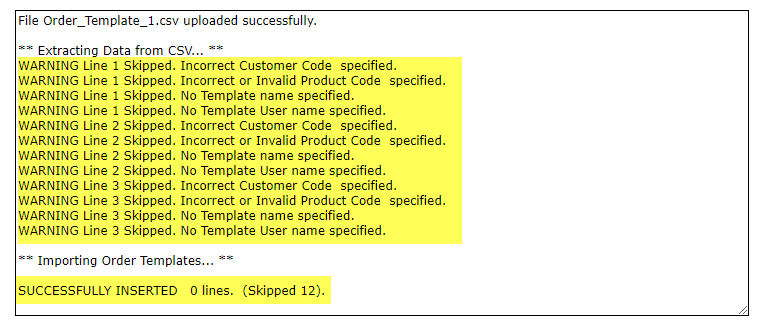
- NOTE - Upload can also be partially successful. Just check 'Successfully Inserted' for the number of lines added and skipped.
Successful
Unsuccessful
Edit Contents of an Order Template
An order template can be edited in the CMS or on your website. NOTE - Depending on settings, users with access to a template can also edit it through their Dashboard menu.
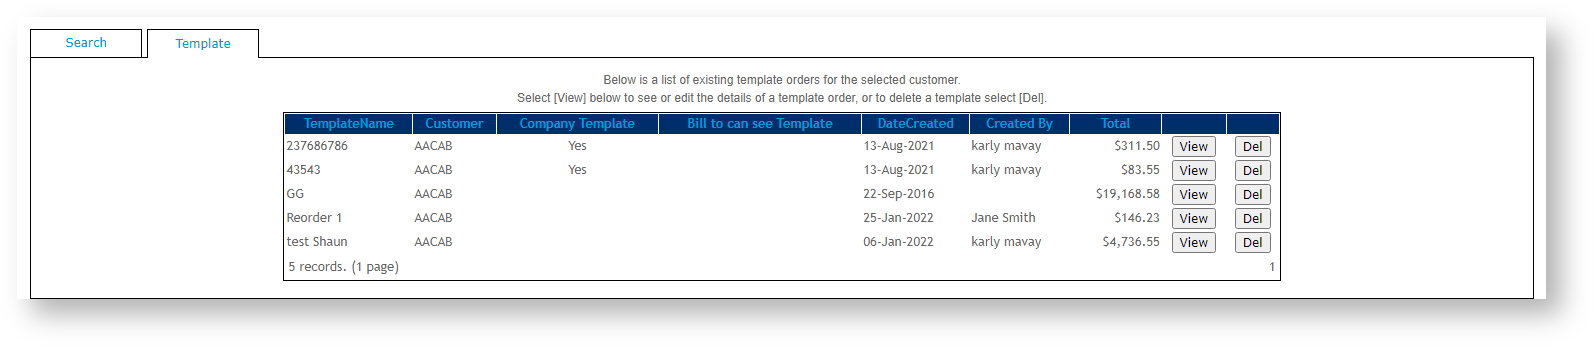
- In the CMS. go to Orders → Template Maintenance.
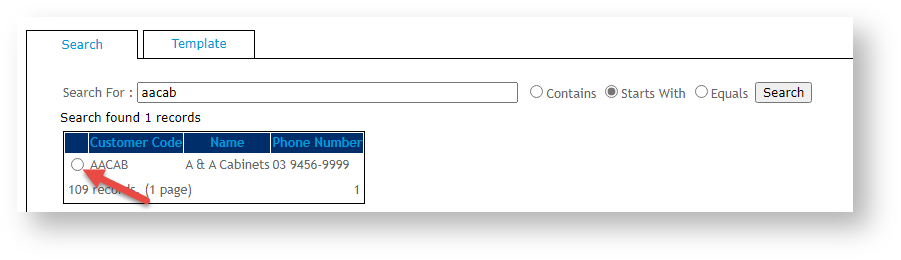
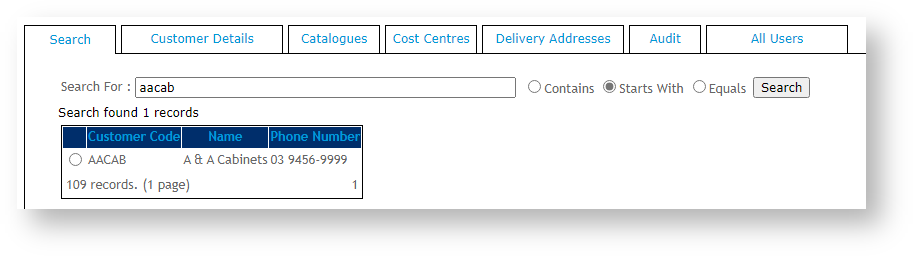
- Enter the Customer Code you wish to edit templates linked to the template for, then click Search. TIP - To display all templates on your website, just click Search without entering anything.
- Select the customer by clicking To select a customer, click its radio button.
- The list of templates for that customer account will load. Click Click View against next to the required template.
- Edit the template as needed. You can edit quantities, resequence product order lines, delete products and add other products.
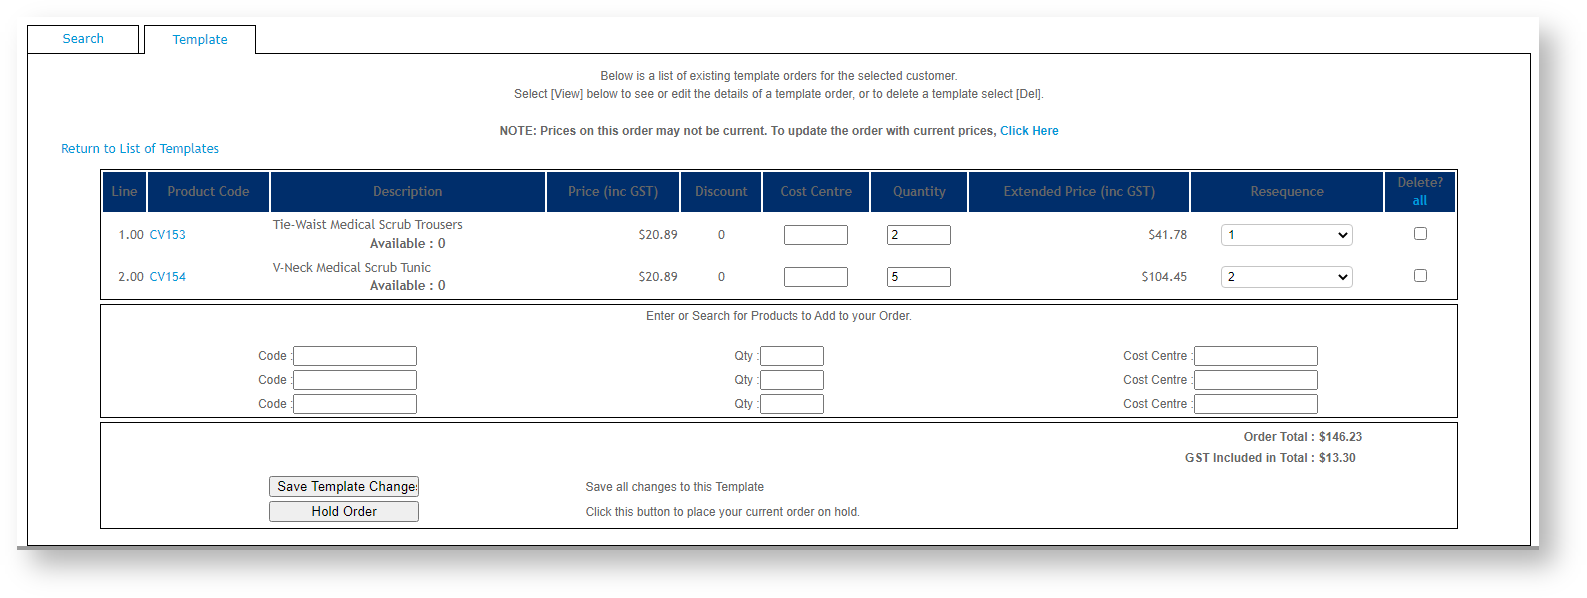
- You can also update the template to display the latest prices for listed products. To update prices, click 'Click Here'.

- Click Save Template Changes at the bottom of the grid.


Allow user access to order templates
To allow the end user access to Order Templates, you will need to add the page 'OrderTemplates.aspx' to their role's menu. When access is granted, Order Templates is a Dashboard menu item.

Edit the Template Quantity Column Heading
In the CMS, navigate to Advanced Content → Resources.Search for and select the radio button next to the resource code rcParValueOrderQtyColHeadingOrderGrid.
Click Modify.

Edit the Current Count Column Heading
In the CMS, navigate to Advanced Content → Resources.Search for and select the radio button next to the resource code rcParValueCurrentCountColHeadingOrderGrid.
Click Modify.

Edit the Order Template Import Instructions
In the CMS, navigate to Advanced Content → Resources.
Search for and select the radio button next to the resource code rcImportTemplatesCSVFieldsInstructionsParValueMode.
Click Modify.- Edit Resource Value.
- To save changes, click OK.

Anchor company company
Configure Company Template Options
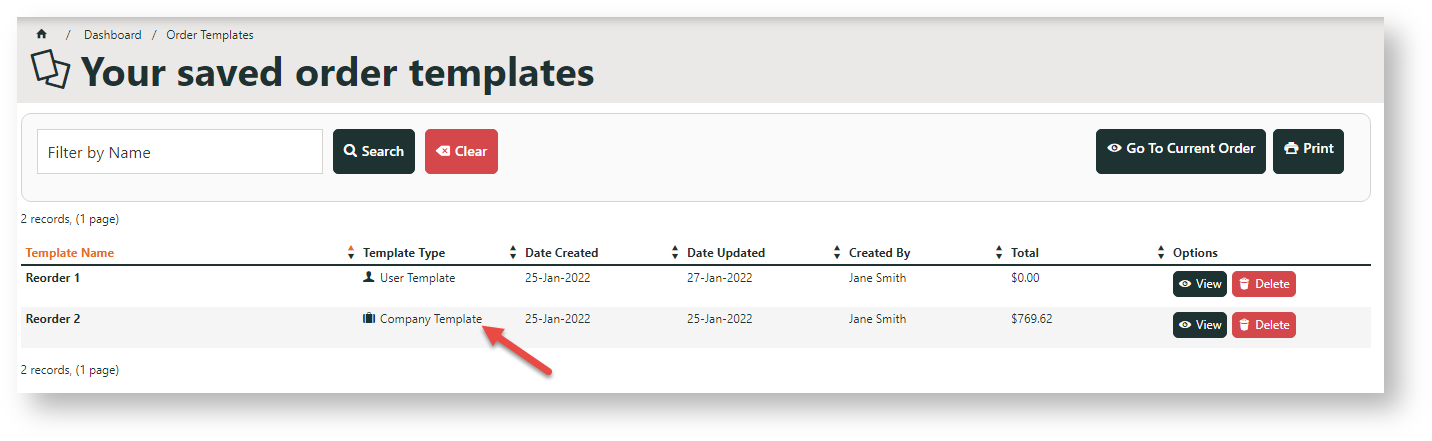
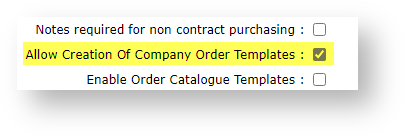
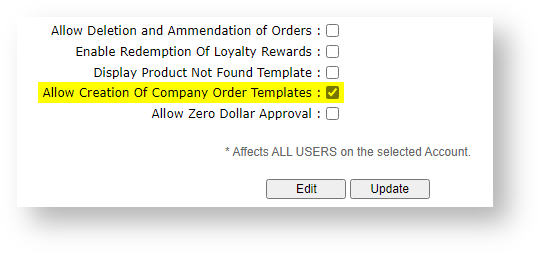
An order template can be saved as a user or company template. A user template can only be accessed, edited and used by the template creator (or if created by the Admin, the user named). A company template can be accessed by all users on the same Customer Code (if they have a Role that allows Order Template access). In the Saved Order Templates list, the Template Type is specified.
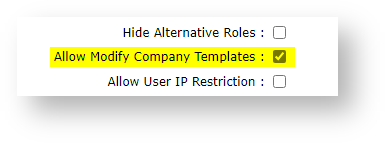
One of two usage options for Company Templates must be configured for each Customer user. Option 2 allows more permissions for non-creator users.
| OPTION 1 | OPTION 2 | ||||
|---|---|---|---|---|---|
User can create, view and use company templates. User can delete a company template only if they created it. User cannot save changes to company templates. | User can create, view, use and save changes to company templates. User can delete any company template. | ||||
For both options: This completes configuration for OPTION 1.
For Option 2, there is one more setting.
This completes configuration for OPTION 2. | |||||
| Info | ||
|---|---|---|
| ||
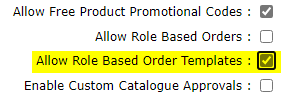
To limit a company order template to specific Roles, add the optional field UserRoleWhenOrderTemplate and enter the Role code in each data row. A company template restricted to a Role will display both 'Company Template' and 'Role Template' in Template Type in the user's order template list.
|

Allow user access to order templates
To allow the end user access to Order Templates, the page 'OrderTemplates.aspx' must be added to their Role's Dashboard menu. See: Add a menu item. NOTE - Users with access to this functionality can also create and manage order templates themselves. For user assistance on order templates, see: Order Templates.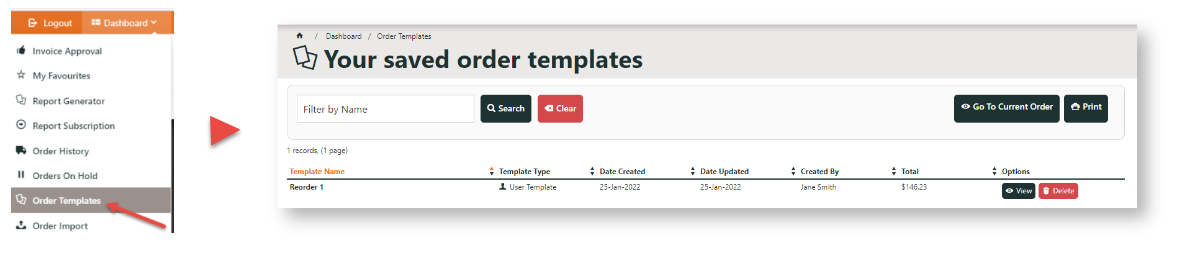
Edit Template Options & Text Displayed to User
The Order Template page template displays order templates to users on your website. You can edit the widgets that control display and text/label options on this template.
Order Template page
General template options are rendered by the Order Templates Widget.
For a guide to display options, see: Order Templates Widget.
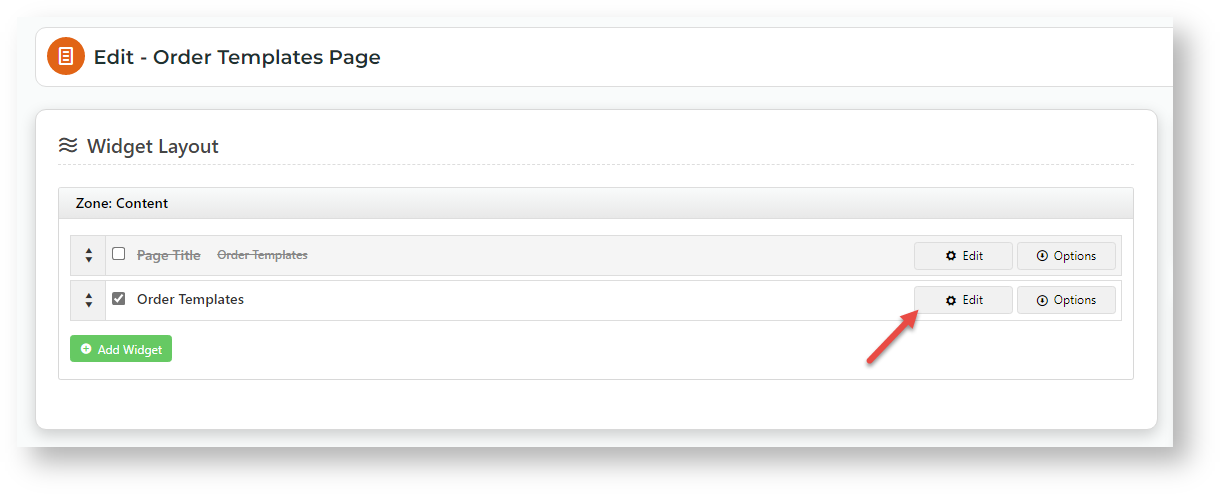
- In the CMS, go to: Content → Content → Pages & Templates → Orders → Order Templates Page.
- Click Edit for Order Templates Page.
- In the template, click Edit next to Order Templates.
Order Line section
Order Line level options and styling, e.g., cost centre and notes input fields, are rendered in the Order Templates Line Info template.
- In the CMS, go to: Content → Content → Pages & Templates → Orders → Order Template Lines Info.
- Click Edit next to Order Template Lines Info.
- In the template, click Edit next to the relevant widget.

Which widget?
- Edit labels and text - Order Line Description
- Edit Product Code display options, e.g., make code a hyperlink, show APN instead of Product Code, display Code as prefix - Order Line Product Code
- Add/remove Cost Centre field - Order Template Cost Centre
- Allow resequencing of product lines - Order Template Sequence
- Provide/remove the Notes field - Order Template Notes
Related help
| Content by Label | ||||||||
|---|---|---|---|---|---|---|---|---|
|
| Content by Label | ||||||||||
|---|---|---|---|---|---|---|---|---|---|---|
|