...
| Excerpt |
|---|
The Custom Fields features lets you add non-standard extra fields from these database tables: Articles, Banners, Categories, Products, Promotions and Users. |
| Info | ||
|---|---|---|
| ||
'field' is a database term. All the bits of information that your website uses are contained and managed in a database dedicated to your business. In this database, information is organised in a collection of tables. A table is a container for contains data of an identified function or feature your website needs. Some examples are Users, Products, and Orders. Think of the a table as organised in a spreadsheet, with columns and rows. A column contains a data type relevant to that table. For instance, the 'Users' table will come with many standard columns - Email Address, User Name, Role, etc. Each is a data type. You can also think of a column as a field. When you read across a row, just like in a spreadsheet, you are looking at information ('a record') for an specific entity, e.g., a particular user.You can also think of a column as a field. When you add, edit or view a page in the CMS or on your website, you are accessing database fields and values entered for them.
Custom fields are fields that are not used or created in a standard version displayed on pages in standard versions of the Customer Self Service eCommerce Platform. |

We recognise that your website may benefit from adding custom fields that are important to your business needsYour business may want to maintain data in non-standard fields either on a website page or in the CMS. You can add custom fields to certain these tables in the CMS:
- Articles
- Banners
- Categories
- Products
- Promotions
- Users
The process for adding custom fields is simple:
- Identify the table you want to create a custom field for.
- Create the new custom field for the table.
- Edit a table's record to include the new data.
- (For product or category custom fields only) Display the field on your website. Add the new product field widget to theProduct Detail and/or Product List templates. For a category field, add the category field widget to the Category template.
Step-by-step guide
1. Create a New Custom Field
- In the CMS, navigate to Advanced Content → Custom Fields.
- Select the table you wish to add your custom field to (e.g. Categories, Products, Users).
- The page will load, displaying any existing custom fields for the table you selected.
- Click the Add New Custom Field button.
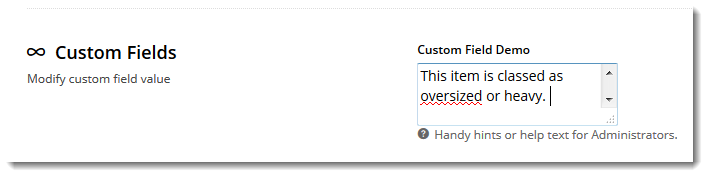
- Populate the In Add Custom Field Details as specified, enter the field requirements (for display and entry of values by administrators):
- Field Name - a code to associate with identify this field in the database. Alphanumeric only, with no spaces or special characters. Underscore ( '_ ') permitted.
- Prompt - the field prompt/title which displays to Administrators on the Product Maintenance screenlabel displayed next to the field.
- Help - additional information which displays to Administrators on the Product Maintenance screenabout the field displayed.
- Data Type:
- Text - alphanumeric characters, including spaces, special characters, and html.
- Integer - whole numbers
- Decimal - numeric data including fractional components
- DateTime - calendar dates and times
- Boolean - checkbox for 2 valuesvalue option, e.g. True/False
- Allow Unlimited Text (for data type 'Text' only) - ticking this box removes the character limit from the field.
- Length (for data type 'Text' only) - where unlimited data has NOT been allowed, this sets the maximum field length.
- Display Type - the interface which displays to Administrators on the Product Maintenance screen. Options here will change depending
- , Yes/No
- Identity - checkbox will display an ON/OFF toggle
- earlier. Possibilities include TextBox, DropDownList, and DateTimePicker.Mandatory - ticking this box makes
- Display Type - the interface displayed to Administrators on the page the field appears in. NOTE - Display Type options depend on the Data Type selected
- Product Maintenance
- .
- Allow Unlimited Text - (for Text Display Type only) tick to allow unlimited amount of text
- Mandatory - tick to make the custom field required on the page it displays in
- .
- Active
- ticked by default. Leave as is.
- -
Click Save to create the custom field
- leave ticked for the field to be in use. Untick to make inactive.
- To save the custom field, click Save.


2. Edit a
...
record to include
...
data from a custom field
Where a custom field displays depends on the table it was added to.
| Table | Page |
|---|---|
| Article Maintenance → Edit Article |
| Banner Maintenance → Edit Banner |
| Category Maintenance → Maintain Category |
| Product Maintenance → Maintain Product |
| Promotion Codes → Edit Promotion Code |
| Website Users - Edit User |
To add/edit custom field data,
- Navigate to the page the custom field is on.
- Click Edit.
- Scroll to the Custom Fields section.
- Edit the data as required.
- Click Save.
3.
...
Enable website users to view the custom field
...
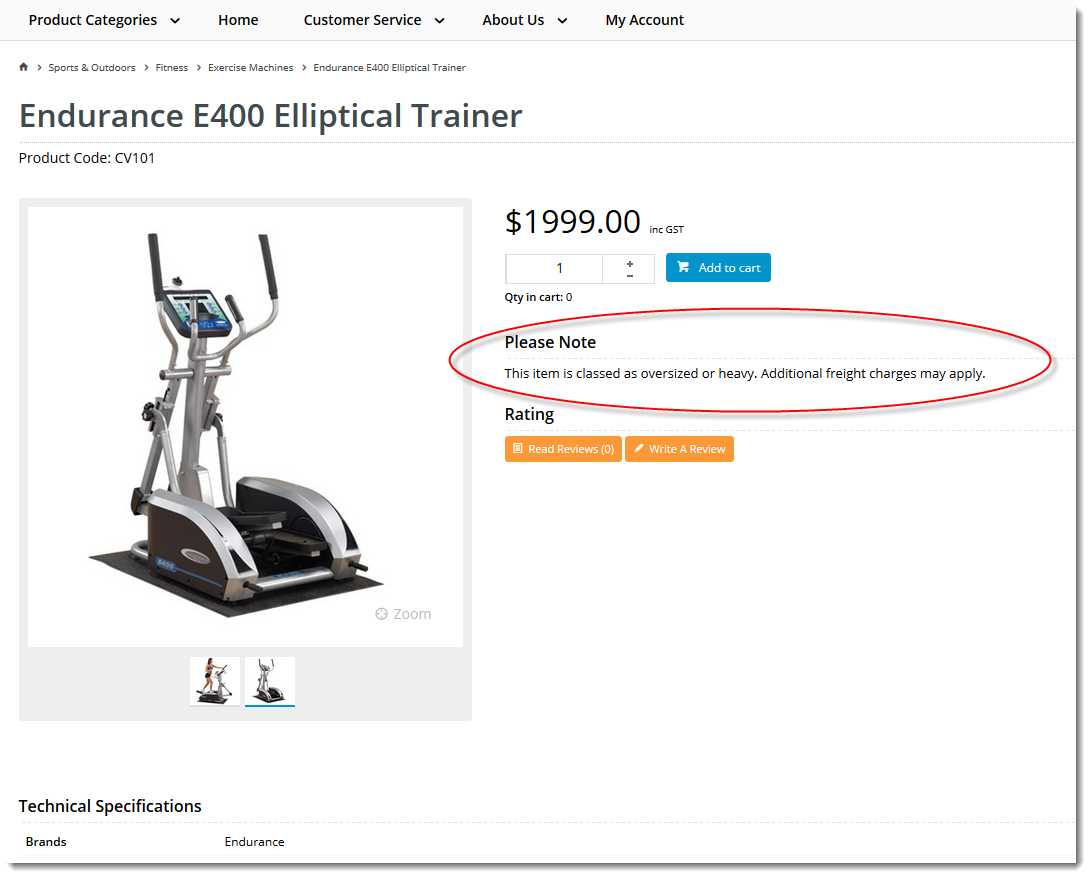
on your website. (For Products and Categories only)
- Navigate to Content → Standard → Pages & Templates.
- Select the page template you'd like to display the custom field on. In this example we'll use the Product Detail template..
- Custom Product fields are commonly displayed on the Product Detail Template.
- Custom Category fields are commonly displayed on the Product List or Category List Template.
- Locate the appropriate zone for you want the custom field widgetto display in. The optimal location will depend on your layout.
- Click the Add Widget button.
- Search for the required widget (for example 'Product List Field' or 'Category List Field' widget).
- Click the Add button.
- The widget editing popup will appear for you to configure the options:
- Description - a descriptive reference for the Administrator on the layout page. This does not display on the front-end website.
- Layer - this widget can be rendered conditionally based on role or customer, or displayed under all conditions (All Pages).
- Product Field - select the new custom field from the drop-down list. The format will be the Field Name prefaced with 'CUS_'.
- Show Heading - tick this box to include a heading for this widget.
- Heading Text - the heading text displayed to the end user.
- Fallback Information - default text can be entered, to be displayed against products with no data in this field.
- Show Toggle - allows the content to be hidden by default, and displayed when the user clicks on the Heading.
- Show Inline Heading - allows the heading to be displayed in line with the field content (ignored when toggle is in use).
- Configure options for field display:
- Click Save.


The custom field widget will now render on the relevant product relevant template.
Related help
| Content by Label | ||||||||||||||||||||
|---|---|---|---|---|---|---|---|---|---|---|---|---|---|---|---|---|---|---|---|---|
|
...