...
| Excerpt |
|---|
Customer Self Service allows for track and trace to be set up features Track and Trace links for carriers that support this functionality on their track and trace websites. own websites. This article describes the setup for those tracking links. |
| Tracking Link - Order History | Tracking link - Order Shipped Email |
|---|---|
Step-by-step guide
To Set up Configure Carrier Track and Trace Links:
- Determine the Carriers that allow for which of your freight carriers provide track and trace functionality on their websites.
- Enquire with these carriers to determine if they support the ability to call their website track and track trace with the consignment note as in the calling URL . See Common Carriers URL Pages below (see Common Carrier Tracking URLs below for information on some known Australian carriers).
- Determine the carrier codes in PRONTO for each of the required carriers.
- In Customer-Self-Service, in the Admin Role, go to the 'Settings' page and select the 'Freight' Login to the CMS as an Administrator.
- Navigate to 'Settings' --> 'Settings'.
- Select the Freight tab.
- Change Update the setting "'Carrier Codes for Track and Trace"' field. Enter all of the carrier codes from PRONTO that will be trackable. Enter them with a ; between them. For example, "STAR;TNT;BORD;DFE"The way the external pages references are built dynamically using 2 system resources and a specific URL stored against each carrier.
- Go to 'Content --> 'Resource Maintenance'
Defining the link for each carrier (note that this is done using the SysTable which is a generic table used for many different types of functions - this means the field prompts are often generic):
- Defining the Button Label:
- Search for 'rcOrderSearchTrackLabel'
- Use the 'Modify' option to change the 'Resource Value' to the required value. The default option for this value is: 'Track Order'
- Defining the Tracking Link Template:
- Search for 'rcOrderTrackingLinkTemplate'
- Use the 'Modify' option to change the 'Resource Value' to the required value. The default option for this value is: '<a target="_blank" class="TrackOrder" href='{0}'>{1}</a>' . It is accepting 2 parameters - the first (i.e. {0}) is the carrier specific URL to call and the second (i.e. {1}) is the resource mentioned above "rcOrderSearchTrackLabel". The full URL will be built bring all three values together.
- Go to 'Settings' --> 'Dictionary'.
- Enter 'Systable' into the 'TableName' prompt.
- Click 'Open'.
- Click the 'Search' tab.
- Search for the carrier code and "CC" (the system table type). For example, to find carrier code of TNT, search for 'TNT CC'.
- Select the record.
- Click the 'General' tab.
Click 'trackable PRONTO carrier codes in a semicolon-separated format (e.g. "TNT;TOLL;POST;IPEC").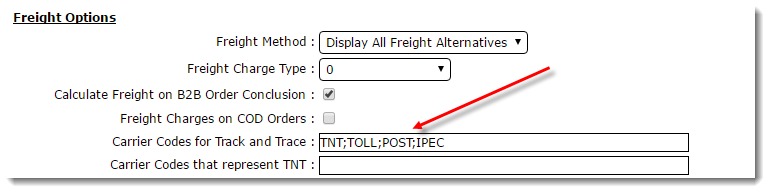
- Define the Track & Trace URL for each carrier:
- On the Freight tab of the Settings page, select a trackable carrier from the Standard Freight table.
- Click 'Modify'.
- In the setting 'Alpha5' enter the URL for the carrier with the consignment note string being replaced by the parameter {0}. For example, TNT would be Track and Trace URL' field, enter the carrier's URL with the placeholder {0} for the Consignment Note string.
(For example, Australia Post would be 'http://wwwauspost.tntexpress.com.au/interaction/asps/trackref_detail.asptrack/track.html?id=DOMESTIC_TRACK.html&TextArea={0}'.{0}'. Once the user clicks the tracking link, the {0} will be replaced by the consignment note number for that particular sales order).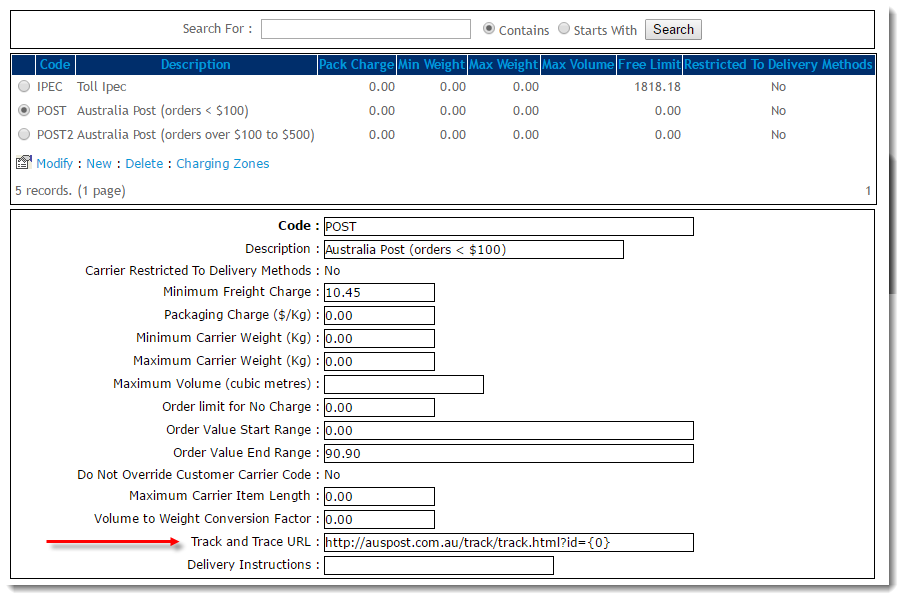
- Click 'OK' to saveClick 'RefreshCache' to write settings back to the system immediately
- Repeat for all remaining trackable carriers in the table.
...
The Order
...
History screen will now be able to
...
display track and trace
...
links, as well as the Order Shipped email.
| Tip |
|---|
Remember that in order to show the tracking link, a sales order will need to have both the carrier code and consignment note number populated to be able to show the link.in PRONTO. |
Common Carrier
...
Tracking URLs
| Carrier Name | URL |
|---|---|
| Border Express | |
| Couriers Please | http://www.4pod.com.au/track.php?key=IPD&track={0} |
| Simon National Carriers | http://www.simon.com.au/shippingDoc.aspx?value={0} |
| Star Track Express (DFE) | http://www2.startrackexpress.com.au/scripts/webtracktrace.dll/conget?connote={0} |
| TNT Express | http://www.tntexpress.com.au/interaction/asps/trackref_detail.asp?id=DOMESTIC_TRACK.html&TextArea={0} |
| TOLL | https://online.toll.com.au/trackandtrace/showConnotes.do?connote={0} |
| WA Freight Group | https://portal.wafreight.com.au/pod/onlinepod.asp?references={0} |
| Australia Post (eParcel) | http://auspost.com.au/track/track.html?id={0} |
| Info | ||||
|---|---|---|---|---|
| ||||
|
Related articles
| Content by Label | ||||||||||||||||
|---|---|---|---|---|---|---|---|---|---|---|---|---|---|---|---|---|
|