| Info | ||||
|---|---|---|---|---|
| ||||
|
Configuring the Standing Orders feature is available to CMS Admin Users only. Editing content templates may be available to certain roles. For an overview of how Standing Orders work, refer to the Standing Orders Overview page.
Overview
The Standing Orders feature can be configured globally or at the Role, Customer, User and Customer User levels using the Override facility. It is available only for Users (and Roles) who can place orders on account. For each Customer account, you will need to enter specific Users (and/or Roles).
| Excerpt | ||
|---|---|---|
| ||
Admin Users can configure the Standing Orders feature for their website. |
Step-by-step guide
NOTE - This feature must first be enabled by Commerce Vision.
1. Enable and configure Standing OrdersTo enable and configure Standing Orders:
| Panel | |
|---|---|
On this page:
|
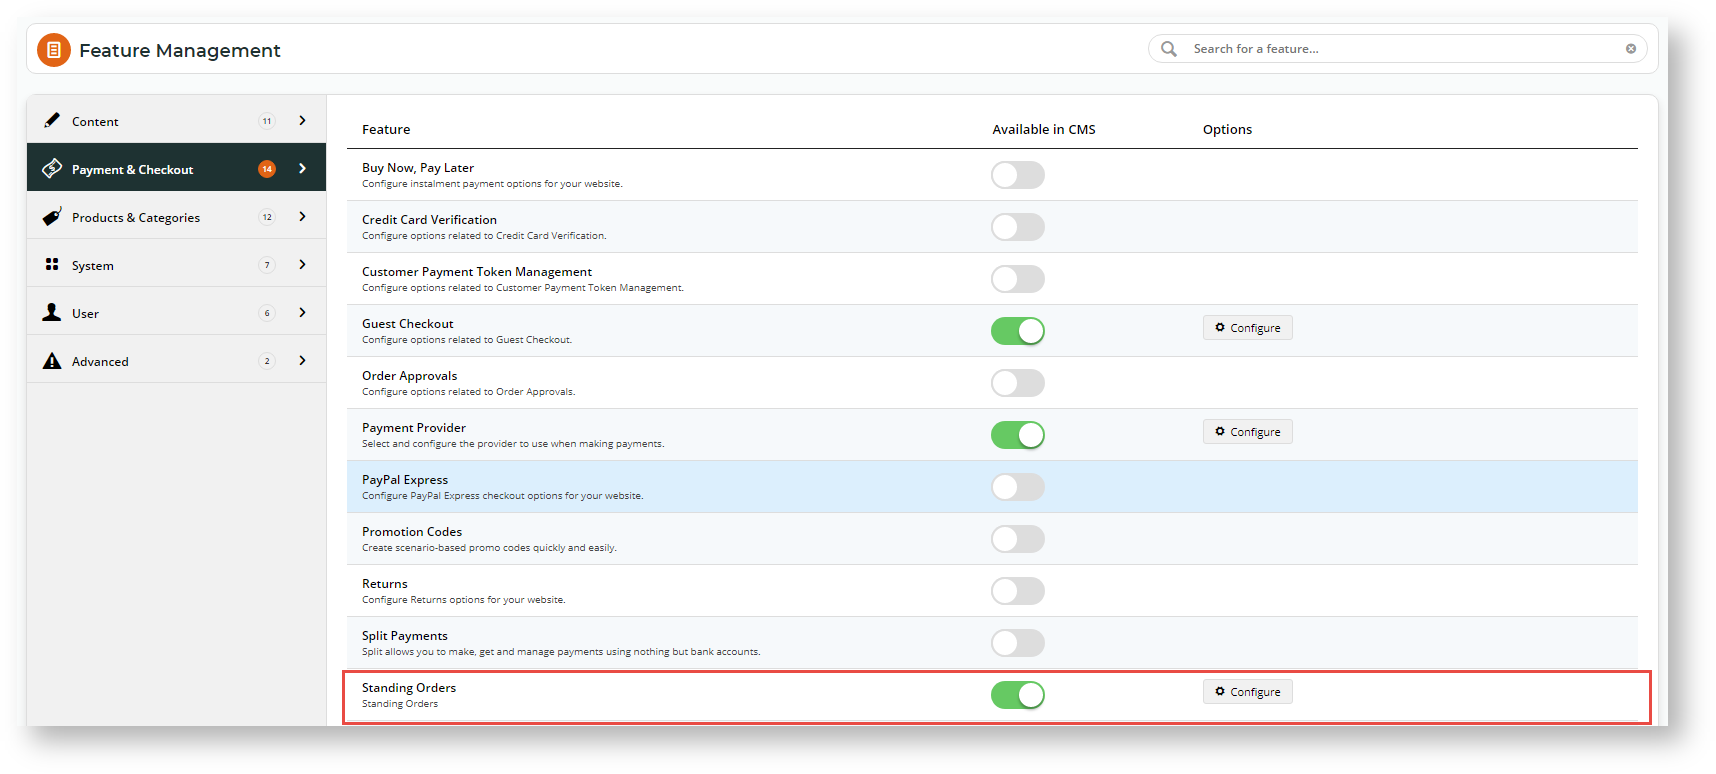
To enable Standing Orders for your website, toggle ON Standing Orders. (Contact Commerce Vision to enable this feature if you are unable to enable it here.) This toggle will trigger a Standing Order Administrator toggle to display in the User's Edit User screen. (By default, this Standing Order Admin toggle is disabled. You can enable it for specific Users or Roles in Step 8.)
| Expand | ||
|---|---|---|
| ||
|

If ON, the Enable Standing Orders toggle will enable Standing Orders for all Users (apart from any Overrides). TIP - Businesses usually would not permit all Users to create standing orders. Leave this toggle disabled and set overrides to allow/disallow specific Customer/Role/User/Customer User access to this feature.
| Info |
|---|
A User who owns a standing order cannot be deleted from the system. To delete them, the standing order's ownership must be changed or the standing order, deleted. |
If ON: the order is placed (and future recurrences will require approval if the limit is still exceeded).
If OFF: the order will not be placed and will be skipped (and future ones will require approval if the limit is still exceeded).
The Place Standing Orders When Over Customer Budget toggle determines whether a recurrence of a re-priced or adjusted standing order will be placed if the order total would exceed the Customer's budget. NOTE - The Override feature is available for this setting.
If ON: the order is placed (and future ones will be prevented from being placed until the budget limit is available)
If OFF: the order will not be placed (and future ones will be prevented from being placed until the budget limit is available)
* (The Owner (usually creator) of the Standing Order will receive a notification email for this event.)
The Can Administer Standing Orders setting determines what Roles or Users are set as Standing Order Administrators. Such Administrators can view, edit and delete all standing orders in their Customer account. This setting cannot be enabled at the global level. Role and/or User overrides must be added. This setting is also available in a User's Edit User screen and can be set there.
In Number of Days Before Expiry to Notify Users, enter the number of days before a standing order expires to send a warning message to the Owner and any cc'ed Users. Default: 14 days; TIP - to turn off this notification, set the number to '0'. (For this function to work, the Standing Order Days Expiry Notifier task must be scheduled. See guide on Task Scheduler.)
In Standing Order Email Due Days, enter the number of days before a standing order will recur to send an alert message to the Owner and any cc'ed Users. Default: 5 days;
In Notification Email Address, enter one or more staff email addresses that are to receive standing order notifications. If entering more than one email address, they must be semi-colon separated.
| Info | ||
|---|---|---|
| ||
If the Owner of a 'shared' standing order is inactive or deactivated, the email addresses entered here will receive a notification, as an alert that a 'shared' standing order exists for an inactive user. |
2. Edit Standing Order widgets
Once the Standing Orders feature have been enabled, standing order widgets are automatically added in various templates. These widgets render text, buttons and messages displayed in Standing Orders templates. Text and messages can be edited.
(i) Schedule Standing Order Panel Widget
The Schedule Standing Order Panel Widget is located in the Schedule Standing Order template (Content → Pages & Templates → Orders).
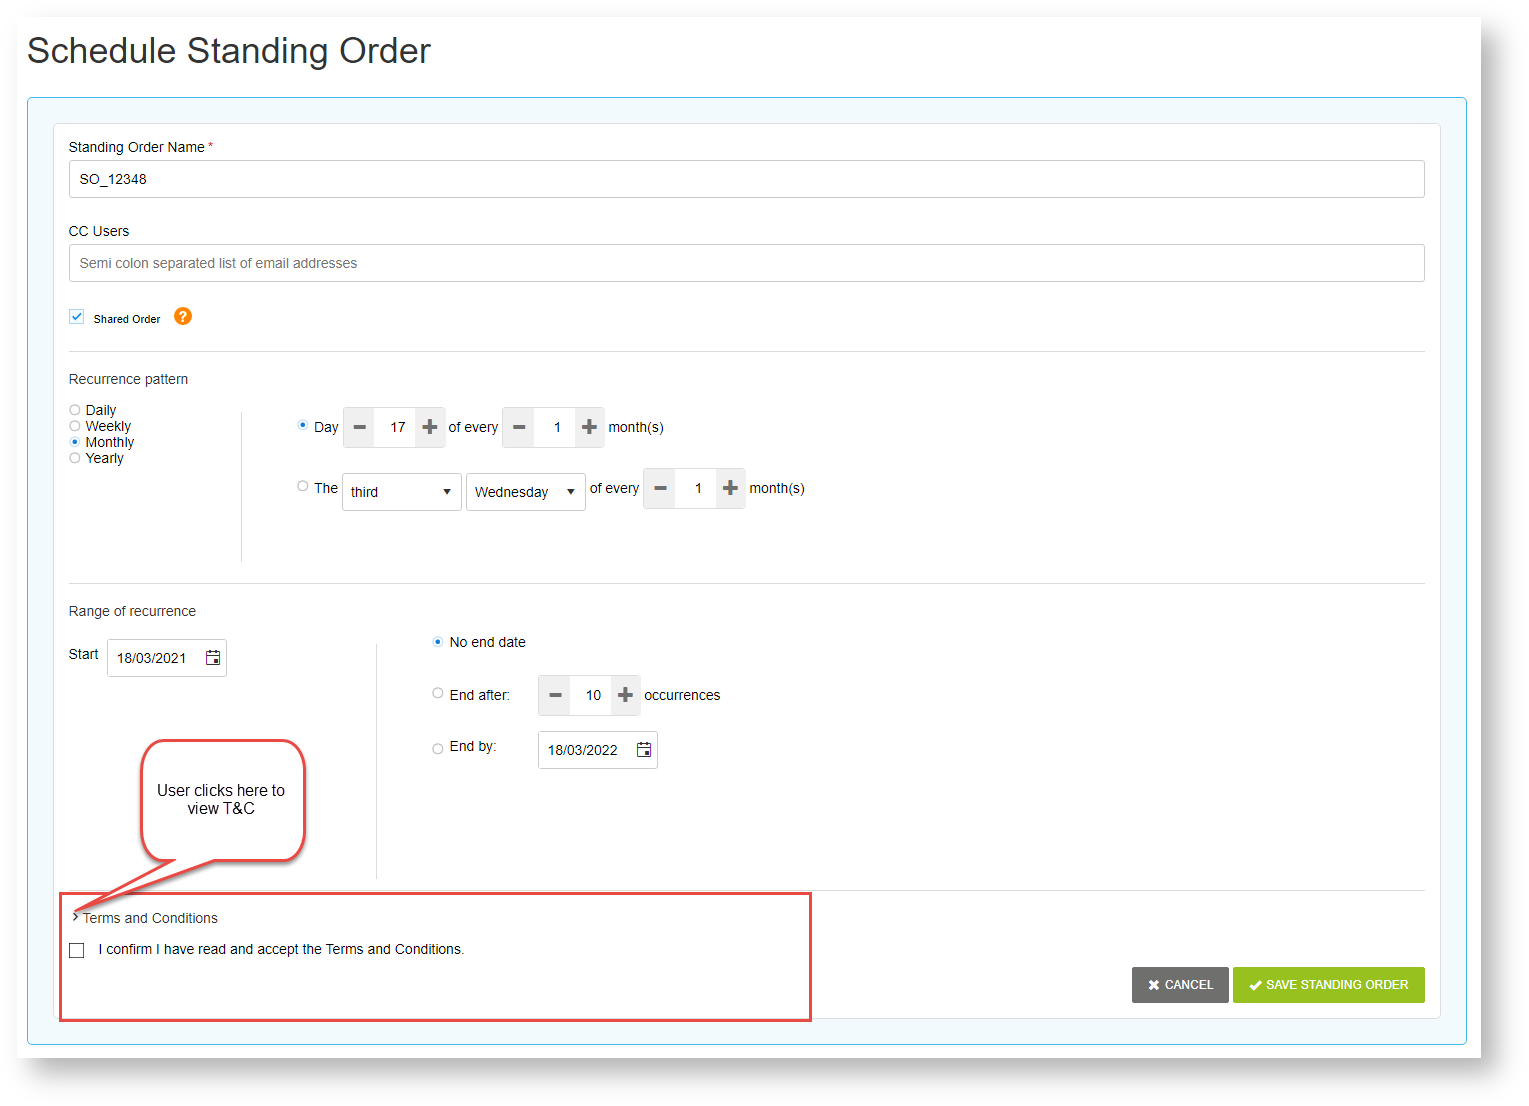
This widget renders the text and messaging displayed in the Schedule Standing Orders panel. You also have the option of forcing Users to accept the Standing Order Terms and Conditions before they can save a standing order. Terms and Conditions text and related messaging can be edited. Note - if no text is entered in the Terms and Conditions textbox, no T&C section will display for the User. (Click here for help on this widget.)
Set Terms and Conditions
| title | Setting Terms and Conditions |
|---|
Your business may have a set of Terms and Conditions (T&C) a User must agree with before they can save their standing order. If enabled, the T&C section appears in the Schedule Standing Order panel when a standing order is being created. The User must tick a checkbox to confirm they have read and agreed to the T&C before the standing order can be saved. If the User fails to tick the checkbox and attempts to save the standing order, a popup message alerts them that their consent is required.
Adding and enabling the T&C is done in the Schedule Standing Order Panel Widget.
| title | Click here to view help on enabling Terms and Conditions... |
|---|

Terms and Conditions: textbox for entering your standing order Terms and Conditions. NOTE - if blank, the T&C section will not display for the User.
Require Acceptance of Terms and Conditions: if Users are required to accept the T&C before they can create a standing order, this toggle must be enabled.
Terms and Conditions Acceptance Checkbox Text: Phrasing for the 'I agree' checkbox User must tick to save the standing order.
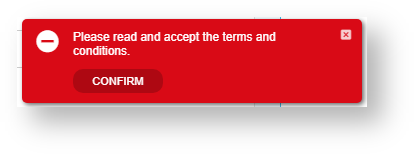
Terms and Conditions Mandatory Message: message in the popup displayed if the User tries to save but has not ticked the 'I agree' checkbox.
Example of message:
(ii) Standing Order Schedule Information Widget
The Schedule Standing Order Panel Widget is located in theCustomer Access to Standing Orders
Standing Orders has builtin flexibility in how you can control which customer accounts have access to Standing Orders as it is unlikely that all your buyers will need this feature. And if they are a large organisation, they may well want to limit this function to certain users.
Controlling access to Standing Orders uses one or a combination of these three properties:
- Only Users (and Roles) that can place orders on account can create recurring orders. This can be specified in each Customer account.
Don't enable Standing Orders globally. Instead, use the Overrides system to enable access only to specific user groups: Customer (account), Role, User, Customer User
Expand title What is a Customer User? A user may have access to multiple Customer accounts, e.g., the user is a buyer for a large organisation with separate accounts for different regions or departments. Not all these Customer accounts may want or need Standing Orders enabled.
Customer User allows you to specify that a user must be currently in a certain Customer account to access this feature. If the user switches to another account while logged in, the feature is no longer available.
The Standing Order Administrator role can be set against one or more website users. A user with this role can view, edit and delete all standing orders in their Customer account.
Expand title More about the Standing Orders Administrator... This special role becomes available when Standing Orders is enabled by Commerce Vision. It can be set against a user in User Maintenance → Edit User page or in the Standing Orders Settings page.

| Excerpt | ||
|---|---|---|
| ||
Enable and configure Standing Orders. |
Information
For administrators.
For non-admin Roles, see: Standing Orders Overview
| Panel | ||||
|---|---|---|---|---|
On this page:
|
Step-by-step guide
1. Configure Standing Orders
| Anchor | ||||
|---|---|---|---|---|
|
- Go to Settings → Settings → Feature Management → Orders & Checkout → Standing Orders
- For the Standing Order Feature Settings page, click Configure.
Enable Standing Orders: leave OFF unless you want to enable Standing Orders for all Users (apart from any Overrides). Use Overrides to enable/disable for specific Customer/Role/User/Customer User. TIP - Businesses would not usually permit all users to create or be responsible for standing orders.
Info NOTE - If you're trying to disable an enabled user or customer user and the system will not allow it, it is likely that the user is the owner (usually the creator) of a current standing order.
Place Standing Orders When Over Order Limit: determines whether to place a repeat order with re-priced items or other adjustments that will push the order total over a user's budget limit. (Only if the Customer account uses User Order Limits.)
Toggle ON: the order is placed (but future repeat orders will require approval if the limit is still exceeded).
Toggle OFF: the order is not placed and will be skipped (and future ones will require approval if the limit is still exceeded).- Place Standing Orders When Over Customer Budget: determines whether to place a repeat order with re-priced items or other adjustments that will push the order total over the Customer account's budget. NOTE - Use the Override feature if this varies from customer to customer.
Toggle ON: the order is placed (but future repeat orders cannot be placed until the budget limit is available)
Toggle OFF: the order is not placed (and future ones cannot be placed until the budget limit is available)
* (The Owner (usually creator) of the Standing Order will receive a notification email for this event.) - Can Administer Standing Orders: click Overrides to set the Roles or Users that will be Standing Order Administrators. This special role can view, edit and delete all standing orders in their Customer account. Enabling/disabling this role can also be done for a specific user on the Edit User page.
- Number of Days Before Expiry to Notify Users: enter the number of days before a standing order expires for an alert to be emailed to the Owner and any cc'ed Users. Default: 14 days; TIP - To turn off this notification, set the number to '0'. (For this function to work, the Standing Order Days Expiry Notifier task must be scheduled. See: Task Scheduler.)
- Standing Order Email Due Days: enter the number of days before a standing order is to be placed for an alert to be emailed to the Owner and any cc'ed Users. Default: 5 days;
Notification Email Address, enter one or more internal (staff) email addresses to receive standing order notifications. Multiple email addresses must be semi-colon separated.
Info title Notification about Inactive User Owner If the Owner of a 'shared' standing order has been deactivated, these recipients will receive a notification that a 'shared' standing order exists for a deactivated user.
- Click Save or Save & Exit otherwise your changes including any overrides will not be saved.
2. Add Configure for Schedule Standing Order Button Widget
This widget renders the Schedule Standing Order button on the Checkout page. This lets the user start a standing order.

- Go to the Checkout template (Content → Content → Pages & Templates → Checkout).
- Go to the zone where you want this button added. TIP - A good place is the bottom of the Step2 zone.
- (optional) Edit the button text in the widget if needed. See: Configure for Schedule for Standing Orders Button Widget
3. Edit Standing Order widgets
When Standing Orders is enabled, standing order widgets are automatically added in various templates. These widgets render text, buttons and messages in Standing Orders templates. Text and messages can be edited.
(i) Schedule Standing Order Panel Widget
Location: Schedule Standing Order template (Content → Pages & Templates → Orders).
Purpose: Renders the text and messaging on the Schedule Standing Orders panel.
What you can do:
- Enable/disable force users to accept the Standing Order Terms and Conditions before they can save standing orders.
- Edit Terms and Conditions text and related messaging. NOTE - If the Terms and Conditions textbox is empty, the T&C section is not displayed to the User.
Guide to widget: Schedule Standing Order Panel Widget
(ii) Standing Order Schedule Information Widget
Location: Standing Order Summary template (Content → Pages & Templates → Orders).
The Standing Order Schedule Information Widget provides Purpose: Renders the heading text of the recurrence order details in for the order's detail screen and appears in emails that display include recurrence details. The heading can be edited

What you can do: edit heading. (Click here for help on this widget.)
(iii) Configure Schedule for Standing Order Button Widget
The Configure Schedule for Standing Order Button Widget is located in the Checkout template (Content → Pages & Templates → Checkout).
Guide: Standing Order Schedule Information Widget
(iii) Configure Schedule for Standing Order Button Widget
If you do not see this widget, use the Add Widget button to add it to the required zone in the Checkout template. It should be added to the bottom of the Step2 zone.
This widget renders the Schedule Standing Order button, which provides access to the Schedule Standing Order panel during Checkout. You can edit the text for the button.
Location: Checkout template (Content → Content → Pages & Templates → Checkout)
Purpose: renders the button that lets a user create the Standing Order schedule
What you can do: edit the button label
Guide: Configure for Schedule for Standing Orders Button Widget
(iv) Cart Buttons Widget
The Cart Buttons Widget is not used only for Standing Orders. It renders all buttons Users can select to access a range of additional functions while in the Cart. The 'Create Standing Order' button is located here since it is in the Cart that the User can choose to create the order as a Standing Order. The button is only displayed if a User has access to Standing Orders.
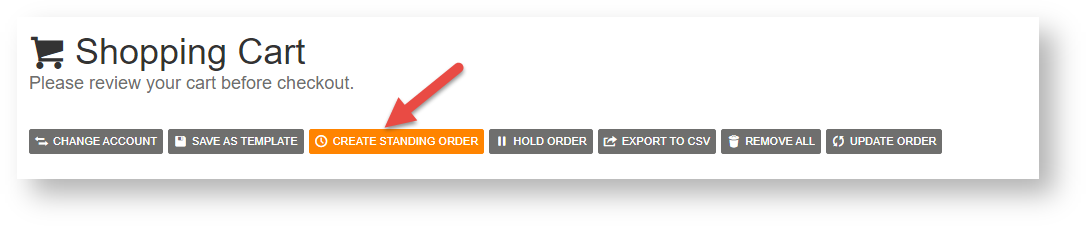
The Cart Button Widget is located in the Cart template (Content → Pages & Templates → Checkout). To change the text and icon on this button, in the Cart Buttons Widget, click on the Standing Orders tab and edit the fields as you require.

Location: Cart template (Content → Content → Pages & Templates → Checkout → Cart)
Purpose: Renders the button that lets the user start a standing order. The button displays only for users enabled for Standing Orders. (TIP - The Widget includes buttons for other functions as well.)
What you can do: edit the text and icon displayed on the button.
Guide: Cart Buttons Widget
4. Create Scheduler Task for Standing Orders Emails
| Anchor | ||||
|---|---|---|---|---|
|
Whenever a recurrent repeat order is processed and placed, the usual order confirmation emails (and any approval-related ones) will be are sent to relevant Usersusers. In addition, certain events related to the standing order process events will trigger other notification emails. These emails require you to schedule standing order email tasks in Scheduler Maintenance.There are three Scheduler Maintenance tasks must be created to check for and send these emails. See: Standing Order Emails
Standing Orders scheduled tasks:
- Standing Order Due Days Notifier: schedules the recurring order due soon emails email to be sent to the Owner and any other cc'ed Users (MANDATORY if order placed due soon emails are to be sent),
- Standing Order Expiring Soon Notifier: schedules expiry warning soon emails email to be sent to the Owner and any other cc'ed Users (MANDATORY if standing order expiring soon emails are to be sent),
- Standing Order Approver Notifier: (applies only if the Order Approvals function is active on your site) schedules emails relating to for standing order approvals approval events (ONLY IF ORDER APPROVALS IS ACTIVE ON YOUR SITE)
- Standing Order Task: schedules all other standing order-related emails. (MANDATORY)
Refer to next section on Standing Order Emails for more details about each email.
To access Scheduler Maintenance,
Login to your website and navigate- related emails. (MANDATORY)
4
- Logged in on your website, go to Settings → Scheduler Task Maintenance.
- SelectSelect New.
- In Begin the task, : select whether to send the email is to be sent 'At Startup' or 'On a Schedule' you will . If on a schedule, this will be set up hereduring the task.
- In Name, enter : enter a descriptive name for this task.
- Tick the Active : tick checkbox if this task is to be active immediately after saving it.
- In Task, Task: select one of the three Standing Order tasks from the list.
- In Schedule, : enter the required its details, e.g., start/end dates and times. Note NOTE - If task type is 'On a Schedule', enter the frequency details.
- In Error Notification CC Emails, : enter an the email address of the person to be notified of any errors when sending these emails.
- Click Save to save this task.
- to receive failed send error notifications.
- Click Save.
- Repeat (steps 2-9) for other required scheduled tasks.
5. Edit Standing Order Emails
| Anchor | ||||
|---|---|---|---|---|
|
Standing You can edit standing order email templates can be edited via . Go to Content → Emails.
Emails related to standingStanding order approval emails
The Standing Order Approver Notifier task will trigger the following emails:
Standing Order Awaiting Approval Email
This email : notifies a User user they are the approver for a standing order. (See Approver Functions for more information.)Expand title Click here to view an example... 
The email content includes:
- Email title/subject: alerts the recipient that this is an 'Awaiting Approval of Standing Order' email
- Order Details: include the Order Number, Customer information, and the User who created the standing order
- Recurrence Information: includes how often the order will recur, the next recurrence date, and which users if any will be alerted at each recurrence
- Order Summary: includes order lines and order amount
- Order Address and delivery instructions (not displayed)
The content can be edited and customised in various widgets in the Standing Order Awaiting Approval Email template.
Standing Order Awaiting Approver Selection Email
This email : notifies the standing order Creator/Owner that they need to select an approver. The contents of this email Email content can be edited or customised in various widgets in the Standing Order Awaiting Approver Selection Email template.Expand title Click here to view an example... 
The email content includes:
- Email title/subject: alerts the recipient that this is an 'Awaiting Approver Selection' email
- Order Details: include the Order Number, Customer information, and the User who created the standing order
- Recurrence Information: includes how often the order will recur, the next recurrence date, and which users if any will be alerted at each recurrence
- Order Summary: includes order lines and order amount
- Order Address and delivery instructions (not displayed)
The content can be edited and customised in various widgets in the Standing Order Awaiting Approver Selection Email template.
Emails
related tofor Standing Order Due and Expiry
The Standing Order Due Days Notifier task will trigger the following email:
- Standing Order Due Days Notification Email
This email is sent to Email: notifies the current owner and any cc'ed Users to remind them that a recurrent recurring order is due to be placed in 'X' number of days. The text for the message Email content can be edited in the Standing Orders Due Days Widget.
The Standing Order Expiry Soon Notifier task will trigger the following email:
Standing Order Expiry Email
This email is sent to the : notifies current owner and any cc'ed Users 'X' number of days before the standing order expires. The number of days is set in standing order settings. The text for the message is Email content can be edited in the Standing Order Expiry Widget.Expand title Click here to view an example... 
The email content includes:
- Date of expiry
- Email order details
- Recurrence information
- Order summary
- Order address and delivery instructions
The content can be edited in various widgets in the Standing Order Expiry Email template.
All other emails for Standing Order
The Standing Order Task will trigger the following emails:
Standing Order Changed Ownership Email
This email is sent when ownership of the standing order is transferred to another User. It is sent to the : notifies old owner, new Owner, and any cc'ed Users entered for the when ownership of a standing order is transferred to another user. The Email content can be edited in various widgets in the Standing Order Expiry Email template.Expand title Click here to view an example... 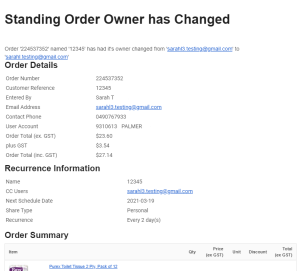
The email content includes:
- Ownership change details
- Order details
- Recurrence information
- Order summary
- Order address
The content can be edited in various widgets in the Standing Order Changed Ownership template.
- Standing Order No Products Email
This email is sent to : notifies the current Owner of the a standing order and any cc'ed Users. It is triggered when no products are available for users that a recurring order and the recurring order is was not placed because of product unavailability.) The Email content can be edited and customised in various widgets in the Standing Order No Products email template.
Example:
- Standing Order Over Budget Email
This email is sent to : notifies the current Owner of the a standing order and any cc'ed Users . It is triggered when that due to re-pricing or re-adjustment to a standing order means , the next processed order will be over budget. The Email content can be edited and customised in various widgets in the Standing Order Over Budget email template.
6. Add Standing Order
widgets for Order notification emailsMessages in Order Email Templates
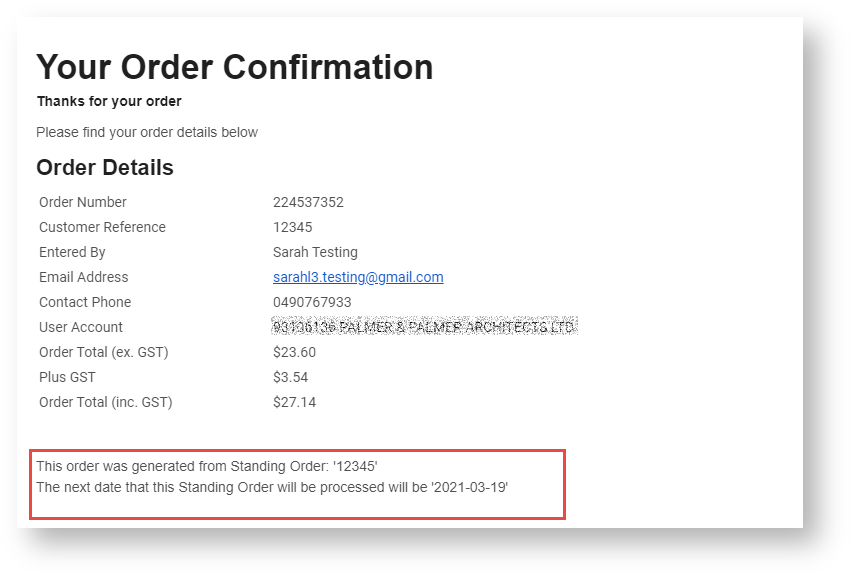
Every time a recurring order is placed, the usual order notification emails are automatically sent. The most common would be the order confirmation email. You can add the Standing Order Message Widget and Standing Order Removed Lines Widget in these email templates
Add these widgets to order email templates to insert standing order messages.
- Standing Order Message Widget - adds when applicable, inserts one or more of the following these messages when applicable: the order is from a standing order, the next scheduled recurring order date, if the order is the last scheduled order, if the order requires needs approval.
- Standing Order Removed Lines Widget - adds inserts the message that one or more order lines (products) has been were removed from this standing recurrent order due to unavailability
Messages from these widgets will be included only if an order has been generated from a standing order and are A message will display only for placed orders from standing orders and when relevant to the order.
Example:
To add these widgets,
- Go to Content → Emails and find the required email template, e.g., Order Confirmation Email
- Go to the zone
- to add the message, and click Add Widget.
- Find the Standing Order Message Widget, and click Add Widget.
- Find the Standing Order Removed Lines Widget and click Add Widget.
- (Optional) Edit the messages in the widgets and change their locations
- .
- (Optional) Send a test email to view the email content. Click Test Email in the top right corner of the screen.
Standing Orders Reporting (option)
NOTE - standing order reports are typically custom-designed and implemented to suit your business. Please consult Commerce Vision to discuss any standing order reporting requirements.
Standing order reports can be created to track standing order information such as the following:
- Current list of standing orders
- Standing orders for closed accounts
- Standing orders for inactive users.
Additional Information
| Multiexcerpt | ||||
|---|---|---|---|---|
| ||||
| Minimum Version Requirements |
| |||||
|---|---|---|---|---|---|---|
| Prerequisites |
| |||||
| Self Configurable |
| |||||
| Business Function |
| |||||
| BPD Only? |
| |||||
| B2B/B2C/Both |
| |||||
| Third Party Costs |
|
Related
helpResources
| Content by Label | ||||||||||||||||||||
|---|---|---|---|---|---|---|---|---|---|---|---|---|---|---|---|---|---|---|---|---|
|
| Content by Label | ||||||||||
|---|---|---|---|---|---|---|---|---|---|---|
|