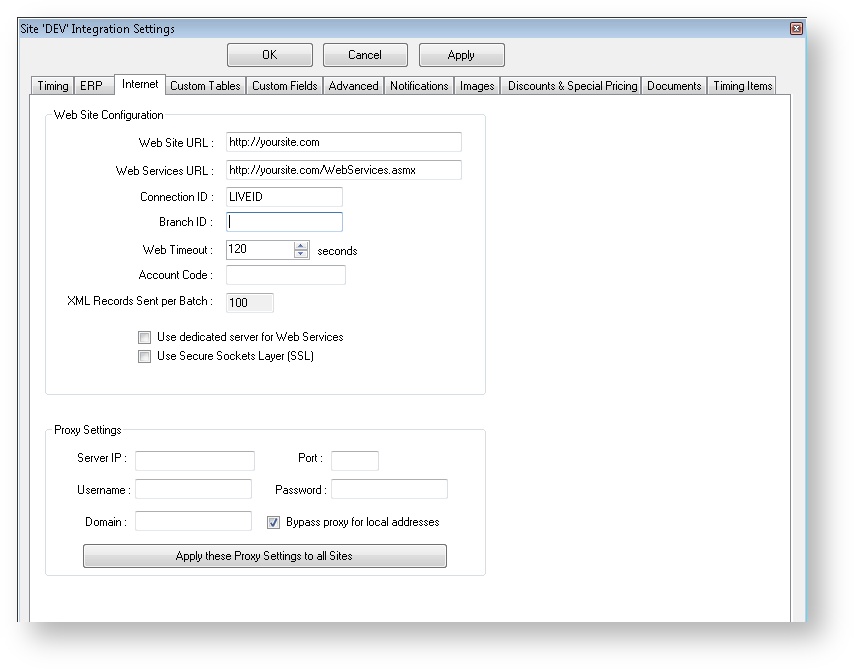
The Internet tab of the Integrator Settings is where web connection and server information is configured.
Step-by-step guide
To Maintain Internet Settings:
- Open the Integrator client and click the 'Settings' icon.
- Click the 'Internet' tab.
- Set the values for each field; refer to the table below.
- Click 'Apply' then 'OK'.
Field | Description |
|---|---|
| Web Site URL | The URL of the website (e.g. http://yoursite.com). |
| Web Services URL | The URL of the website, appended with 'webservices.asmx' (e.g. http://yoursite.com/webservices.asmx). |
| Connection ID | The unique Connection ID of the website (Commerce Vision can provide this) |
| Branch ID | The Branch identifier (for multi-branch sites). |
| Web Timeout | The time, in seconds, that an operation will keep trying for until it gives up. Generally set to 120 seconds. |
| Account Code | Leave blank (field no longer in use). |
| XML Records Sent per Batch | This value determines how many XML records the Integrator will process at one time. Keeping the number low will reduce processing time. Please note: All files will be processed on each send; batching simply prevents time-outs on very large files. |
| Use dedicated server for Web Services | Leave blank (functionality no longer in use). |
| Use Secure Sockets Layer (SSL) | Tick this box for HTTPS sites where data encryption is required. Using this functionality unnecessarily will result in increased processing and data overhead. |
| Server IP | The IP Address of the proxy server. |
| Username | The username for proxy authentication. |
| Domain | If proxy authentication is required, the authentication domain. |
| Port | The proxy server port number. |
| Password | The password for proxy authentication. |
| Bypass proxy for local addresses | Tick this box to bypass the proxy server when connecting to local addresses. |
The 'Apply these Proxy Settings to all Sites' button will update all sites (LIVE, STAGE, DEV, etc) to use the proxy settings specified here.
Related articles
