Overview
| Excerpt |
|---|
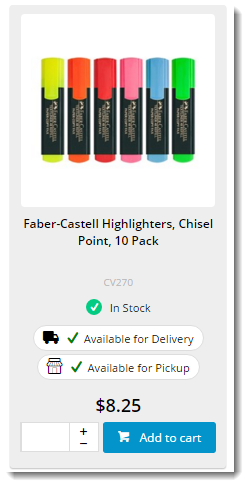
Customer Self Service's Click and & Collect functionality allows users to order products online and collect them at a store location convenient to them. Click and & Collect can be a great sales driver, as it may save the customer from shipping costs, as well as allowing them to receive their goods much more quickly. |
With Click & Collect features the ability to check stock availability at any point during the order process, and to show different availability statuses for products based on the order fullfilment method - delivery vs. pickup. For delivery, availability is based on the customer's default warehouse, but for pickup it is based upon their currently selected store. On arrival at the website, the user can set their pickup location ('My Store')functionality, the user can set their pickup location ('My Store') at any time during their visit.
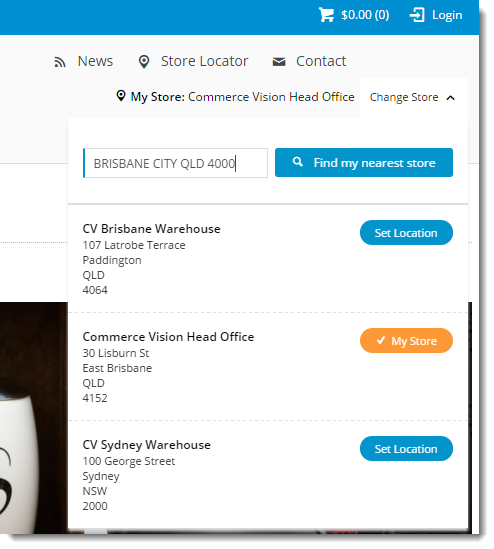
Setting their preferred store allows the pickup availability to be displayed to the user. If the user changes their pickup store, the availability will be re-calculated and the page will refresh with changes.
Products may display a different availability status for delivery, as the customer's default warehouse is used to calculate availability for this fulfillment method. A B2B user who switches to another account may see different delivery availability if the new account code has a different default warehouse.
Store Locator
Before Click & Collect can be implemented, it's imperative that a Store Locator has been populated with valid pickup locations. Refer to this guide for instructions - Pickup Warehouses / Store Locator.
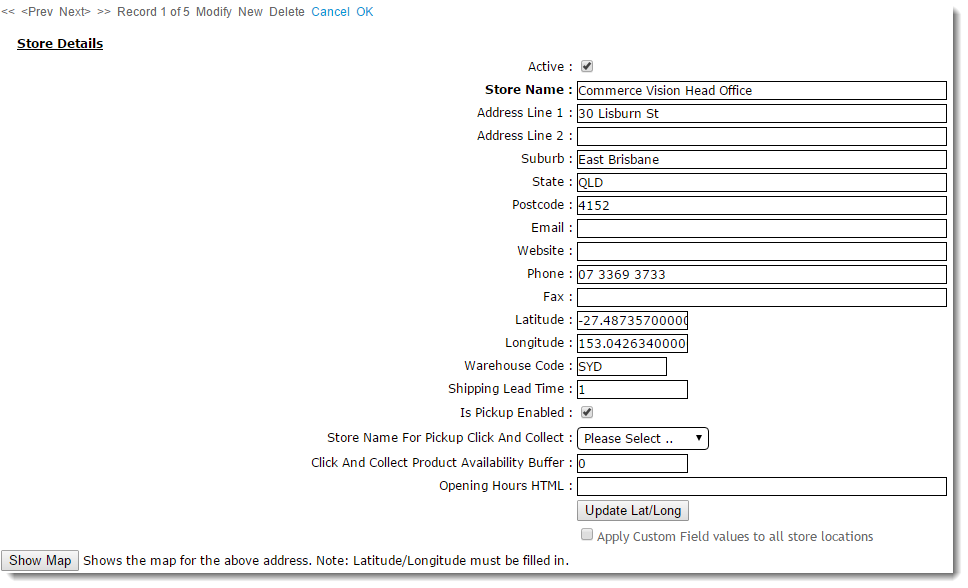
For each location, the following fields are of special importance for Click & Collect:
- Is Pickup Enabled - For standard checkout, determines whether the user can select this location to collect their order. For Click & Collect, determines whether this location can be set as 'My Store' for pickup.
- Click And Collect Product Availability Buffer - a buffer value specific to this warehouse, overriding the value in System Settings.
- Store Name For Pickup Click And Collect - sets an alternate pickup warehouse for this location (e.g. a debtor's default warehouse may be ok for delivery, not suitable to collect from. In this instance, an alternate warehouse is used).
System Settings

- Enable the functionality - Enable 'Enable Store Availability Click & Collect (tick)'
- Set stock levels for availability calculation (looks at ProntoStockWarehouse - Qty on Hand, minus Committed)
- Available for Delivery
- Available for Pickup
- Low Stock Call to Pickup
- Product Buffer
- Decide how to handle order restrictions (whether you accept the online order even if product deemed 'unavailable')
- Can Order if Unavailable for Delivery / Pickup / Low Stock etc
- YES = Always Allow, NO = Never Allow, DEFAULT = Standard behaviour per business rules
- Can Order if Unavailable for Delivery / Pickup / Low Stock etc
- Enable Nearby Store Availability (optional)
- Enable Nearby Stores Availability (tickbox)
- Store Location Max Distance for Alternate Stores (default is 50km)
- Determine display mode for Delivery availability - Standard vs Transfer zone (Core items have a min/max set, 'Days to Delivery' functionality. Warehouses are already grouped in PRONTO xwhse-functions table)
- Store Avail Click and Collect Deliv Display Mode
- Pronto Stock Warehouse Transfer Zone Field
- Configure Email Settings - (Pickup Order Is Ready" email
- Set Order Status for Shipped Pickup Ready (currently 57)
- Add this status to Integrator Advanced Settings 'Order shipped statuses'
- Set Email Template - (currently 'Order Shipped Pickup Ready')
- Set warehouse to be Pickup Enabled
- Set Buffer override
- Set Alternate warehouse (eg. debtor's default warehouse ok for delivery, but Pickup w/house needs to different)
- Set Order Status for Shipped Pickup Ready (currently 57)
- Ensure the website has a 'Store Location Google Api Maps Uri' populated = https://maps.googleapis.com/maps/api/js?key=
- Ensure the website has a 'Google API Key' populated.
Configure Messaging
Update wording on the following widgets, located in templates as follows:
...
| Tip |
|---|
Keep in mind that actual icons will vary by site design, and Wording / Tooltip values are completely configurable in the CMS. |
...
| Info |
|---|
Related articles
| Content by Label | ||||||||||||||||
|---|---|---|---|---|---|---|---|---|---|---|---|---|---|---|---|---|
|