Overview
With PayPal Express checkout, users are able to complete their purchase in fewer steps. Customers can use the delivery and billing information they have stored with PayPal, rather than re-entering it all again on your website. This makes checkout quicker and easier, thereby increasing conversion rates. 
This guide covers the implementation of PayPal Express checkout on BPD websites.
Step-by-step guide
To enable PayPal Express for your BPD site:
- Login to the CMS.
- Navigate to Settings --> Website Features.
- Click the grey 'minus' icon to enable PayPal Express.
- Verify that the icon changes to a green tick, and an 'Edit' button appears for the feature.
(screenshot here)- Click 'Edit'.
- Enter your xxxx credentials.
(screenshot here)- Enter overrides if required.
(screenshots here)- Update the Product Detail and Cart settings - these determine where the 'Check out with PayPal' button will appear.
- Click 'Save' to save changes and stay on the page, or 'Save and Exit' to save changes and return to the Features index.
Congratulations, PayPal Express is now implemented on your website!
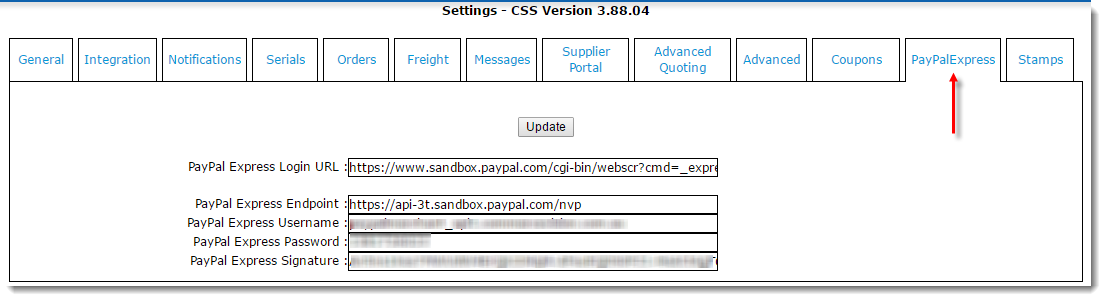
Before beginning, have your PayPal Merchant credentials handy and ensure your CSS is up-to-date for PayPal Express:
- Login to the CMS.
- Navigate to Settings --> Settings.
- Select the PayPalExpress tab.
- Populate the fields as follows:
- PayPal Express Login URL = https://www.paypal.com/cgi-bin/webscr?cmd=_express-checkout
- PayPal Express Endpoint = https://api-3t.paypal.com/nvp
- PayPal Express Username = (Your PayPal Merchant username)
- PayPal Express Password = (Your PayPal Merchant password)
- PayPal Express Signature = (Your PayPal Merchant Signature)
- Click 'Update' to save.
For testing on your Stage site, use the sandbox environment credentials. Contact Commerce Vision Support if you require assistance with this.
Related articles