Step-by-step guide
To enable BPAY at the System level:
- As Administrator, in the CMS, navigate to Settings → Settings → Credit Cards (on your site: /zSettings.aspx).
- Click the Orders tab.
- Click the Credit Cards tab.
- Tick the flag 'Allow BPay Payment'.
- Tick the flag 'Hold BPay & EFT Payments', if required.
- Holding BPay payments ensures a Cash Receipt is not created until the payment is released in the 'Release Payments' screen (see How to release EFT and BPAY Payments for instructions).
- Enter your 'BPay Biller Code' (obtained directly from BPAY).
- Tick the flag 'Auto Integrate BPAY EFT Order Payments', if required.
- Automatically integrating BPay payments means the sales order will not be held until the payment is released via 'Release Payments'.
- Click the 'Update' button to save changes.
Once the functionality is enabled, every BPAY transaction will require a Biller Code and a Reference:
- The Biller Code is your organisation's unique ID, obtained directly from BPAY.
- The Reference can be sourced in one of two ways:
- Receipt Number = the web order number + a system-defined check digit. This will produce a unique reference for every order payment. This method is the default.
- Customer Defined = a value from the BPayReferenceNumber field, which is stored against the customer record online. This field can be maintained via 'Customer Maintenance' or integrated from PRONTO. The reference number will always be the same based on the customer.
Customer Defined BPAY Reference numbers can be enabled at the Role level. For example, your organisation may decide that wholesale B2B customers each have their own BPAY Reference, whilst Public B2C customers use the system-generated reference. (The system will default to the Receipt Number method if the role flag is not set.)
Step-by-step guide
To Set the BPAY Reference Source at Role Level:
- Login as an Administrator.
- Navigate to Accounts → Role Management (on your site: /zRoles.aspx).
- Select the required role via radio button.
- Click the Functions tab.
- Click Modify.
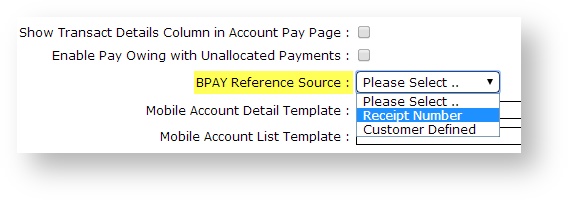
- Update the setting BPAY Reference Source by selecting from the drop-down list:
- Receipt Number
- Customer Defined
- Click OK to save.
The above BPAY Reference sources apply to order payments only. For invoice/account payment, the BPAY Reference will be a system-generated receipt number, taken from the Customer Payments table.
If Customer Defined References are to be used, they will need to be maintained at the Customer level.
To Set the BPAY Reference Number for a Customer:
- Login as an Administrator.
- Navigate to 'Accounts' --> 'Customer Maintenance' (/CustomerMaintenance.aspx?mode=admin)
- Search for the required customer.
- Click the 'Customer Details' tab.
- Click 'Modify'.
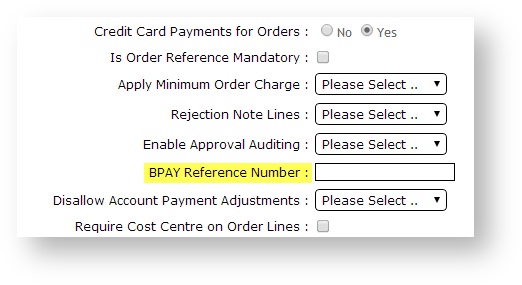
- Enter the customer's reference in the field 'BPAY Reference Number'.
- Click 'OK' to save.
Related help


