Deployment Rules
Deployment rules are there to maintain content integrity on target sites.
- Deployment will be cancelled if a content item is not found.
- Deployment will fail if the item is in draft mode (if Page Preview is on).
Deployment Process
Regardless of content type, the deployment process is completed using the Deploy popup. This opens on selecting the Deploy button or the Deploy menu item. NOTE - The popup will not open if you attempt to deploy an 'unlocked' lockable item.
Deployment Steps
1 - Select the data type(s) and item(s) to deploy. | Step-by-step | ||
1. Toggle ON each data type you want to deploy. 2. Toggle ON each item to deploy. (Not all content types have the item level.) 3. Click Next. | |||
2 - Select target site(s). | Step-by-step | ||
1. Toggle ON one or more destination site(s) to deploy to. 2. Click Next. | |||
3 - Check data items and target site(s) are correct. | Step-by-step | ||
1. Review the data and destination site summary. 2. To proceed with deploytment, click Deploy. | |||
4 - Check deployment results. | Step-by-step | ||
The deployment steps are complete when all four steps are done. | Click the link to view deployment results for errors and other messages.
|
Administrator Functions
Enable/disable Deploy Content
- In the CMS, go to Settings → Settings → Content → Deploy Content.
- Click Configure.
- Toggle ON/OFF Destination Sites.
- When enabled, Deploy buttons or links will display for deployable objectsitem. (NOTE - For Role and menu deployment, see: Deploy Role and menus.)
Deploy disabled Deploy enabled
- The Content Deployment Log will also be available on the Advanced Content menu. See: View Deployment Log.
Add
linked sitesTarget Sites
Sites that share an organisation Id are treated as being in a the same network. You may not always want to deploy a set of changes to all available sites. What sites a deployment instance can select from is set all networked sites to be selectable for the Deploy Content feature. Target sites can be enabled and disabled in Feature Settings.
To add sites that content can be deployed toenable a site to be selectable as a target site:
- Go to Settings → Settings → Content → Linked Sites.
- Click Configure.
- Scroll down to the Target Sites section.
- Toggle on one or more sites from the available sites.
- Click Save.
Deploying
lockable objectsThe contents of a lockable objectLockable Items
A lockable item must be in locked status to be deployable. if unlocked, only the unlock status is deployed. This is used to allow users on linked sites to edit content. You'll know when an object is deployable by the displayed Deploy button or link under Options. If your site uses Page Preview and an object is deployed before Publishing, it will be deployed in the Draft mode.If the source site has the Page Preview feature enabled and an item is deployed in draft mode, deployment will fail.
- Go to the locked objectitem.
- Locate the Deploy button and click itClick the Deploy button. NOTE - If there is no Deploy button, no data item is ready to deploy. If there is a Deploy button but does not work, there is no locked deployable item.
- In the Deploy modalpopup, select individual objects items to deploy or toggle Select All.
- Click the Next button.
- Select one or more available deployment target sites.
- Click Next.
- Check the summary of items to be deployed.
- To confirm deployment, click Deploy.
- Check the deployment results. NOTE - The result for each individual site is displayed separatelyIf deploying to multiple target sites, check the Content Deployment Log for individual site results.
- You can To check the deployment details for more information. On the Results modaldeployment results, click the link.
- Check the deployment details. You can enter notes about the deployment.
Deploying non-lockable objects
Non-lockable objects need additional setting to be enabled for deployment.
- For a guide to a deployment record, see: View Content Deployment Log.
Deploying Non-lockable Items
To deploy a non-lockable objectitem:
- In the CMS, go to Settings → Settings → Content → Linked Sites Deploy Content.
- Click Configure.
- In Linked Sites Feature Settings, toggle ON the feature content type(s) you want to deploy. NOTE - Non-lockable content types do not have the word 'locks'.
- Click Save.
Deploying Role Settings
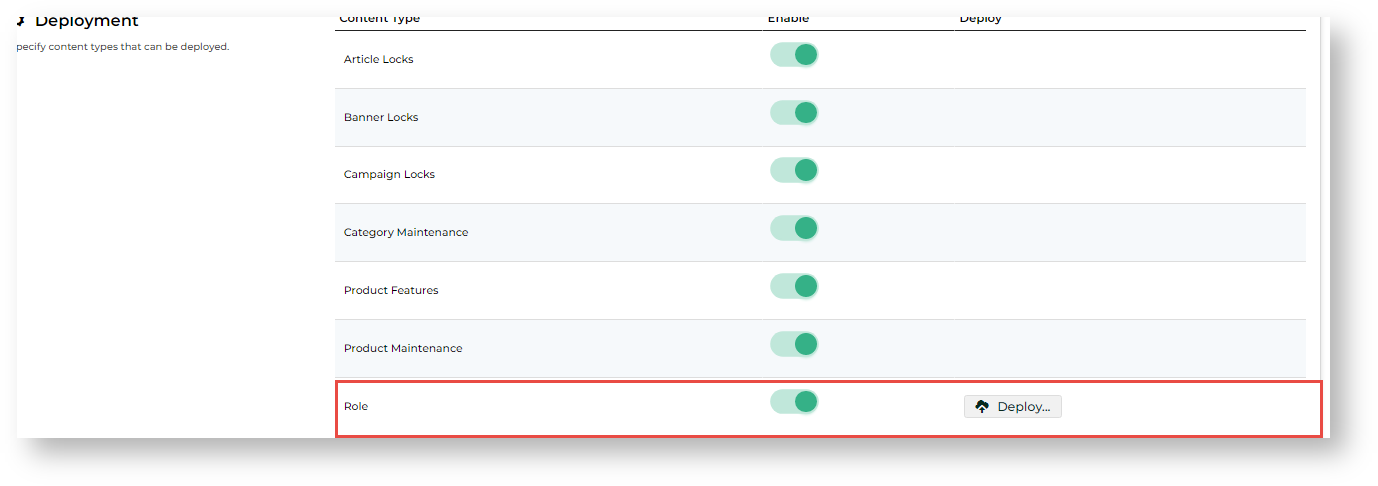
Role settings changes are deployed from the Deployment section of the Linked Site Deploy Content Feature Settings page.
To deploy Role changessettings:
- In the CMS, go to Settings → Settings → Content → Linked SitesDeploy Content.
- Click Configure.
- In Linked Deploy Sites Feature Settings, toggle ON Enable Role Deployment.
- Click the Deploy button displayed Save.
- In To open the Deploy modal, select one or more Roles to deploy.
Click Next.
Select the linked sites for deployment.click the Deploy button next to Role.
Anchor deployment-log deployment-log
Viewing Deployment History & Results
| deployment-log | |
| deployment-log |
To check deployment results:
- In the CMS, go to Content → Advanced Content → Content Deployment Log.
- Use the Search tool to find the deployment instance.
- Click Edit for the deployment instance you want to view.
Additional Information
| Multiexcerpt | ||||
|---|---|---|---|---|
| ||||
Minimum Version Requirements |
| |||||
|---|---|---|---|---|---|---|
| Prerequisites |
| |||||
| Self Configurable |
| |||||
| Business Function |
| |||||
| BPD Only? |
| |||||
| B2B/B2C/Both |
| |||||
| Third Party Costs |
|
Related help
| Content by Label | ||||||||
|---|---|---|---|---|---|---|---|---|
|


