...
| hidden | true |
|---|
...
Report Generator permits Role-defined groups of users to re-run (generate) certain reports themselves. During the report design stage, a report can be assigned a Report Group and made active for Report Generator. When configuring Report Generator, Admin selects the Report Groups that can be accessed via the Report Generator. All active reports in selected Report Groups will be viewable. Viewing restrictions can be set so that only nominated Roles can access particular Report Group reports.
As an additional option, Report Subscription can be enabled for Report Generator. This feature allows Admin to flag a report as subscribable. This will allow Users to set up a scheduled reporting task so that their generated report can automatically be updated and emailed to themselves and any nominated recipients on a daily, weekly or monthly basis.
| Info | ||
|---|---|---|
| ||
|
Step-by-step guide for Admin
During the Report Design stage, a report is assigned a Report Group. When configuring Report Generator, you decide the following:
- which group(s) of Users (all or by Role) have access to Report Generator.
- which group(s) of Users (all or by Role) have access to Report Subscription. (Note - Roles should be the from same set as those in Report Generator.)
- which Report Groups are accessible by which group(s) of Users (all or by Role). (Note - Roles should be the from same set as those in Report Generator.)
1. Enable and configure Report Generator settings
...
certain Website Users to generate copies of reports they have access to. Report access is set by Role or a custom report group.
You can only view and generate reports you have been granted access to. Before generating a report, you'll be able to change how the report displays (order of sort and group fields), add notes, and change the report name.
Generated Report Features
A generated report:
- does not edit the source report
- has its own unique Id
- is saved with a new file name
- is only accessible by the user who generated the report
- can be used with the Report Subscription feature (if source report was set as subscribable). See: Report Subscription.
| Excerpt | ||
|---|---|---|
| ||
The Report Generator feature permits Users based on Role to re-run (generate) reports they have access to. |
User Guide
Generate a report
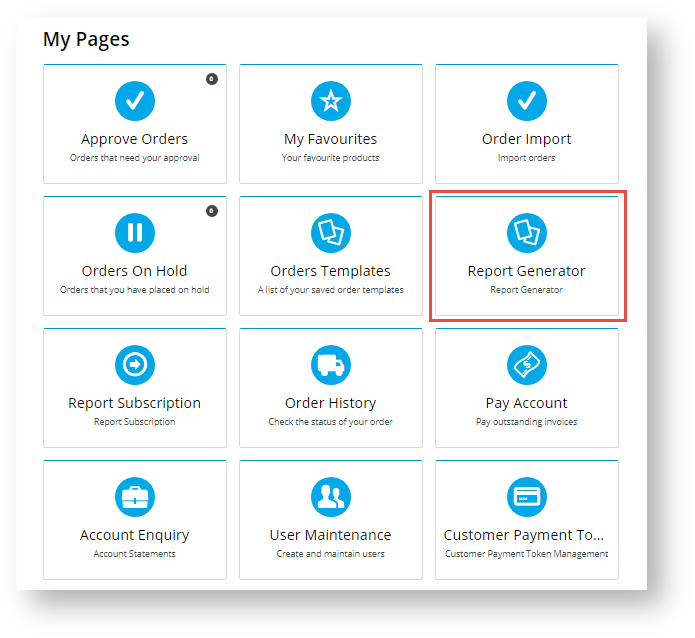
If your Role(s) has access to the Report Generator, it will appear as a menu item in your Dashboard.
| Expand | ||
|---|---|---|
| ||
|

To enable Report Generator:
...
In the 'Scheduled Reporting Features Settings' screen, go to the Enable Report Generator toggle.
...
2. Generate a report
Users can only generate (run) reports they have access to. Such reports are available through the Run Reports menu in CMS or the Report Generator as a Dashboard item on your website.
...
To access Report Generator:
- Log in to your website and click Dashboard.
- On your Dashboard, scroll down to the 'My Pages' section and click Report Generator.
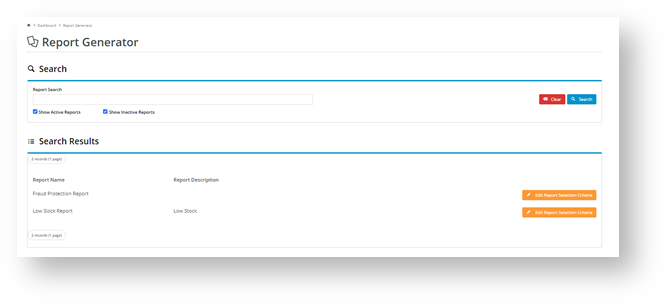
- By default, the Reports list displays all active reports you have access to. (Active reports are those marked as 'current' by Admin.) Find the report you wish to generate. You can search by name or scroll down the list. If you want to find an inactive report
...
- , tick the 'Show Inactive Reports' checkbox and click the Search button.
- For the report you selected
...
- , click the Edit Selection Report Criteria button. The Report Selection Criteria section is displayed.
- In Report Name, you can edit the name so it is more meaningful

...
- or easier to identify. Otherwise, the name of the original report will default.
- In Report Format, the dropdown list will allow you to select a pdf file download option instead of the default csv if this has been set by Admin.
- The Search section contains the report's fields. Note - The availability of 'Search', 'Group By' and 'Sort By' fields for customisation will be different
...
- , depending on how
...
- each report has been designed. If options are available, select
...
- order preferences to determine how the generated report's data will be displayed.
- To generate the report, click the Generate button. The report will be downloaded to your computer
...
- .
- Open the file to view it.
- (optional) If this functionality is available to you and the original report, once the report is generated, the Subscribe button
...
- will be displayed. This allows you want to schedule a subscription task for
...
- the generated report.
To add a subscription, click Subscribe.

...
- You will be taken to the Subscription screen. See Report Subscription help for details.

- If you did not select to subscribe (Step 9), click Close when you have finished with the 'Report Generator' facility.
Additional Information
| Multiexcerpt | ||||
|---|---|---|---|---|
| ||||
| -- |
| Minimum Version Requirements |
| |||||
|---|---|---|---|---|---|---|
| Prerequisites |
|
...
| ||||||
| Self Configurable |
| |||||
|---|---|---|---|---|---|---|
| Business Function |
| |||||
| BPD Only? |
| |||||
| B2B/B2C/Both |
| |||||
| Third Party Costs |
|
Related Resources
| Content by Label | ||||||||
|---|---|---|---|---|---|---|---|---|
|