| Info | ||
|---|---|---|
| ||
Deploy Content is a CV ecommerce multisite content management feature. It can also be used with Content Lock to remotely send restricted from editing locked content to target sites. Implementation requires consultation with Commerce Vision. Source and target sites must be on the same version (min. 2022.3). CV: 105298 |
Overview
The Deploy Content feature allows the CMS remote management and source control of specific content on one or more sites in your organisation. The Administrator and Content Administrator roles to 'can select destinations ('target sites') and copy over' content from one CV website while in the CMS of their own site ('source site')to . NOTE - For successful deployment, source and target sites must be on the same version.
About Deployable Content
When you deploy content, you're copying over one or more
destination CV websitessaved data objects ('
target sitesitems')
in their organisation's network. These administrator roles can enable/disable the feature for specific content types as needed. For a target site to be selectable, it must be on the same version as the source site.What content types and data items can be deployed?
Lockable content items in locked status (available only for items that can be used with Content Lock)Pages and templatesfrom the site you're on to another site. A deployable content type is just a content data group that you can use with this feature. Of course, not all content can be deployed. We've identified those content data groups that multisite organisations often want to reuse on their different sites. In general, all deployable content types contain propriety data - created by, for or are otherwise meaningful to your organisation in some way.
Deployable content types are almost always structured and accessed by way of the CMS navigation menu. Below, they are highlighted in yellow. (NOTE - Not all submenu items are deployable.)

Deployment & Content Locking
A content type also has another feature variable. Its data items can either be lockable or non-lockable. Lockable Items are deployed in locked status so that they cannot be edited or deleted on a target site - by any CMS user. Lockable content types typically contain data a business or head-office wants to maintain control of. Other content types are non-lockable. This means the source site can deploy content that CMS users on target sites can edit and/or delete.
Lockable Items
When deployable? only when both the Deploy Content and Content Lock features are enabled on the source site. NOTE - If a locked item is deployed to a target site with Content Lock disabled target sie, it will be unlocked. This means it can be edited or deleted by users there (if their roles allow it).
These are the lockable content types.
A lockable
content itemsitem can only be deployed when in locked status.
For more on content locking, see: Content Lock.
Non-lockable
content itemsProduct contentItems
When deployable? when the Deploy Content feature is enabled on the source site.
These are the non-lockable content types.
For more on locking, see: Content Lock.
| Expand | title | Click here for specific deployment conditions of a content object type|
|---|---|---|
| Tip | ||
| ||
For a guide on how Content Lock & Deploy Content works with a specific content type, click on the content type. |
Content Type Deployment Rules
General Rules
Deployment rules are there to maintain integrity of deployed data on a target site.
- Deployment to a target site will be cancelled if a data item is not found.
- The deployment process will fail if an item is in draft mode (when Page Preview is on).
Content Type Rules
Each content type also has specific conditions of deployment.
| Expand | |||||||||||||||||||||||||||||||||||||||||||||
|---|---|---|---|---|---|---|---|---|---|---|---|---|---|---|---|---|---|---|---|---|---|---|---|---|---|---|---|---|---|---|---|---|---|---|---|---|---|---|---|---|---|---|---|---|---|
| |||||||||||||||||||||||||||||||||||||||||||||
|
What Can Be Deployed?
When Deploy Content is available for a page or content object, a Deploy button displays| Panel | |
|---|---|
On this page:
|
Start Deployment
When an item or page of items is of a deployable content type, you will see a Deploy button on the top right of the page
or
on the
item's Options menu.
The general rule is:
- use the Deploy button to select from all multiple valid items on the page.
- use Deploy on an item's menu to deploy only that item.
| Info | ||
|---|---|---|
| ||
Deployment function is disabled (no Deploy buttons or menu items) when no target sites have been set for the source site. |
Example: deploying in Category Maintenance

(1) Deploy button, (2) Deploy menu item
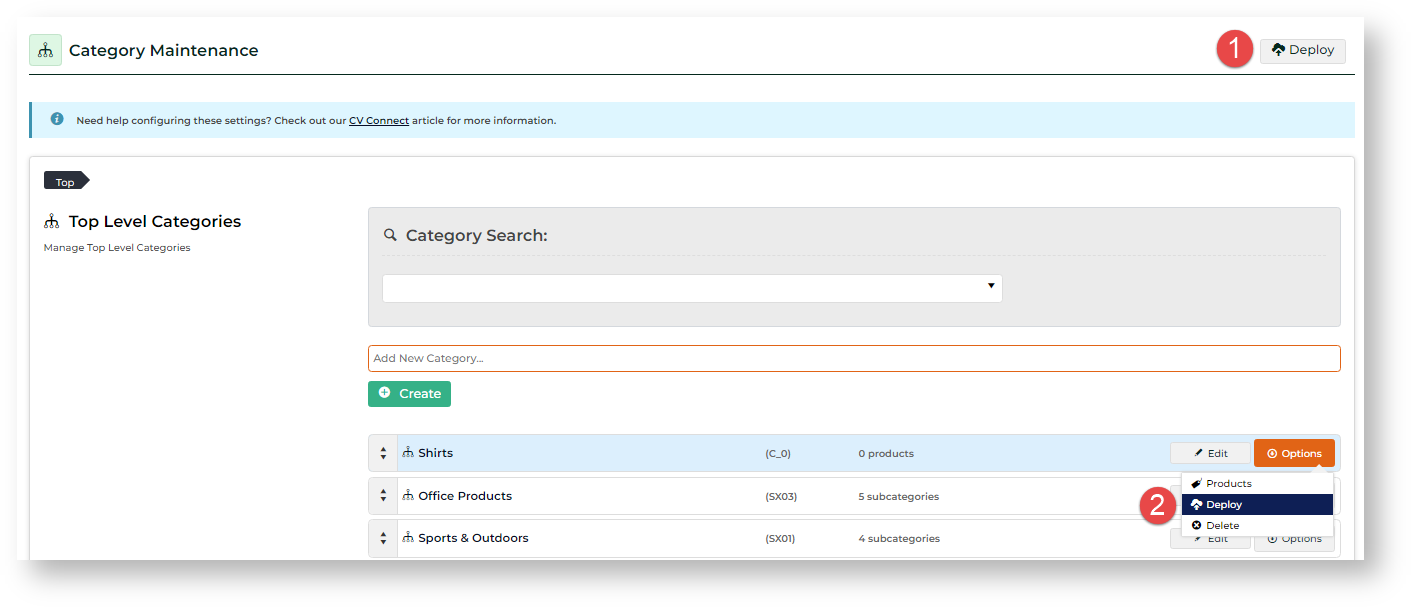
(1) Clicking the Deploy button
allows all valid categories can be selected for a deployment
.

(2) Selecting Deploy from
the 'Shirts' category's Options menu
| Panel | |
|---|---|
On this page:
|
Deploy Rules
Deploy rules are there to maintain content integrity on linked sites.
- Deployment is cancelled if edited object is not found.
- Deployment will fail if an object is in draft mode (if Page Preview is on).
The Deployment Process
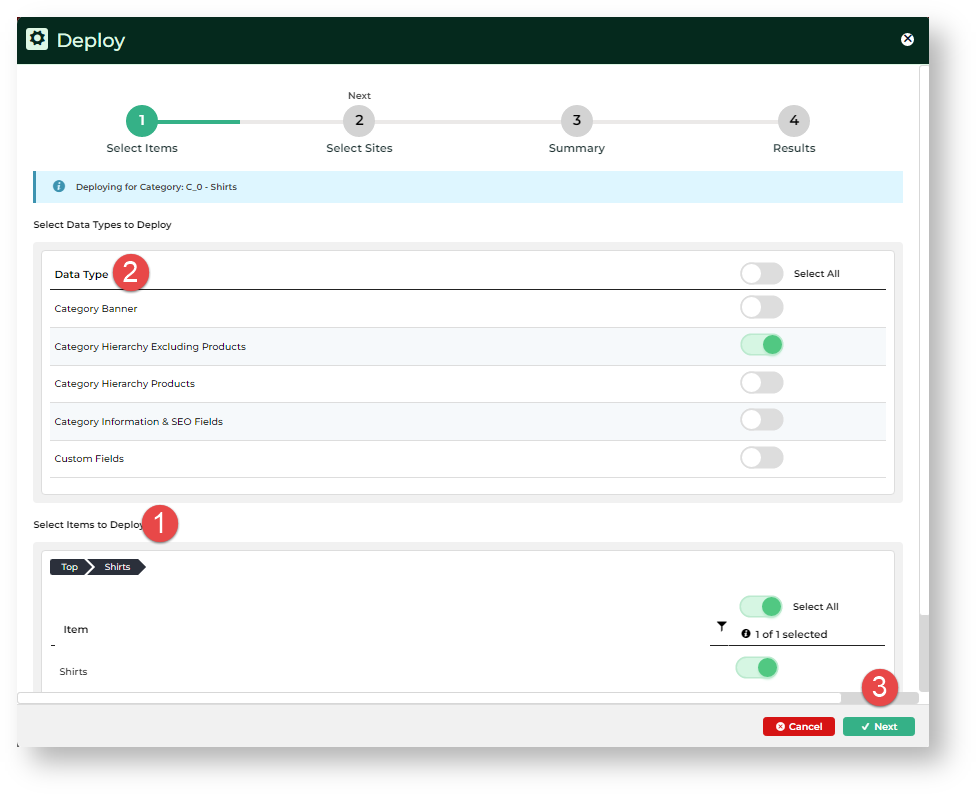
No matter the content data type, the deployment process is completed through the Deploy modal. This popup opens when you click the Deploy button or the Deploy menu item. The process has four steps:

1. Toggle ON each data type you want to deploy.
2. Toggle ON each item to deploy. (Not all content types have the item level.)allows only this category to be selected.

Deployment Steps
Regardless of content type, the deployment steps are the same. Clicking Deploy opens the Deploy popup. NOTE - The popup will not open if you attempt to deploy an 'unlocked' campaign.
1. Select Data Item(s)Valid data items are displayed for selection. NOTE - If the popup has no no data items, it means there are no deployable items. 1. Toggle to select data item(s). 2. If applicable, toggle to select data type(s). NOTE - Some content items have selectable data types, e.g., products, categories. This allows you to specify only those data types you want to deploy. 3. Click Next. 2 - Select destination site | Step 1 Deploy
| |
2. Select Target Site(s). | Step-by-step |
4. Toggle ON to select one or more destination target site(s) to deploy to. 25. Click Next. |
3 - Check selected data and destination site(s) are correct. | Step-by-step | |
| 1. Review the data and destination site summary. 2. To proceed with deploytment, click Deploy. | |
4 - Check deployment results. | Step-by-step | 1. Go to Content → Advanced Content → Content Deployment Log. 2. Find the deployment instance. 3. Click Edit for the failed deployment instance. 4. Scroll down, then click More Information. 4. View error messages for the deployment. |


Deploy Rules and Result Messages
Result Messages
Successful
- single linked site - all changes to selected data type(s) and items have been deployed on the destination site.
- multiple linked sites - all changes to selected data type(s) and items have been deployed on all destination sites.
Failed
- single linked site - at least one change to selected data type(s) and items cannot be deployed and the whole deployment instance was cancelled. Nothing was deployed to the selected linked site.
- multiple linked sites - at least one change to selected data type(s) and items cannot be deployed on all sites and all deployment instances were cancelled. Nothing was deployed to all selected linked sites.
Partially successful
multiple linked sites -all changes to data types of selected data type(s) and
| Step 2 Deploy
| |||||
3. Check Data Item & Target Site Selections6. In Deployment Name, name this deployment. If left blank, the system adds the content type + date as the name. 7. Review data and target site selections. Go back to Steps 1-2 to reselect, if needed. 8. To start deployment, click Deploy. | Step 3 Deploy
| |||||
4. Check Deployment Results9. Check the Successfully Deployed? column,
|


|
Administrator Functions
Enable/disable Deploy Content

Deploy disabled Deploy enabled

 The Content Deployment Log will also be available on the Advanced Content menu. See: View Deployment Log.
Add linked sites
Sites that share an organisation Id are treated as in a network. You may not always want to deploy a set of changes to all available sites. What sites a deployment instance can select from is set in Feature Settings.
To add sites that content can be deployed to:
Go to Settings → Settings → Content → Linked Sites.Click Configure.

Deploying lockable objects
The contents of a lockable object must be in locked status to be deployable. if unlocked, only the unlock status is deployed. This is used to allow users on linked sites to edit content. You'll know when an object is deployable by the displayed Deploy button or link under Options. If your site uses Page Preview and an object is deployed before Publishing, it will be deployed in the Draft mode.
Go to the locked object.Locate the Deploy button and click it.

In the Deploy modal, select individual objects to deploy or toggle Select All.

Click the Next button.
Select one or more available deployment sites.

Click Next.

Check the deployment results. NOTE - The result for each individual site is displayed separately.

You can check the deployment details for more information. On the Results modal, click the link.


Deploying non-lockable objects
Non-lockable objects need additional setting to be enabled for deployment.
To deploy a non-lockable object:
In the CMS, go to Settings → Settings → Content → Linked Sites.Click Configure.
In Linked Sites Feature Settings, toggle ON the feature type(s) you want to deploy.

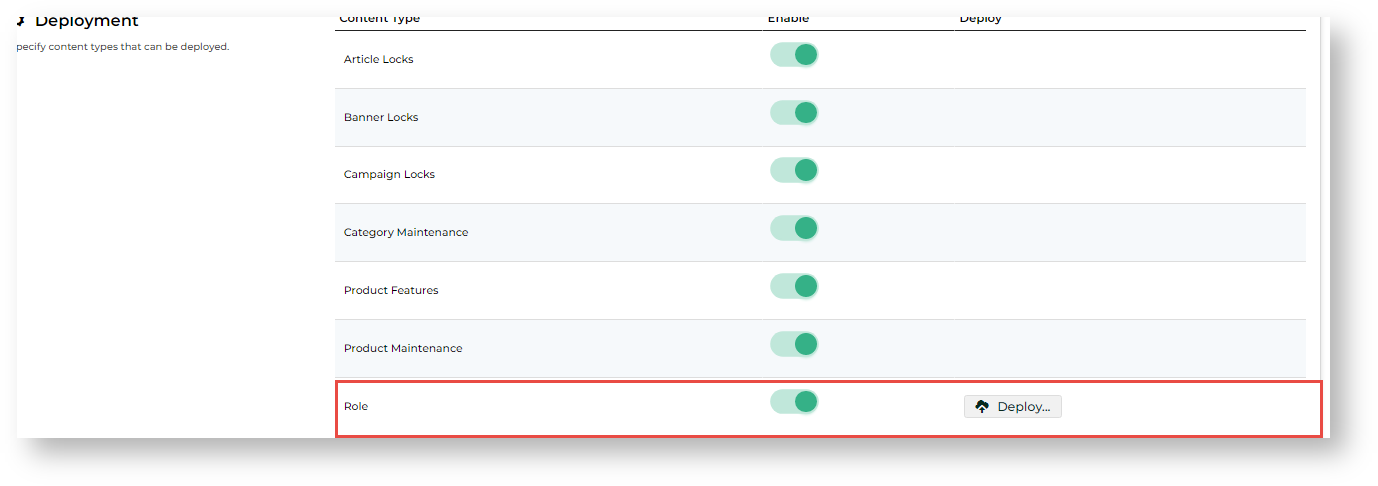
Deploying Role Settings
Role settings changes are deployed from the Deployment section of the Linked Site
10. Click the link to view the deployment's results, e.g., for errors and other messages.
| Step 4 Deploy |

Deploying Role Settings
Unlike all other content types, Role settings are deployed from the Deploy Content Feature Settings page.
To deploy Role changessettings:
- In the CMS, go to Settings → Settings → Content → Linked SitesDeploy Content.
- Click Configure.
- In Linked Deploy Sites Feature Settings, toggle ON Enable Role Deployment.
- Click the Deploy button displayed Save.

- In To open the Deploy modal, select one or more Roles to deploy.
Click Next.- Select the linked sites for deployment.
- popup, click the Deploy button next to Role.
Anchor deployment-log deployment-log
Viewing Deployment History & Results
| deployment-log | |
| deployment-log |
To check deployment results:
In the CMS, go to Content → Advanced Content → Content Deployment Log.
Use the Search tool to find the deployment instance.


Additional Information
| Multiexcerpt | ||||
|---|---|---|---|---|
| ||||
Minimum Version Requirements
| Multiexcerpt | ||
|---|---|---|
| ||
4.38 |
| Multiexcerpt | ||
|---|---|---|
| ||
Implementation by Commerce Vision |
| Multiexcerpt | ||
|---|---|---|
| ||
No |
| Multiexcerpt | ||
|---|---|---|
| ||
Content |
| Multiexcerpt | ||
|---|---|---|
| ||
Yes |
| Multiexcerpt | ||
|---|---|---|
| ||
Both |
| Multiexcerpt | ||
|---|---|---|
| ||
| n/a |
Related help
view any deployment your site was involved in (as source or target site), view the Content Deployment Log. You can also rename a deployment and add notes about it while in the record.
Related Resources
| Content by Label | ||||||||
|---|---|---|---|---|---|---|---|---|
|
| Content by Label | ||||||||
|---|---|---|---|---|---|---|---|---|
|