...
- Navigate to 'Web Product Maintenance' → 'Category Review'.
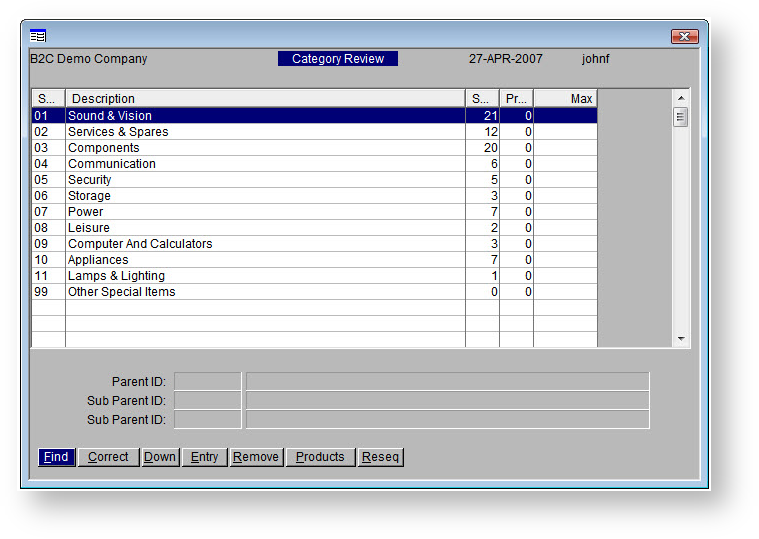
- The Category Review screen will display:
- A list of top level categories
- The number of subcategories and products within each
- Click Entry / use the E key.
- The Sort Code will automatically populate with the next available number. You can change this or leave as is.
- Enter a Description for your new category.
- Enter a sort Order. This is the sequence, or where the new category will appear in the list.
- Hit the ESC key to exit input mode, then use the Down key to drill down to the next level.
- Add a subcategory by repeating the above process - click Entry, then enter a name and sort order.
- Click Up to go back up a level.
- Use the ESC key to exit Category Review.
- Integrate - 'Product Categories' - Send Changed.
Here's a quick video showing how to add new categories & subcategories.
Multimedia
name AddingCategoryInPRONTOWebMaint.mp4
Tip It's worth noting that in PRONTO, the 'ESC' key will take you back up a level or get you out of 'entry' mode, but your category list may not refresh correctly to show what you've just added.
If this happens, just exit and re-enter the Category Review screen to reload your data.
Adding Products to a Category
...
- Navigate to Web Product Maintenance → Category Review.
- Highlight the required top level category and click Down to drill down to subcategory level.
- Keep drilling down until you get to the subcategory you want to add products to.
- With the subcategory highlighted, click Products.
- Click Add. The list of products will load (if your PRONTO is quirky, you may need to arrow up to see them).
- Click Find to search for a product code. Once it's found and highlighted, click Mark to mark the item for editing (you'll see an *asterisk* appear).
- Repeat Step 6 for any other products you want to add.
- Once all required products are marked, click Action.
- A popup will appear. The Action type should be 'A' (Add sort code).
- Hit Enter. PRONTO will auto-fill the Sort Code with the category code you came from. Leave as is.
- Enter through the Flag field and click OK. Your products have now been added!
- On the Integrator - send Changed for Product Master + Pricing.
Here's a quick demonstration:
Multimedia
name AddingMultipleProductsToCategoryViaCatReview.mp4
Via Stockcode Review
- Navigate to Web Product Maintenance → Stockcode Review.
- You can either follow the Mark & Action method noted above, or add products individually as follows.
- Click Find (or hit F) to search for a product code.
- With the required product highlighted, click Correct (or hit C).
- Hit Enter to get to the Sort Code field, then enter the code of the required category. If you're not sure what your category's sort code is, click the magnifying glass icon to find it.
- Hit Enter to confirm your changes.
- Repeat Steps 3-6 as required.
- On the Integrator - send Changed for Product Master + Pricing.
...
