Overview
Customer Self Service features Track and Trace links for carriers that support this functionality on their own websites. This article describes the setup for those tracking links.
| Tracking Link - Order History | Tracking link - Order Shipped Email |
|---|---|
Step-by-step guide
To Configure Carrier Track and Trace Links:
- Determine which of your freight carriers provide track and trace functionality on their websites.
- Enquire with these carriers to determine if they support the ability to call their website track and trace with the consignment note in the calling URL (see Common Carrier Tracking URLs below for information on some known Australian carriers).
- Login to the CMS as an Administrator.
- Navigate to 'Settings' --> 'Settings'.
- Select the Freight tab.
- Update the 'Carrier Codes for Track and Trace' field. Enter all trackable PRONTO carrier codes in a semicolon-separated format (e.g. "TNT;TOLL;POST;IPEC").
- Define the Track & Trace URL for each carrier:
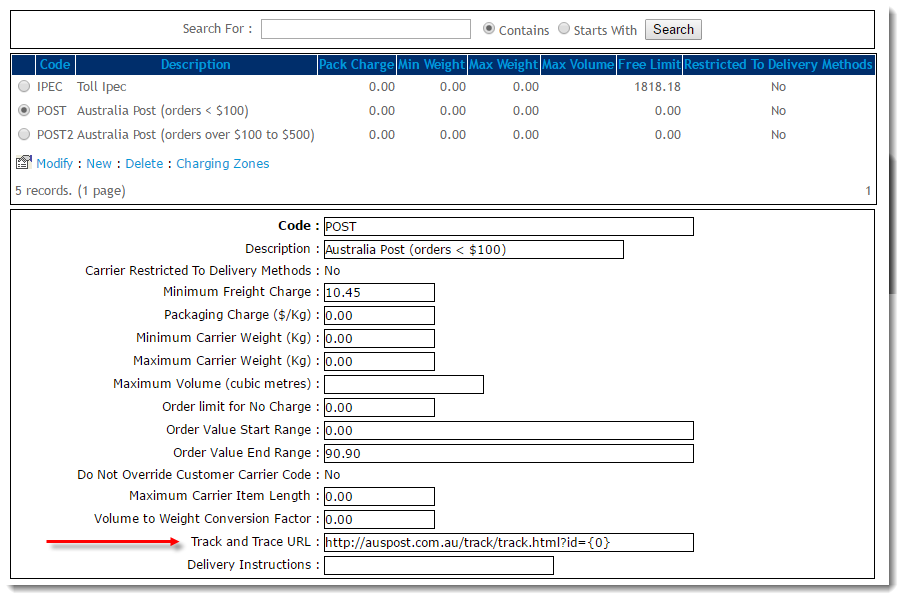
- On the Freight tab of the Settings page, select a trackable carrier from the Standard Freight table.
- Click 'Modify'.
- In the 'Track and Trace URL' field, enter the carrier's URL with the placeholder {0} for the Consignment Note string.
(For example, Australia Post would be 'http://auspost.com.au/track/track.html?id={0}'. Once the user clicks the tracking link, the {0} will be replaced by the consignment note number for that particular sales order).
- Click 'OK' to save
- Repeat for all remaining trackable carriers in the table.
The Order History screen will now be able to display track and trace links, as well as the Order Shipped email.
Remember that in order to show the tracking link, a sales order will need to have both the carrier code and consignment note number populated in PRONTO.
Common Carrier Tracking URLs
| Carrier Name | URL |
|---|---|
| Border Express | |
| Couriers Please | http://www.4pod.com.au/track.php?key=IPD&track={0} |
| Simon National Carriers | http://www.simon.com.au/shippingDoc.aspx?value={0} |
| TNT Express | http://www.tntexpress.com.au/interaction/asps/trackref_detail.asp?id=DOMESTIC_TRACK.html&TextArea={0} |
| TOLL | https://online.toll.com.au/trackandtrace/showConnotes.do?connote={0} |
| WA Freight Group | https://portal.wafreight.com.au/pod/onlinepod.asp?references={0} |
| Australia Post (eParcel) | http://auspost.com.au/track/track.html?id={0} |
| Fastways | https://www.fastway.com.au/tools/track/?l={0} |
Related articles
Additional Information
--
| Minimum Version Requirements | **.**.** |
|---|---|
| Prerequisites | -- |
| Self Configurable | Yes |
| Business Function | Orders |
| BPD Only? | Yes |
| B2B/B2C/Both | B2B |
| Ballpark Hours From CV (if opting for CV to complete self config component) | Contact CV Support |
| Ballpark Hours From CV (in addition to any self config required) | Contact CV Support |
| Third Party Costs | n/a |
| CMS Category | CMS Category |

