This feature must be implemented by Commerce Vision for your site.
Overview
Popup alerts automatically display after a user has logged into your website. An alert allows your business to add current or important messages, and ensure they will be read by all registered users or a subgroup based on settings. You can add an alert reminder, which emails a reminder to the user, and a checkbox if the user is required to acknowledge reading it.

On this page:
Step-by-step guide
This guide assumes the Popup Alerts feature has been set up for your site.
Create 'Alert' Article Type
Every alert message is linked to an Alert article type. It allows the system to recognise aleart messages that are grouped together. Note that all alerts a user is not restricted to viewing will be displayed on the popup regardless of which alert type it is linked to.
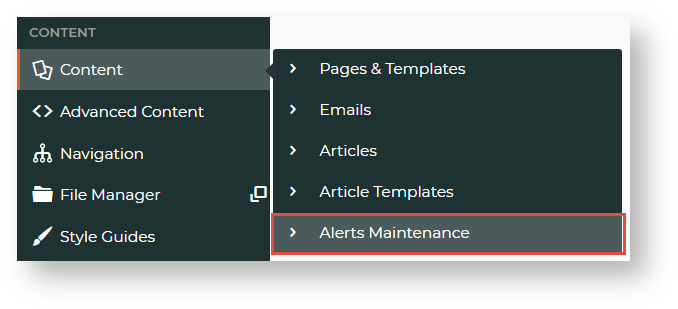
- In the CMS, go to Alerts Maintenance (zArticles.aspx). Here, it has been placed on the Contents tab.
- If the Article Type 'Alert' has not been created, click the Alert/Article Types tab.

- Click New.
- In Code, enter a meaningful word for this alert type, e.g., 'Shipping' etc. This will display to the user.
- In Description, enter a title for this alert.
- To save, click OK.
Create an Alert Message
- Click the Article Maintenance tab.
- Click New.
In Article Type, select 'Alert'.
In Name, enter a heading for the popup.
In Description, enter the message. TIP - You can use html and style tags to format the alert.
- In Alert Page Type, select the alert type.
- If this alert is to go live as soon as it is saved, tick Is Alert Live.
- In Article Posted, today's date defaults. Change it if needed. This indicates the creation date.
- In Start Date and Expiry Date, enter the period the alert is to display.
If the alert applies to all users, leave these fields blank. Or you can define the alert is for a subgroup of users.
Field Use Customer Type Trade 'B2B' or Consumer 'B2C' users. Customer Warehouse Limit by Warehouse Code. Customer Code Limit by (default) Customer Code. Bill to Customer Code Limit by Bill to Customer Code. (Used with Cost Centres) Alert Contract Code Alert Initial Roles Limit by initial role after login. User's Email Address Limit to specific users To add a link to a document, select the document. NOTE - This must have been Create Alerts Popup for Users on Login using Upload General Documents.
When the user clicks on the link, the document opens.To let the user choose to see the message again, tick Alert Remind Later. A 'Remind Me Later' button will display for the Alert Type in the popup. If the user clicks it, a 'Current Alerts'
button displays on the user's home page. The user can click on it to view the message again. NOTE: For the button to display, the 'Hide Alerts flagged as 'Remind me later?'' toggle in the Alerts Popup Widget must be OFF.
When the user clicks the 'Remind me later' button, the Current Alerts button displays on the Home Page. (Where it displays depends on the zone in which the Alerts Popup Widget is located.) TIP- You can also enable the counter in the widget so that the number of messages is indicated.
When the user clicks 'Current Alerts', the alerts popup displays.
NOTE - If the 'Acknowledge and Accept' button is also available, if user clicks it, this will cancel the reminder for that message.
If you want an alert type to keep displaying until the user acknowledges and accepts it by clicking a button, tick Alert Acknowledgement Required. An Acknowledge and Accept button will display next to the Alert Type. NOTE - By default, the message will not be displayed again if a user clicks the button. For the message and button to display each new session, ensure the 'Hide Alerts Already Acknowledged?' toggle in the Alerts Popup Widget is OFF.
- To save, click OK.


Upload a document for Alerts
A document must be added if it is to be attached to an alert.
To upload a document:
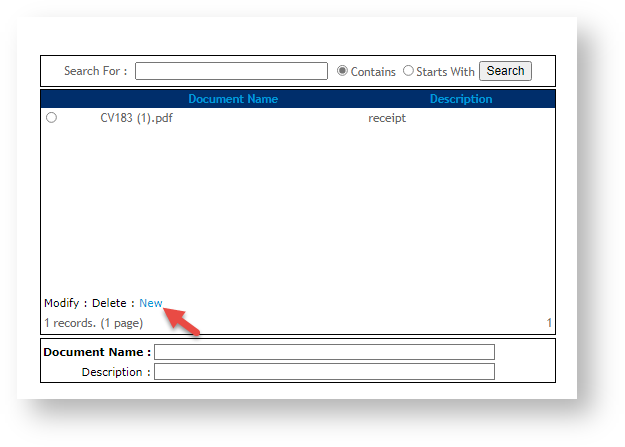
- Go to System Preferences → Upload General Documents.
- Click New.
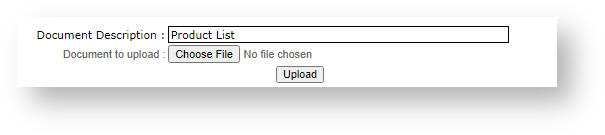
- In Document Description, enter a description of the file.
- Click Choose File.
- To add the document, click Upload.
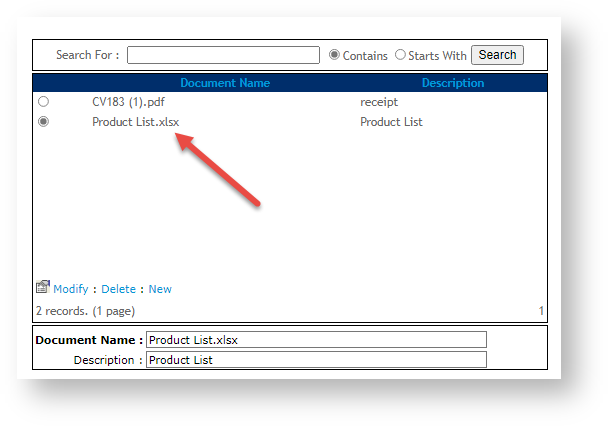
- The document is now listed and available for selection when creating an alert.
Add the Alerts Popup Widget
For the alert popup window to display, the Alerts Popup Widget must be added to either the Home Page or Theme template.
To add the Alerts Popup Widget,
- Go to the template you need (Content → Pages & Templates → Theme Layout OR Home Page).
- Click Edit.
- Go to the zone you want and click Add Widget. TIP- It does not matter which zone. The alert displays in the centre of the screen.
- Find the Alerts Popup Widget and add it.
- You can set display options in the widget.
Related help