Overview
Your BPD website features two types of menus: Whilst a standard website will generally only have one main product menu, you might have several content menus appearing in various places.Your site's footer probably has at least one section menu on it already.
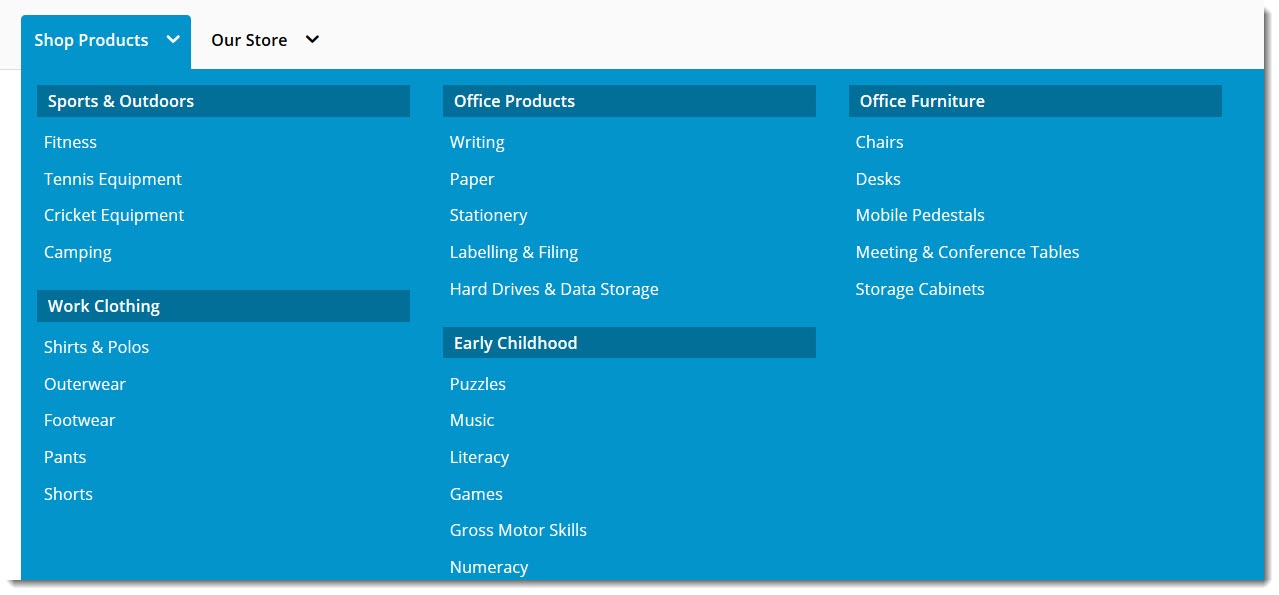
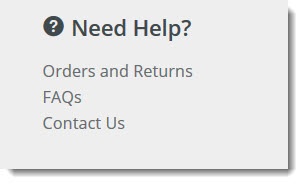
| Sample Navigation Menu | Sample Section Menu |
|---|---|
|
|
We've recently updated the UI for our Section Menu Editor in the CMS, so creating and editing your content menus just became a whole lot simpler.
Take a look.
Once the feature is enabled, you'll see a new 'Section Menu Editor' option under the Navigation menu in the CMS. Here's where both the classic menu editor and new Section Menu Editor now live (prior to the CMS upgrade, the menu editor sat under the 'Advanced Content' menu).

The new interface guides you through the creation of your menu, as well as the addition of each menu item.
Before you can take advantage of our new Section Menu Editor, you'll need to be running version 4.06 or higher. We'll also examine your current menu data prior to enabling the feature, to ensure a smooth transition from old to new.
Interested? Contact us to get started!
Creating a New Menu
- In the CMS, select Navigation → Section Menu Editor.
- Click Create New Menu.
- Give your menu a description / label.
- Save.
- Add Item to Menu.
- Give the new item a label and select the type of menu item you wish to add - page, product, category or link.
- The dropdown list of options will change depending on the menu type you choose - you can lookup products / categories, existing pages, or input a complete URL for a link.
Just remember:
- Valid URLs must start with either http:// or https://
- Javascript code must start with javascript:
- There are additional options for Pages:
- Include in Site Map
- Open in New Window (this option is also available for Links)
- Hidden
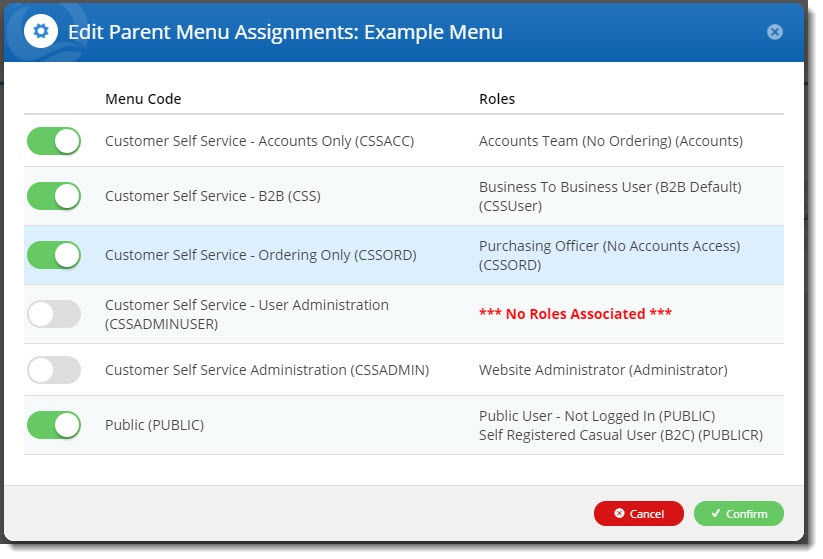
- Next, you can configure who can access this menu. Select Options → Associated Roles.
- By default, each item you add to a section menu will inherit the role permissions of the top level parent item. However, you can configure different access to individual menu items if required.
- When you first create a new section menu, it will be linked to ALL menu codes. You can toggle off the ones you don't want right here.
- Click Confirm, then repeat Step 5 onward to build out your section menu. You can even drag and drop the menu items to re-order them if you decide the sequence isn't right.
- Save your new menu.


Displaying a menu on your site
Once you've got a section menu, the next step is to display it on your site. You can do this in one of 2 ways: using a Section Menu widget, or including it with your site's Mega Menu.
Both options are covered below.
Using a Section Menu widget
A Section Menu widget can be placed virtually anywhere on your website, so it's the most flexible option for displaying a content menu.
- Navigate to Content → Page Templates and select the template you wish to display your menu on. You might choose the Theme Layout for your site's footer, or the content zone of your home page, for example.
- Scroll to the required zone and click Add Widget.
- Search for and select Section Menu widget, then click Add Widget.
- The widget configuration window will open automatically for you to adjust settings.
- Find the Section Menu Item Code field, and select your section menu from the dropdown list.
- Specify any remaining settings you require (icons, etc.), then if you're ready for this widget to display immediately, toggle the 'Enable widget on Save' setting at the bottom of the window and Save.

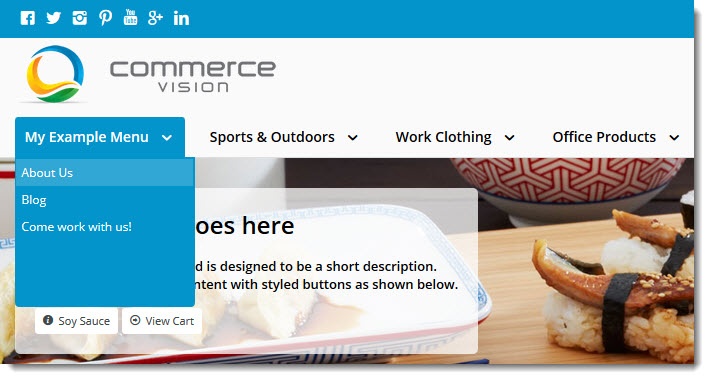
As part of the Mega Menu
If your website uses a Mega Menu (where your top level categories are listed individually, rather than in one big flyout), you can include a section menu within that same area.
You can configure the Mega Menu widget to display a section menu either before, or after the product categories.
- Navigate to Content → Page Templates.
- Select the Theme Layout.
- Locate the Mega Menu widget and click Edit.
- Select the Section Menu Settings tab.
- Configure options as required:
- Section Menu Item Code - select your section menu from this dropdown list.
- Append (display at the end) or Prepend (display at the beginning) your section menu to the Category menu.
- Enter a heading / label for the menu (optional). If you leave this blank, the label from the first menu item will display in its place.
- Enter a link for the menu heading (optional).
- Select an (optional) icon to display next the the heading.
- Select the position for the icon to display - left or right of the heading text.
- Save.
In order to see your changes reflected on the website, you may need to login / out - the Mega Menu widget is session cached. For more information on caching, see our article on Forcing A Cache Refresh.

Custom Pages - adding a page to a menu
Custom pages must be added to at least one menu when you create them. The steps below will outline how to add a page to a menu, whether it's brand new or you're editing an existing one.
- Navigate to Content → Page Templates → Custom Pages.
- Edit the page you require.
- Options → Page Properties.
- Scroll to the Add to a Menu section. You'll see the menus this page is currently accessible on, as well as an Add Menu option.
- Select the menu you'd like to add the page to. You can filter the dropdown options by choosing either Section menu or Navigation menu types.
- You have the option of adding the page to a menu but keeping it hidden, via the Hidden toggle.
- Click Add Menu.
Save & Exit.
Depending on the menu's location on your site, you may need to refresh the cache in order to see your page appear on the web.


Additional Information
| Minimum Version Requirements | 4.06.00 |
|---|---|
| Prerequisites | CV to evaluate your current menu data prior to live site upgrade and enabling of feature. |
| Self Configurable | No |
| Business Function | Marketing |
| BPD Only? | Yes |
| B2B/B2C/Both | Both |
| Ballpark Hours From CV (if opting for CV to complete self config component) | Contact CV Support |
| Ballpark Hours From CV (in addition to any self config required) | Contact CV Support |
| Third Party Costs | n/a |
| CMS Category | Navigation |