Overview
Customer Self Service features a Custom Catalogue functionality, whereby a specific 'basket of goods' can be created and made visible for a specific customer. Custom Catalogues can be assigned at a user level, customer level or role level. A single user can have access to as many custom catalogues as required. Also, a user can be denied access to the global (main) catalogue so that the custom catalogue is the only set of products the user can access. Custom Catalogues are defined in the web database only as the ERP does not support this functionality.
The instructions below refer to 'Advanced Catalogue Maintenance', available in versions 3.67 and above.
1. Create a Catalogue
To Create a New Custom Catalogue:
- Login as an Administrator.
- Navigate to 'Custom Catalogues' (CatalogueMaintenance.aspx).
- Click 'New'.
- Enter a value in the 'Catalogue Code' field. This will be the catalogue's unique identifier in the database.
- Enter a description in the 'Description' field. This will be the name displayed to users with access to the catalogue.
- Click 'OK' to create and save the new catalogue.
Once the Catalogue has been created, it can be configured with a category structure and populated with products.
The advanced Catalogue Maintenance screen will display the catalogue in Tree View. Top Level categories are referred to as Parents, and sub-categories are Children.
The 'Help' link in the top menu bar contains useful hints and file format requirements.
2. Add Categories
To Configure a Custom Catalogue:
- Login as an Administrator.
- Navigate to 'Custom Catalogues' (CatalogueMaintenance.aspx).
- Search for the Catalogue either by Code or Description.
- Select the Catalogue record via radio button.
- Click 'Configure Catalogue'. The advanced catalogue maintenance screen will load.
Click the 'here' link to begin creating categories.

The first category will appear. Select the category name and overwrite it as required (no commas or backslashes should be used).
Right-click on the category which has just been created, and select one of the following options to create another category:
- New Child Category
- Copy Category
New Parent Category
When creating a new Child category, be sure to right-click on the Parent category to which it belongs, before selecting 'New Child Category'. This will ensure the hierarchy is as intended.
- For each new category created, assign a name.
- Click the 'Save' button.
(video contains no audio)
3. Add Products to Categories
After creating categories, the next step is to populate those categories with products. Adding products can be done manually, or via Import.
To manually populate a category with products:
- Login as an Administrator.
- Navigate to 'Custom Catalogues' (CatalogueMaintenance.aspx).
- Search for the Catalogue either by Code or Description.
- Select the Catalogue record via radio button.
- Click 'Configure Catalogue'. The advanced catalogue maintenance screen will load.
- Click on the Category to which products will be added.
- Click the 'Products' tab.
- Search for a product by entering the code or description into the 'Search' box.
Select the required records from the search results list. Selections will be highlighted.
Multiple records can be selected using 'Ctrl' + click. The 'All' link will select EVERY record in the result list; the 'None' link will de-select all records.
- Click the 'Add' button to add selected products to the Category.
- Click 'Save' to save changes.
- Repeat Steps 6-11 to add products to other categories within the Catalogue.
(video contains no audio)
Import Categories & Products
If there are a large number of products to be added to a catalogue, it may be more efficient to perform an import.
Product imports can be done either category by category, or the entire catalogue contents imported in bulk. Both methods are detailed below.
4. Grant Users Catalogue Access
In Customer Self Service, access to Custom Catalogues can be configured in one of two ways:
- Customer Level - ALL users attached to a Customer Code can be granted access to a catalogue by making the catalogue their default.
- User Level - Custom catalogue access can be configured on a user-by-user basis. This is useful where multiple users are attached to a Customer Code, but only some require access to the custom catalogue.
Assign a Catalogue at the Customer Level:
- Login as an Administrator.
- Navigate to 'Accounts' --> 'Customer Maintenance' (/CustomerMaintenance.aspx?mode=admin).
- Search for the required Customer Code.
- Select the record via radio button.
- Click the 'Catalogues' tab.
- Click 'New'.
- Select the required catalogue from the drop-down list.
- Tick the 'Default' flag.
- This ensures ALL users attached to the Customer Code have access to the catalogue, and will automatically view this catalogue upon login.
Click 'OK' to save.
Attaching a Catalogue to a Customer Code will not grant all users access unless the 'Default' flag is set to Yes

Assign a Catalogue at the User Level:
- Login as an Administrator.
- Navigate to 'Accounts' --> 'Advanced User Maintenance' (/UsersMaintenance.aspx?mode=admin).
- Search for the required user.
- Select the record via radio button.
- Click the 'Accounts' tab.
- Select the required Customer Code via radio button.
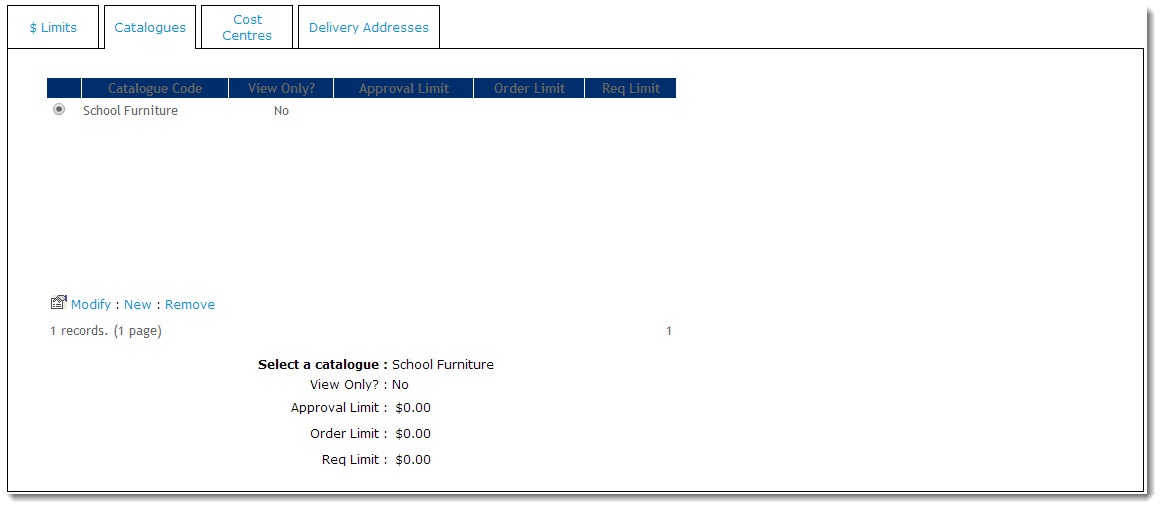
- Click the 'Catalogues' tab.
- Click 'New'.
- Select the required catalogue from the drop-down list.
- Tick the 'View Only?' flag if the user requires viewing but not ordering access.
- Set the dollar value limits if Basic Order Approvals are in use for the catalogue (see Enabling order approvals for further information):
- Approval Limit
- Order Limit
- Req Limit
- Click 'OK' to save.
User catalogue access is configured per Customer Code, allowing a user attached to multiple Customer Codes to access a specific catalogue depending upon the account they are logged in against.
Therefore, if a user with multiple Customer Codes requires access to a particular catalogue across all accounts, access will need to be configured against each Customer Code the user is attached to.
Additional Information
--
| Minimum Version Requirements |
|
|---|---|
| Prerequisites |
|
| Self Configurable |
|
| Business Function |
|
| BPD Only? |
|
| B2B/B2C/Both |
|
| Third Party Costs |
|
Related help