Overview
The Table Maintenance feature is available only to websites on versions 4.29+. As a Table Maintenance solution is always custom, consultation with Commerce Vision is required to implement this feature.
As you may know, much of the content published on your website, whether for products, users etc, are stored as records in database tables. Each record contains data organised across several fields. Certain tables and fields come standard for your Customer Self-Service eCommerce Platform website functions. For instance, a product's details are stored in a table with various fields for description, images, product code, and so on. But every business is unique and for some functions, having custom fields or even custom tables might be the solution. In fact, your site may already be using some non-standard fields, e.g., through Field Groups.
What if your business wants to be able to add and maintain records from a non-standard table online? The Table Maintenance feature provides a simple integrated way to do just this in the CMS. What a custom table is for depends on your specific business needs! It could be a table from the ERP that would be useful for your staff to access online. Or it could be a completely new table with a new function that will be maintained and accessed entirely online.
Once implemented by Commerce Vision, Table Maintenance lets Administrators add one or more custom tables and records to the CMS, as well as set permissions for record maintenance and viewing.
Configure Table Maintenance Settings
NOTE - This guide assumes that Commerce Vision has configured the required custom tables and fields to be made available for selection in the CMS.
Configuration of settings is available only to Administrators. Table Maintenance settings are used to add and arrange available tables so they are displayed in the CMS menu as you want them, and to select what functions are available online (to each table's fields) to maintain records.
1. Enable Table Maintenance
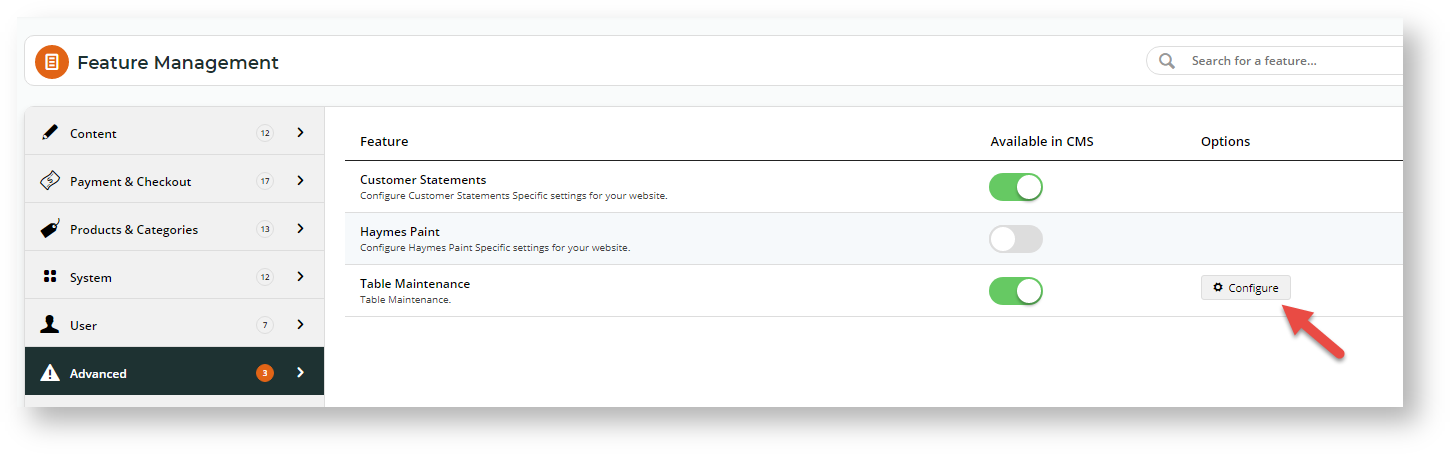
- In the CMS, navigate to Settings → Feature Management → Advanced.
Toggle ON Table Maintenance to enable it in the CMS. (If you have any tables set up already, they will now be visible in the CMS navigational menu.)
- Click Configure.
- In the Table Maintenance Features Settings screen, toggle ON Enable Table Maintenance to switch on Table Maintenance on your site and enable Table Maintenance settings.
- To save this setting, click Save or Save & Exit. Table Maintenance is now enabled in the CMS and on your website.

2. Add and configure a table
NOTES - Table Maintenance must be enabled (Step 1). Available tables have been flagged for editing only by Commerce Vision. They cannot be created or deleted.
This step allows you to add or edit a table, configure its location on the CMS navigation bar, and set record access and editing functions. When a table is added, the system creates a Searchable List page for all its records. The User can select an available record to view or edit it. Depending on settings, they can also create new records.
In the Tables panel of the Table Maintenance Features Settings screen, click Add Table.

Any tables already set up are listed and can be edited or deleted. If you want to edit an existing table, click the table's Edit button. You can see the list of added tables once you enter the Table Maintenance Features Settings screen.
In this example, each line represents an added table. To edit a table, click its Edit button.
- Whether you're adding or editing a table, you will be taken to the Custom Table Header page. Here, you can configure:
(i) whether the table is active (is visible) in the CMS or not,
(ii) the table's page location on the CMS navigation menu,
(iii) the page title for the table as a page,
(iv) what fields Users can search by when looking up records,
(v) the range of functions available for each field for record maintenance.

(i) Make a table page active/inactive
- In Table Available for Maintenance, select an available table.
- Toggle Is Active ON or OFF. If active, the table's page is included in the navigation bar, and its Search and Edit pages to be displayed in the CMS. If inactive, the table page cannot be accessed in the CMS and is hidden on your website.
(ii) Configure a table's location on the CMS navigation menu
This setting configures the location of the table on the navigation bar for Users to access records.
- In Table Available for Maintenance, select an available table.
- In Sequence, add a number. This orders the appearance of table as a menu item on the parent menu when there are more than one menu item.
In Page Icon, select an icon to display next to the menu item name.
In Menu Group, select the CMS main menu under which this table will be grouped.
In Menu Parent Item, enter the name of parent menu item.
In Menu Label, enter the name of table as menu item.

(iii) Add the page title name for the table
- In Table Available for Maintenance, select an available table.
- In Page Title, enter a heading name for the table page.
In Page Title Suffix, enter the record description that is appended to the page title in the record details page. Default: the placeholder: {Description}. This retrieves the existing description of the record from the database.

(iv) Configure fields for Search and Edit records
When a User first enters a table's maintenance page, they see the records list. They can then find the record they want to view or update, then click Edit to enter into the record's details. What the user can see and do in both the Search List and record detail page are set here.
To configure fields:
- In Table Maintenance Tables, click Edit for a table.
- Scroll down to the Search and Edit Fields section. You will see a summary of the field names and prompts (what names Users will actually see) and access and editing permissions for the Search Fields and the Edit Fields.
- To edit the fields, click the Configure Search & Edit Fields button. The Select Fields window, displaying all fields now appears.
You can do the following:
- change the field name (Prompt) displayed to users (by editing each Prompt)
- select which fields will be viewable and searchable on the Search List (by toggling ON/OFF each setting)
- select which fields will be viewable, can be edited (or Read Only), and must not be blank (Mandatory) (by toggling ON/OFF each setting).
- To save your settings, click OK.
- When you have finished configuring the table, click Save or Save & Exit to save any changes.


Once your tables have been set up as you want them, its records can be accessed via the navigational menu by Users with Table Maintenance Roles.
Allow a CMS User access to Table Maintenance
Administrators can specify which CMS Users can access to Table Maintenance. This is based on Role settings.
- Table Maintenance Management - can view and edit record
- Table Maintenance Viewer - can view records only
Refer to the CMS User guide for help in setting a Role for a CMS User,
Additional Information
| Minimum Version Requirements | 4.29 |
|---|---|
| Prerequisites | |
| Self Configurable | Yes after initial consultation |
| Business Function | Content |
| BPD Only? | Yes |
| B2B/B2C/Both | Both |
| Ballpark Hours From CV (if opting for CV to complete self config component) | Contact Commerce Vision |
| Ballpark Hours From CV (in addition to any self config required) | Contact Commerce Vision |
| Third Party Costs | n/a |
| CMS Category | -- |
Related help