Overview
Checkout messages are displayed to the user when they are finalising their order. For instance, they can be used to communicate:

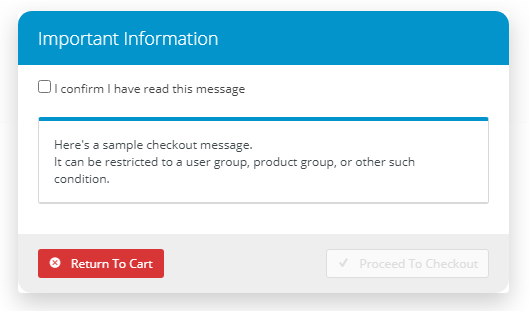
NOTE - There is an option to add a confirmation message and checkbox in the checkout message. If this is enabled, the user must acknowledge they have read the message to continue with Checkout. The confirmation text can be edited in the Checkout Messages Widget.
Checkout messages can be shown to all users at the checkout stage but a message can be configured so that it is shown only when certain criteria are met. For example, you can set messages for:
- orders with products from a specific category;
- specific customers;
- orders containing specific products;
- orders over/under/between certain dollar values.
NOTE - If two or more set messages are applicable to an order, both messages will appear in the checkout message box.
Step-by-step guide
1. Create a Checkout Message
- In the CMS, navigate to Settings → Checkout Messages.
- Click New.
- In Message, enter the message to be displayed to the user.
- Use Sort Code/Mask to define a product category:
- enter the sort code for one category of products,
- enter '%' for ALL products in all categories,
- wildcards for multiple categories, i.e., 'SX123%', or
- leave blank if using an 'Override Query'.
- For Is Plain Text?:
- Tick for the message to be displayed in plain text with no applied formatting.
An example is the default message:Untick for the message formatting to be rendered by any HTML tags added. Most HTML element properties will be guided by your site style. Formatting allows content to visually stand out more and be customised to suit purpose.
Imagine how you want your message to look. You may want some parts to stand out more than others. Or for a certain sentence to appear bigger than others. Or want to add some white space between certain sections.
Add HTML tags
In most cases, you put the text you want to format between opening and closing HTML tags. Each HTML tag is a special word or letters surrounded by angle brackets, < and >. For example, if we add a word 'IMPORTANT' to the default message and want to bold it, we put the bold opening and closing tags before and after the word: <b>IMPORTANT</b>. A closing tag has a forward slash '/' before the special word/letter and the closing angle bracket.

A few tags don't need opening and closing tags. The most useful may be <br/>, which puts a line break where it appears. Suppose we want a break after 'Here's a sample message.'
Nesting tags
List of useful HTML tags
Here are some basic HTML tags you can use to style your checkout messages. Play around with formatting options to achieve the look you want.
Function HTML tag Example Grouping Content <div></div> Headings <h1></h1>
<h2></h2>
<h3></h3>
Paragraph <p></p> Lists Define the List type, then each list item is contained within <li></li>
Unordered list (no special order or sequence for items in list. Default: listed items to start with a bullet point. <ul></ul>
Ordered list. Default: listed items are numbered. <ol> </ol>
Typeface <b>bold</b>
<i>italics</i>
<u>underline</u>
- For Requires User Confirmation:
- Tick to display a checkbox that the user must tick before being allowed to continue
- Untick for the message to display without confirmation from the user
Enter an 'Override Query' if required. NOTE - This field works together with Sort Code/Mask. See Defining the criteria for checkout messages below.
An override query is used to define alternative criteria to be met before the message is displayed to the user.
The following tables can be used:
ProntoSalesOrder
ProntoSalesOrderLine
Customer
ProductAn example would be:
product.conditioncode = 'T'
See more examples below.
- For Applies to Mode, set whether the message applies to B2B, B2C or both user roles.
- (For classic sites only. Leave blank for BPD sites.) For the Top Template (displayed below the message), select the required template, if applicable.
- (For Pronto only.) For Field Group Name, select the fieldgroup that is defined on the prontosalesorder table to be displayed along with the message.
- (For classic sites only. Leave blank for BPD sites.) For the Bottom Template (displayed below the message), select the required template, if applicable.
To save these changes, click OK.

Defining the criteria for displaying checkout messages
When setting up a checkout message, the 'Sort Code/Mask' and 'Override Query' fields are used to define the criteria for whether or not a checkout message is displayed to the user. The following values will provide an example of how to display a checkout message for various scenarios.
Checkout Message Examples
You might find these scenarios helpful when creating your own Checkout Messages.
When a Product in a specific Category is in the Cart:
- 'Sort Code/Mask': Enter the Category code. i.e. SX123456
- 'Override Query': Leave blank.
When a Product under a higher level Category is in the Cart:
- 'Sort Code/Mask': Enter the Parent Category code and add a percentage sign to indicate any categories under that tree. i.e. SX12%
- 'Override Query': Leave blank.
For a specific Customer:
- 'Sort Code/Mask': Leave blank.
'Override Query': Enter the following query and substitute ABC123 for the customer code.
Code = 'ABC123'
When a specific Product is in the Cart:
- 'Sort Code/Mask': Leave blank.
'Override Query': Enter the following query and substitute AB-12345 for the product code.
productcode = 'AB-12345'
When one (or more) of several Product is in the Cart:
- 'Sort Code/Mask': Leave blank.
'Override Query': Enter the following query and substitute 'CV120','CV200','CV250' with your own product codes (comma-separated)
productcode in ('CV120','CV200','CV250')
When the Cart Amount is greater than $200.00 Ex Tax:
- 'Sort Code/Mask': Leave blank.
'Override Query': Enter the following query.
(soOrderTotalAmount-SoOrderTotalTax) > 200
2. Enable Checkout Message
Displaying the Checkout Message is enabled by adding the Checkout Messages widget in the relevant template, e.g., Cart. Further display options are also available in the widget. See the help page for the Checkout Messages widget.
Additional Information
| Minimum Version Requirements |
|
|---|---|
| Prerequisites |
|
| Self Configurable |
|
| Business Function |
|
| BPD Only? |
|
| B2B/B2C/Both |
|
| Ballpark Hours From CV (if opting for CV to complete self config component) |
|
| Ballpark Hours From CV (in addition to any self config required) |
|
| Third Party Costs |
|
| CMS Category |
|
Related help