Banners on CV ecommerce
What you'll need before you start
Images for your banner(s). To maximise image download efficiency on your customer device, create different versions for each device type.
Follow this guide:
See also: Image Optimisation
1. Enable and configure Banners
Before you can create and edit banners, the Banners feature must be enabled. Once enabled, Banner Maintenance displays as a submenu item in the Content menu.
To enable Banners:
- Go to Settings → Feature Management → Content.
.- Ensure Banners is toggled ON.
- Click Configure.
- In Banner Feature Settings, toggle ON to allow banner filters. This lets content creators restrict a banner to a subgroup of Users.
TIP - The Maintain Banner Types button provides direct access to the Banner Type Maintenance screen. See: Create a Banner Type.- To save your settings, click Save & Exit.
2. Create a Banner Type
A 'banner type' is one or more banners grouped together. Keep in mind that when you add a banner feature to a page or template, a banner type is what is selected.
This step creates a banner type. Maintain Banner Types is accessed on the Banner Settings or the Banners Maintenane page.
If you already have the Banner Type set up and just want to add a new banner to an existing one, go to Step 3.
- In the CMS, go to Content → Banners.
- Click Add New Banner Type.
- Enter a unique Code and Name for the new type, and assign an Icon if you wish. 'Name' and 'Icon' display when selecting a banner type for a page.
- Click Save.
- The new banner type displays in the Banner Type Maintenance list. From this page, Edit a banner type.
Upload an Image Banner
- In the CMS, go to Content → Banners.
- Click Edit for the banner type.
- Click Add New Banner.
- Enter the Banner Details:
Description - Short description to identify the image or video
Banner Link - The URL, /category, or /product page linked to
Banner Link Open in New Window - toggle ON for linked page to open in new window
Start Date - (optional) Date banner is visible on your site
Expiry Date - (optional) Date banner is automatically removed from your site- Image upload
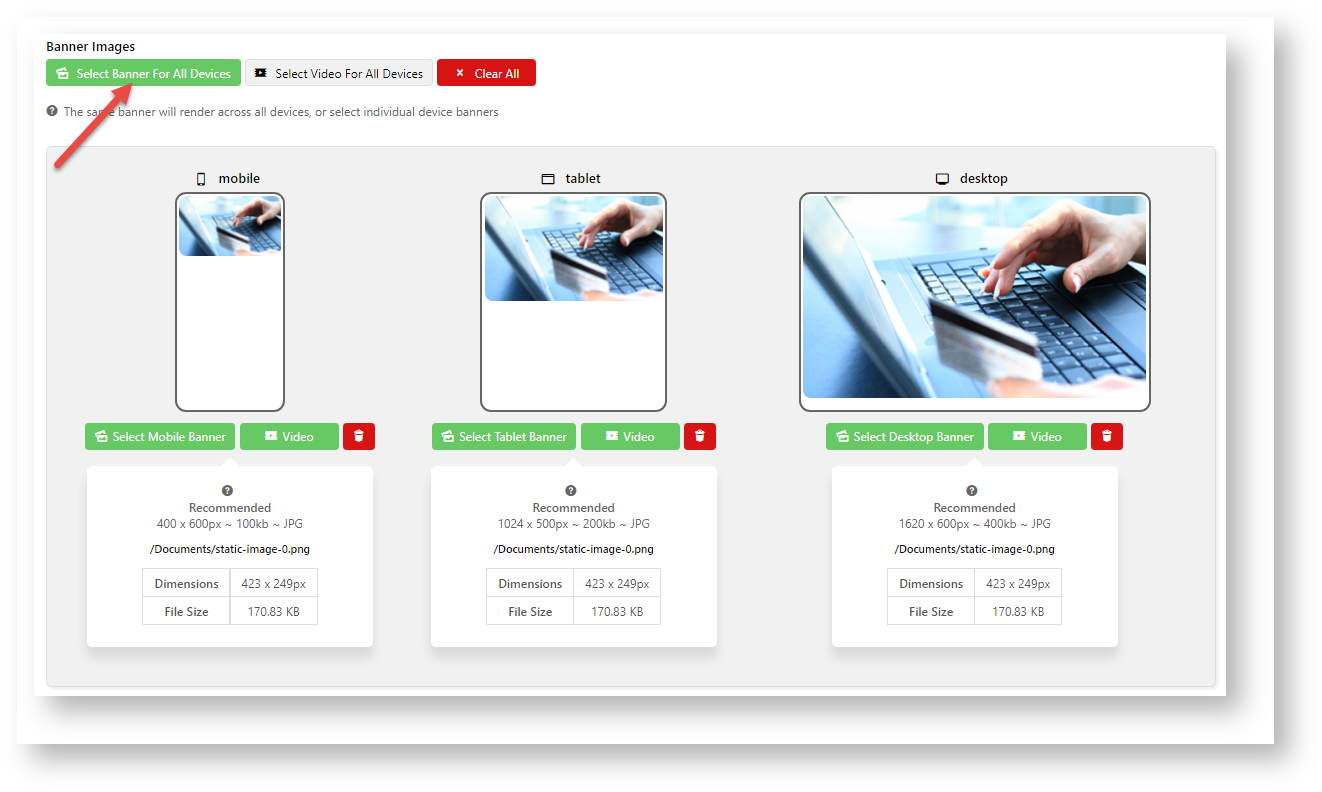
- To upload the same image for all device types, click Select Banner for All Devices. (To upload a different image each device type, go to step 5(b).)
Example: same image for all devices- To upload a different image file for each device type, click their Select Banner. TIP - For efficient download, use the ideal file size and dimensions in 'Recommended' for each device type.
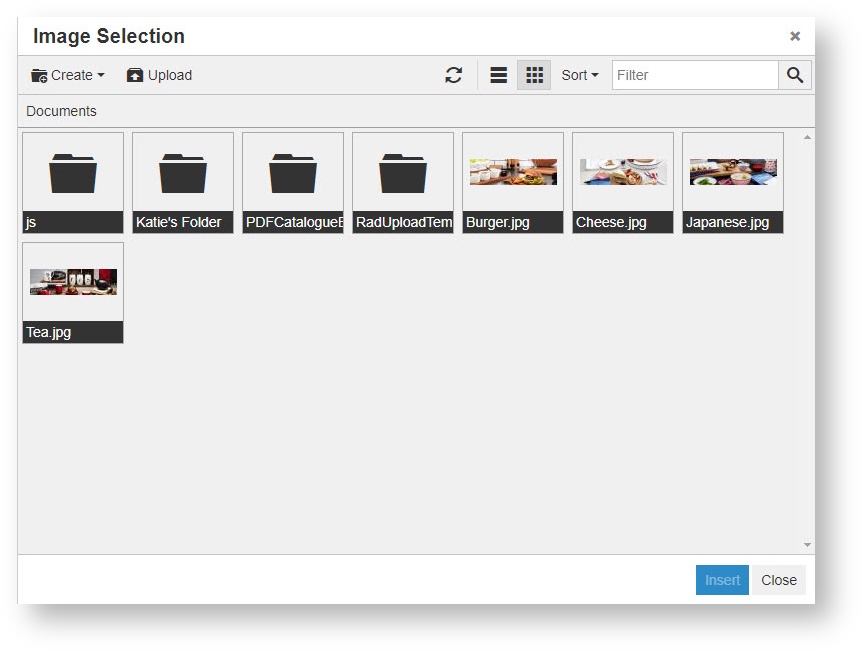
- In Image Selection, select and insert a previously uploaded image. To upload a new one, click Upload.
- Upload the image, then click Insert.
- Enter Overlay content if required. This will appear on a transparent panel over your image.
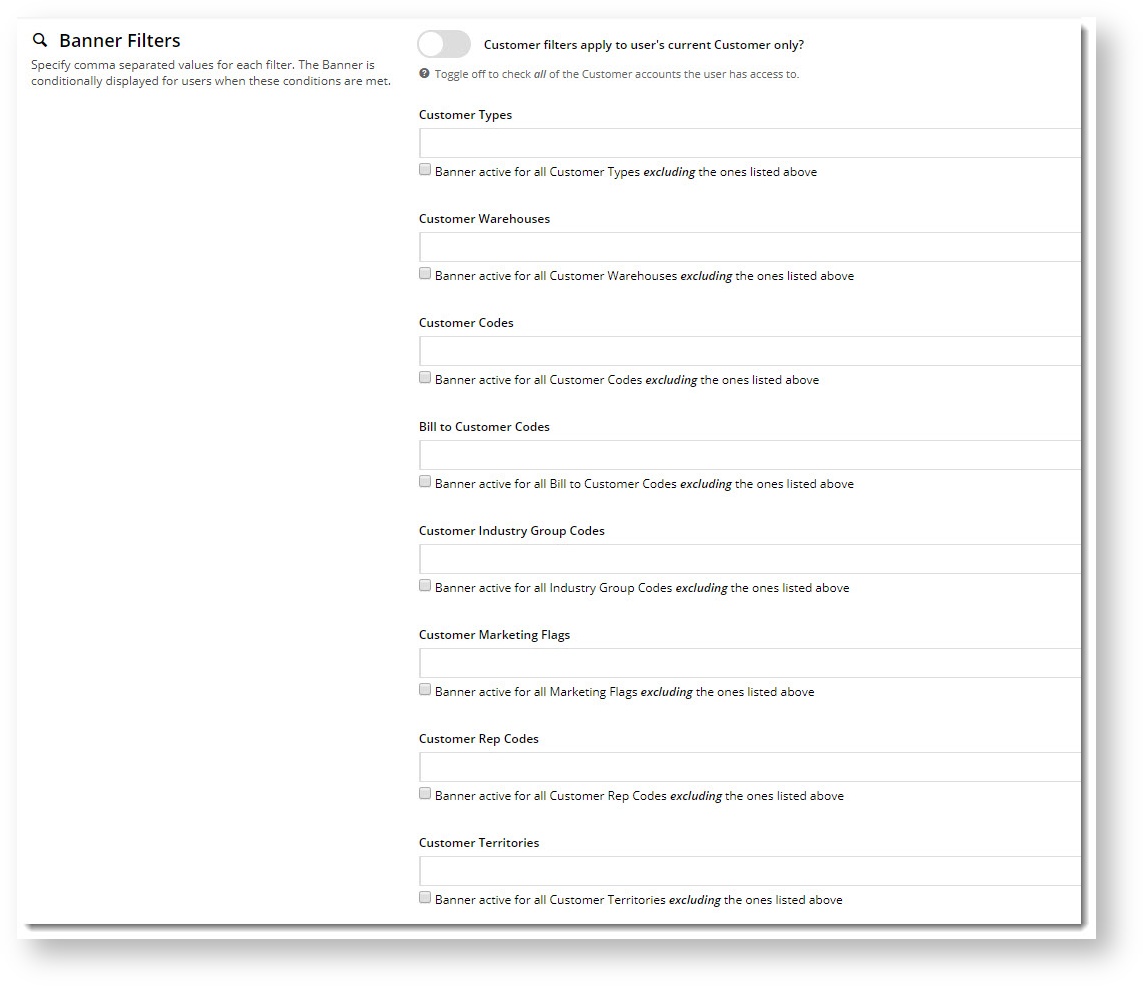
Example of Overlay- If this banner is not for all users, use the Banner Filters section to define user groups. The filter fields correspond to your ERP fields. Not all fields may be in use on your website. Multiple values, separated by commas, can be entered in a field.
- Customer filters apply to user's current Customer only? - Toggle ON if users with multiple customer accounts should see this banner only if they are currently in a Customer account that has been given access. OFF - if a logged in user switches to a Customer Account that does not have access to the banner, they will still see it.
- Click Save & Exit.
- You'll see the newly added banner listed on the Maintenance page, with a coloured tile to indicate whether it's Active, Scheduled, or Expired.
- Repeat Steps 3-11 to add more images if this is a slider banner. You can drag and drop banners to re-sequence them if required.
Add a Video Banner
This option embeds an externally hosted video (Vimeo or YouTube) into the banner area, allowing it to be played on your website.
- In the CMS, go to Content → Banners.
- Click Edit for the banner type.
- Click Add New Banner.
- Enter the Banner Details:
Description - Short description to identify the image or video
Banner Link - The URL, /category, or /product page linked to
Banner Link Open in New Window - toggle ON for linked page to open in new window
Start Date - (optional) Date banner is visible on your site
Expiry Date - (optional) Date banner is automatically removed from your site- Video Upload
To upload one video for all device types, click Select Video for All Devices. To upload a different video for each device type, click Video for the device type.Enter video link details.
Video Type - select YouTube or Video.
Video Title / Description - enter name for video.
Video ID - enter Video ID from video source. NOTE - do not add the whole URL.
Click Save.
Once your banner(s) have been created, you can add the banner type to a page or template.
Related Resources


