...
- Login as an Administrator.
- Navigate to 'Settings' --> 'Settings' (/zSettings.aspx).
- Click the 'Integration' tab.
- Click the 'Items' tab.
- Update the 'Contract Item Source' by selecting an option from the drop-down list: (this determines the Contract Item source for 'Display Contract Items First' and 'Contract Items Only' functions).
- Debtor Contract
- Custom Pricing
- Click the 'Update' button at the bottom of the page to save.
- Navigate to 'Accounts' --> 'Role Management' (/zRoles.aspx).
- Select the required role via radio button.
- Click the 'Functions' tab.
- Click 'Modify'.
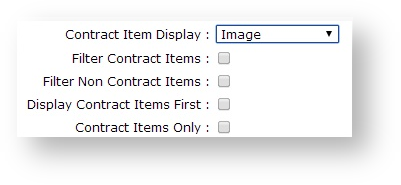
- Update the setting 'Contract Item Display' by selecting an option from the drop-down list:
- None - no highlighting of contract items.
- Image - displays an image linked to the PRONTO special price rule.
- Update 'Filter Contract Items' - when ticked, places a link above the Product Grid enabling users to filter out Non-Contract Items so that only Contract Items are displayed.
- Update 'Filter Non Contract Items' - when ticked, places a link above the Product Grid enabling users to filter out Contract Items so that only Non-Contract Items are displayed.
(NOTE - these two flags require a token on the page template in order to render properly. Contact our Support Team for assistance.)- Update 'Display Contract Items First' - elevates Contract Items to the top of the search results grid or product category display.
- Update 'Contract Items Only' - limits product display to Contract Items only. (NOTE - this flag can also be set at User level, overriding the system setting)
- Click 'OK' to save.


...