Customer Self Service allows for Contract Items to Contract products can be highlighted on the web, so that customers are able to easily identify those products for which they receive special pricing or contract terms.
Step-by-step guide
To Highlight highlight Contract Items:
- Login as an Administrator.
- Navigate to 'Settings' --> 'Settings'As Administrator, go to Settings → Settings (/zSettings.aspx).
- Click the 'the Integration' tab.
- Click the 'the Items' tab.
- Update the 'Contract Item Source' by selecting an option from the drop-down list: (this determines the Set the Contract Item source (for 'Display Contract Items First' and 'Contract Items Only' functions) .to either:
Click the 'Update' button at the
- Debtor Contract
- Custom Pricing
- bottom of the page to saveTo save, click the Update button.
- Navigate to 'Accounts' --> 'Go to Accounts → Role Management' (/zRoles.aspx).
- Select the required role via radio button.
- Click the 'the Functions' tab.Click '
- Click Modify'.
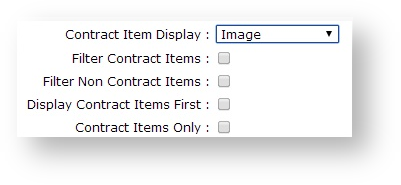
- Update the setting 'Set Contract Item Display' by selecting an option from the drop-down list to either:
- None - no highlighting of contract items.
- Image - displays an image linked to the PRONTO special price rule.
- Update 'Set Filter Contract Items' - when . When ticked, places a link is placed above the Product Grid enabling users to filter out Non-Contract Items so that only Contract Items are displayed. Update '
- Set Filter Non Contract Items' - when . When ticked, places a link is placed above the Product Grid enabling users to filter out Contract Items so that only Non-Contract Items are displayed.
(NOTE - these These two flags require a token on the page template in order to render properly. Contact our Support Team Commerce Vision for assistance.)- Update 'Display If Contract Items First' - elevates Contract Items to the top of the are to be listed first in the search results grid or and the product category displaypage, set Display Contract Items First.
- Update 'Contract Items Only' - limits product display to Contract Items onlyTo limit products displayed to Contract Items only, set Contract Items Only. (NOTE - this This flag can also be set at User level, overriding the system setting.)
- Click 'OK' to saveTo save, click OK.

If 'Image' is selected as the Contract Item Display method, an image file will need to be uploaded. This will be a small icon used to highlight contract items.
First, upload the image file to 'General Images'.
- Login as an Administrator.
- Navigate to 'Preferences' --> 'Go to Preferences → Upload General Images' (/zImages.aspx).Click '
- Click New'.Click
- the 'Choose File' button to browse to To browse the image file, click Choose File.
- Enter In ImageDescr, enter an image description in the 'ImageDescr' field.
- Click the 'the Upload' button.
...
Once the image has been uploaded, it can be linked to a PRONTO Custom Pricing code.
- Login as an Administrator.
- Navigate to 'Settings' --> 'Settings'Go to Settings → Settings (/zSettings.aspx).
- Click the 'the Integration' tab.
- Click the 'the Items' tab.
- Scroll to the 'the Contract Price Codes' tab.Click '
- Click New'.
- Enter the values as required:
- Code - enter the Pronto Custom Pricing Rule code with which to associate the image.
- ContractType - leave blank (field no longer in use).
- Alt Tag - enter an image description.
- Image - enter the image file name or click the '..' button to search.
- Click 'OK' to saveTo save, click OK.

Related
...
Resources
| Content by Label | |||||||||||||||||||||
|---|---|---|---|---|---|---|---|---|---|---|---|---|---|---|---|---|---|---|---|---|---|
|