The Customer Self Service eCommerce Platform allows Admin to set pickup ('Click and Collect') locations that can be selected by Users during checkout. All locations (stores, warehouses, etc) must be entered and enabled on your website.
Please note that the Store Pickup functionality is not compatible with Live Freight. If your BPD site uses Live Freight and you are interested in implementing Store Pickup functionality, please contact us to discuss customisation options.
Need more pickup location flexibility?
An advanced option is also available for sellers that have more than one possible pickup location in a particular area. For example, suppose your business has a complex network of stores and distribution warehouses in the same city. A customer has selected a particular store for pickup. However, it may be make more business sense for collection to be at the area's distribution warehouse, e.g., for stock availability reasons. Overrides can be set so that the customer will automatically be diverted to the warehouse address for pickup.
To use this option, please consult with Commerce Vision so that your site is configured correctly, override pickup locations are set against stores and your business rules are applied.
Step-by-step guide
This guide details how to set up a new Store Location and maintain existing locations for sites on our Best Practice Design (BPD) websites.
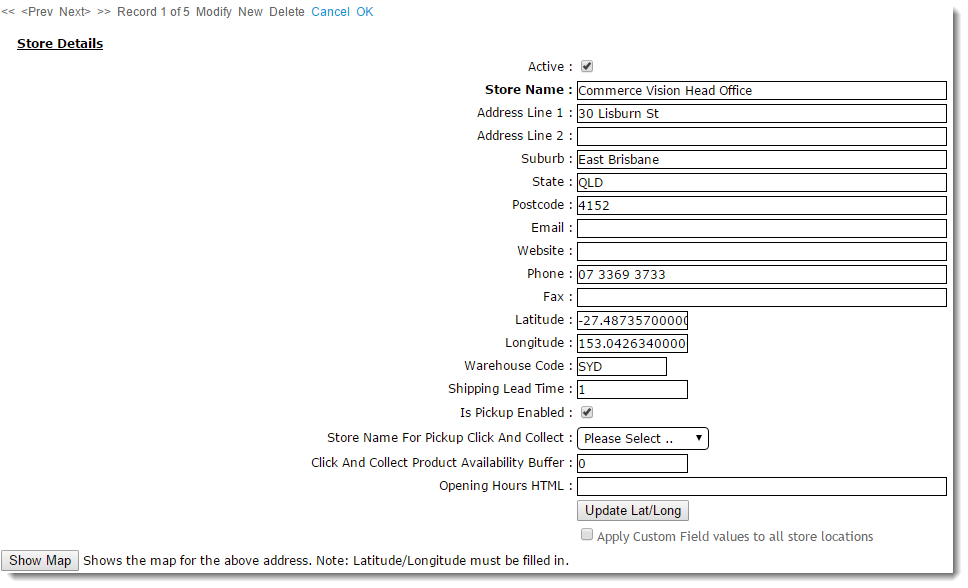
Create a New Store Location
- In the CMS, navigate to Settings → Store Locator.
- Select the 'Store Locator' tab.
- Click 'New'.
- Enter the Store Name, Address, and contact fields.
- Enter the 'Latitude' and 'Longitude' values (this site may be helpful - http://www.latlong.net/)
- Enter the 'Warehouse Code' - ERP warehouse value.
- Enter the 'Shipping Lead Time' - the number of days required to process and ship an order from this warehouse from when it is first submitted.
- (Optional) Tick 'Is Pick-up Enabled' to activate this location for Click & Collect.
- (Optional) Set the 'Store Name For Pickup Click And Collect'. This provides an alternate pickup warehouse for this location (e.g., if it is suitable for pickup. You can also set this alternative warehouse to default instead of the store location. See CV Support for details.)
- (Optional) Set the 'Click And Collect Product Availability Buffer'. This is an optional product buffer value specific to this warehouse, and overrides the value in System Settings.
- Click OK to save.
Maintain Pickup Warehouses / Store Locations
- In the CMS, navigate to Settings → Store Locator.
- Search for the required store or click 'Search' to display all current records.
- Select the required store record. The 'Store Details' tab will load.
- Click Modify.
- Tick or untick the setting labelled 'Is Pick-up Enabled', as required. The 'Is Pick-up Enabled' setting will integrate to the PRONTO 'StoreLocation' table for the edited Warehouse Code/Store Location.
- Click OK to save.
If you're implementing Store Pickup functionality for the first time, contact us to verify your site's pickup availability calculation is correct.
Our Support Team may need to enable a flag that instructs your site to calculate stock availability based only on the user's store (rather than all warehouses) when the products in their cart are set for pickup.
Related Help