Customer Self Service allows for the option of store pickup for customers during checkout. This feature is commonly referred to as 'Click & Collect'.
In addition to configuring the site to offer store pickup, the various warehouses or store locations need to be enabled so they are presented as an option during checkout.
This guide applies to sites using Commerce Vision's 'Best Practice Design' (BPD) framework only.
Step-by-step guide
To create a new Store Location:
- Login to the CMS.
- Navigate to 'Settings' --> 'Store Locator' (/StoreLocatormaintenance.aspx).
- Select the 'Store Locator' tab.
- Click 'New'.
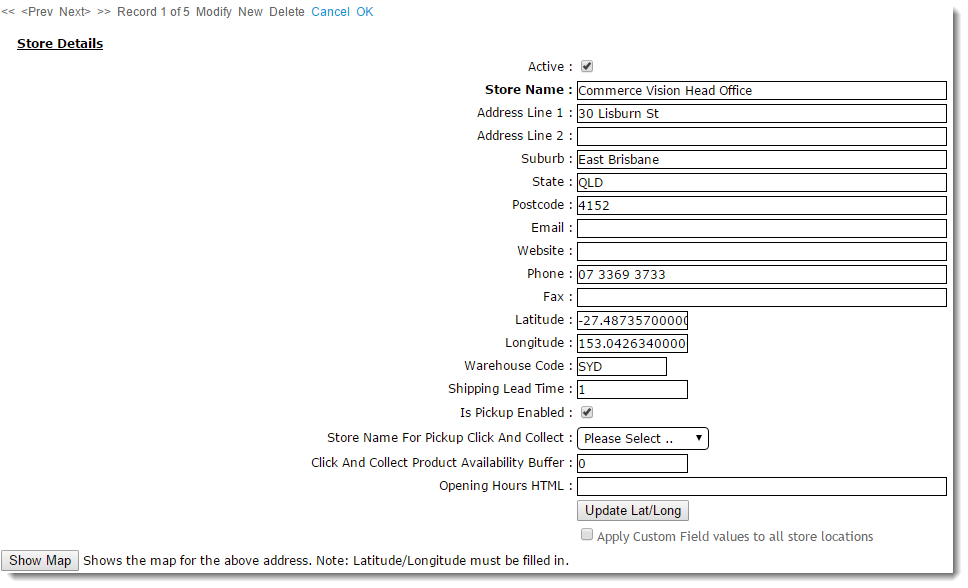
- Populate the Store Name, Address, and contact fields.
- Populate the 'Latitude' and 'Longitude' values (this site may be helpful http://www.latlong.net/)
- Populate the 'Warehouse Code'.
- Populate the 'Shipping Lead Time' (the number of days required to process and ship an order from this warehouse from when it is first submitted).
- Tick the 'Is Pick-up Enabled' setting to activate this location for Click & Collect.
- Click 'OK' to save.
To Maintain Pickup Warehouses:
- Login to the CMS.
- Navigate to 'Settings' --> 'Store Locator' (/StoreLocatormaintenance.aspx).
- Search for the required store or click 'Search' to display all current records.
- Select the required store record. The 'Store Details' tab will load.
- Click 'Modify'.
- Tick or untick the setting labelled 'Is Pick-up Enabled', as required.
- Click 'OK' to save.
The 'Is Pick-up Enabled' setting will integrate to Pronto's 'StoreLocation' table for the edited Warehouse Code/Store Location.
Related articles