Maintaining Subscription Products
Just like other products on your website, Subscription Products are maintained in Product Maintenance - used for setting where, how and what will be displayed for a product on your website. When the Product Subscriptions feature is enabled, a product can be set as a subscription product.
With this toggle enabled, subscription-related options such as setting time frames and auto-renewal automatically display. If a Subscription Product has more than one purchasing option, the product and options (variants) need to be organised in a Master/Child product relationship. (You will be familiar with this if you have used the Product Variants feature.) Here is an example.
Example
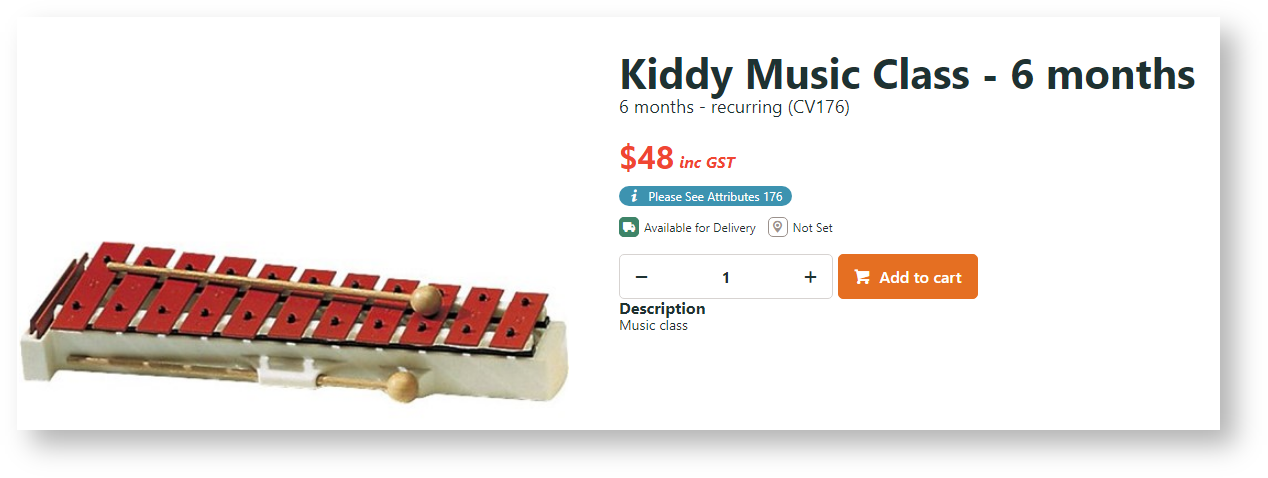
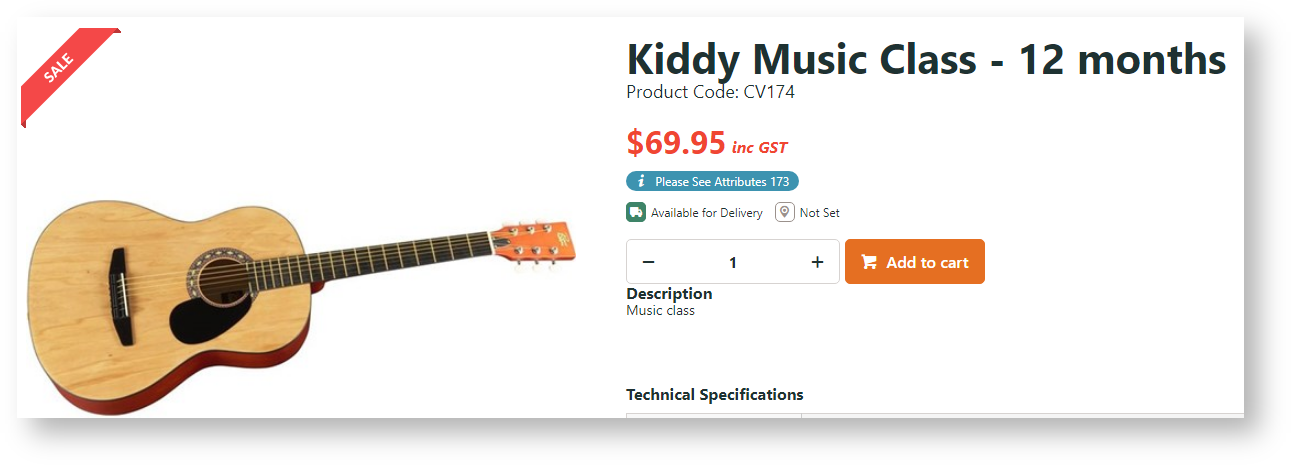
Company ABC Music wants to sell access to their toddler music class. Options are a 6 or 12 month membership on an auto-renewal basis as well as a one week trial. Each option will be set as a unique combination of a 'time frame' and 'recurring' (auto-renew on expiration).
Time frames are manually set to suit specific the product variant offerings. Here, we have set up three time frame values: '6 months', '12 months' and '1 week'.
| Variant | Value |
|---|---|
| Time Frame (Subscription Period) | 6 months, 12 months, 1 week |
| Recurring (auto-renew) | Yes, No |
Since the subscription product has variants, we create a Master subscription product with code 'CV168'. Each of the variants (Child products) will have their own Product Codes.
- 6 months + Recurring: Yes
- 12 months + Recurring: Yes
- 1 week + Recurring: No
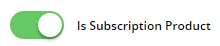
Both the Master and Child products will be set as 'Is Subscription Product' in their Maintain Product pages. For the Master subscription product, we add all subscription product options as its Child products.
What your customers see
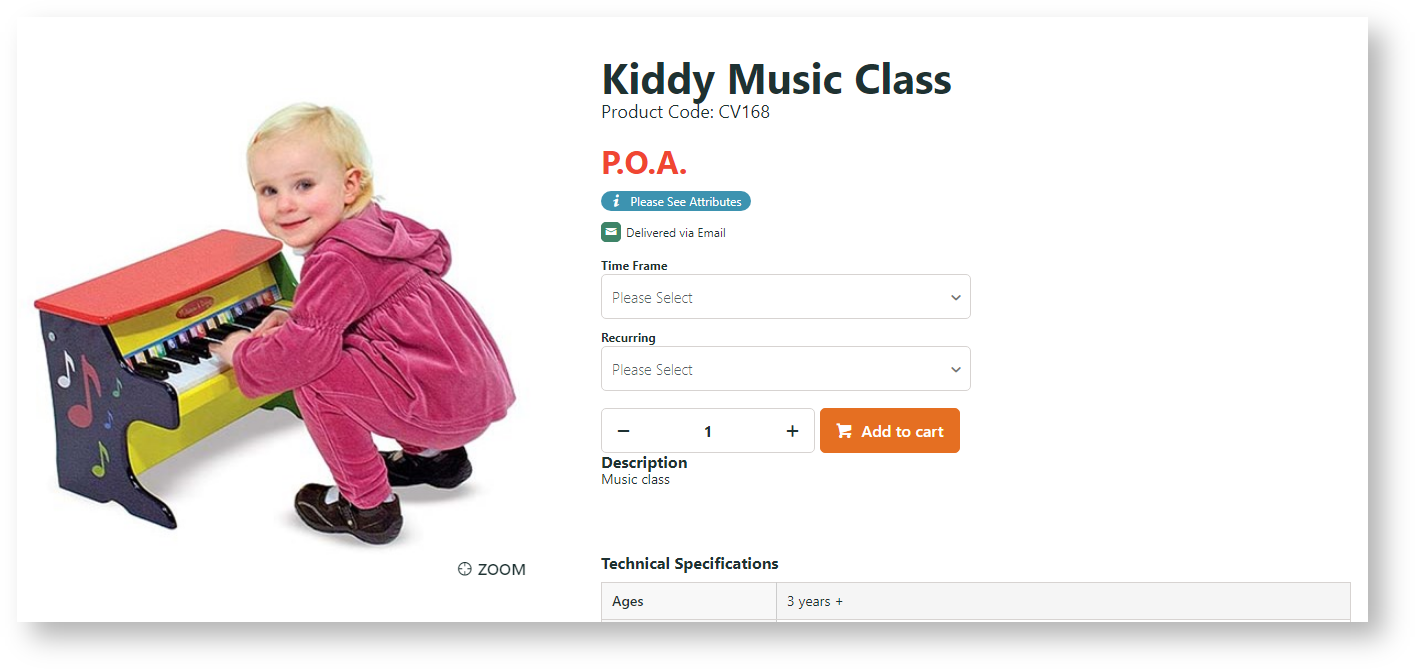
Once the subscription Master and Child products are set up and made active, they become visible to customers on your site. Let's say a customer searches for 'music class'. The search results will list the three Child subscription products as well as the Master product (although this can be configured differently, e.g., to only show the Master product or just the Child products).
Your customer can select either the Master product or one of the Child products.
| Selecting Master product | Selecting Child product |
|---|---|
The Master product has been set to display without a price unless a purchasing option is selected. NOTE - You can set whether your customers can buy directly from the Master product's page.
They select a 'time frame' and 'recurring' value and the price will display. To purchase, they simply add to cart.
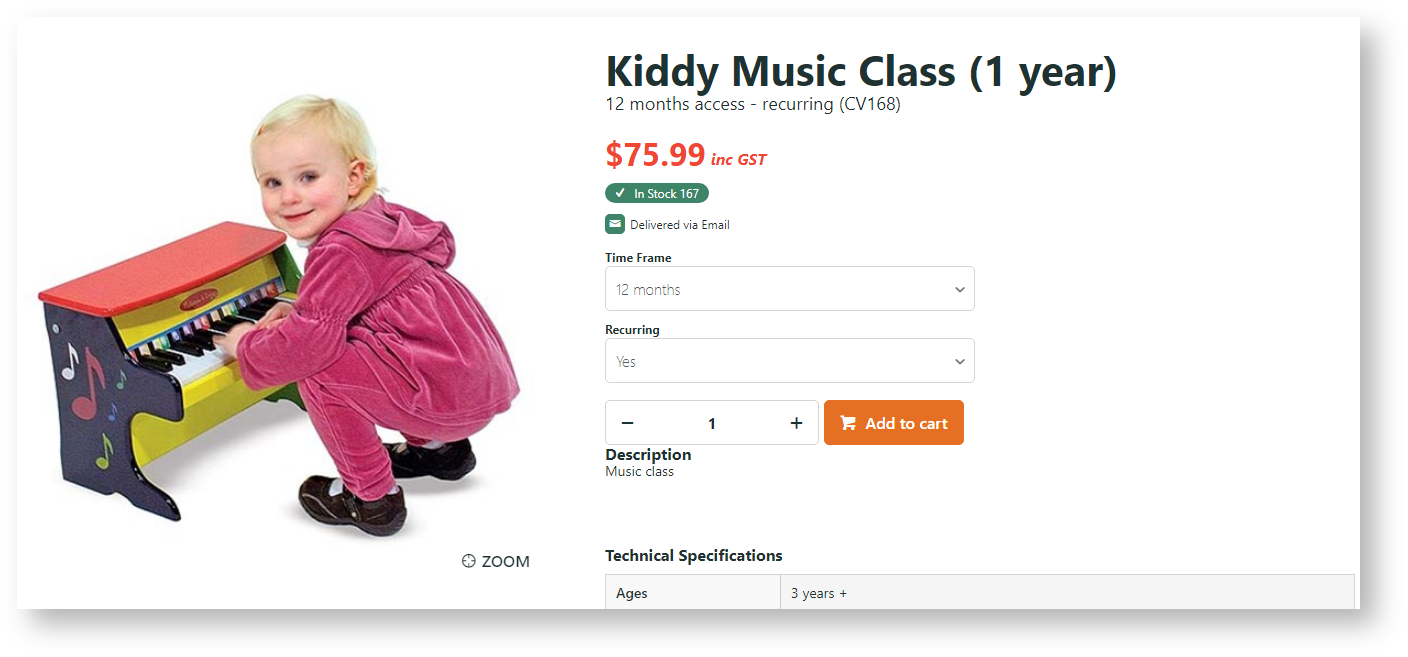
| Each Child product with price displays on its own page. It is added to cart just like any other product.
|
What happens after order submission?
When your customer successfully purchases a subscription product, apart from the usual order processing steps, their subscription record is saved. A scheduled task that checks for new subscriptions (usually daily) will activate the subscription the next time it runs. The customer can view the subscription details from the Dashboard once logged into your site. They can also edit credit card details and stop auto renew if applicable. By default, an active subscription is associated with a Cutomer Code (the Customer account level). This allows any Website User assigned to this Customer access to the subscription.
Paying for recurring subscriptions
Some payment types are not suitable for subscription products, e.g., Buy Now, Pay Later options. They can be hidden at checkout whenever the Cart contains a recurring subscription product. This option must be implemented by Commerce Vision.
Step-by-step
This guide helps you configure and maintain subscription products and subscription-related email notifications.
1. Configure Subscription Products settings
Check Subscription Products is enabled for your site and basic notification settings have been configured.
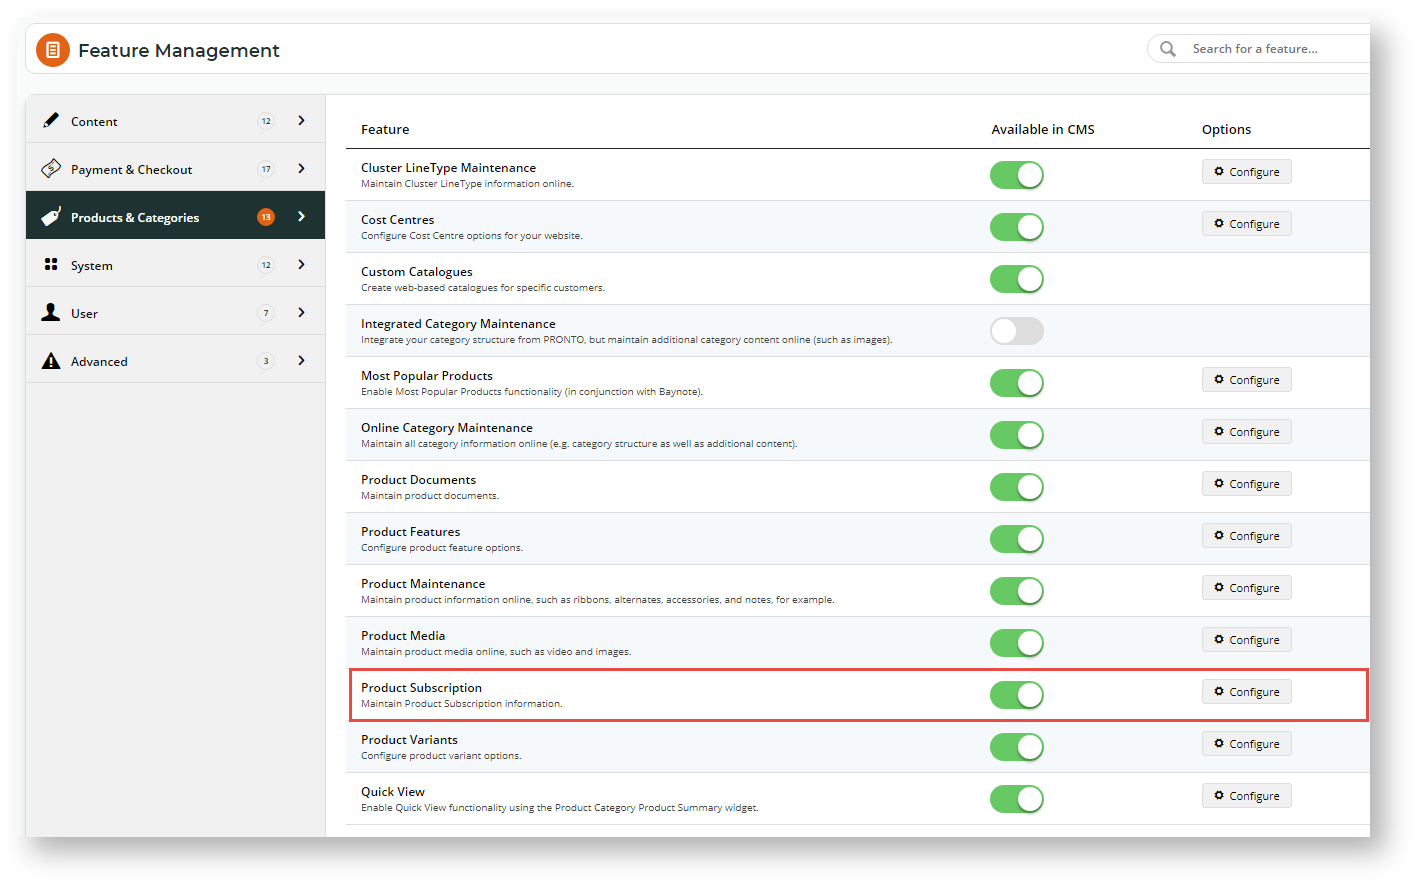
- In the CMS, navigate to Settings → Feature Management → Products & Categories.
- Ensure the Product Subscription toggle is ON and click Configure. NOTE - If the toggle is not displayed, contact Commerce Vision.
- To enable the feature on your site, toggle ON Enable Product Subscription.
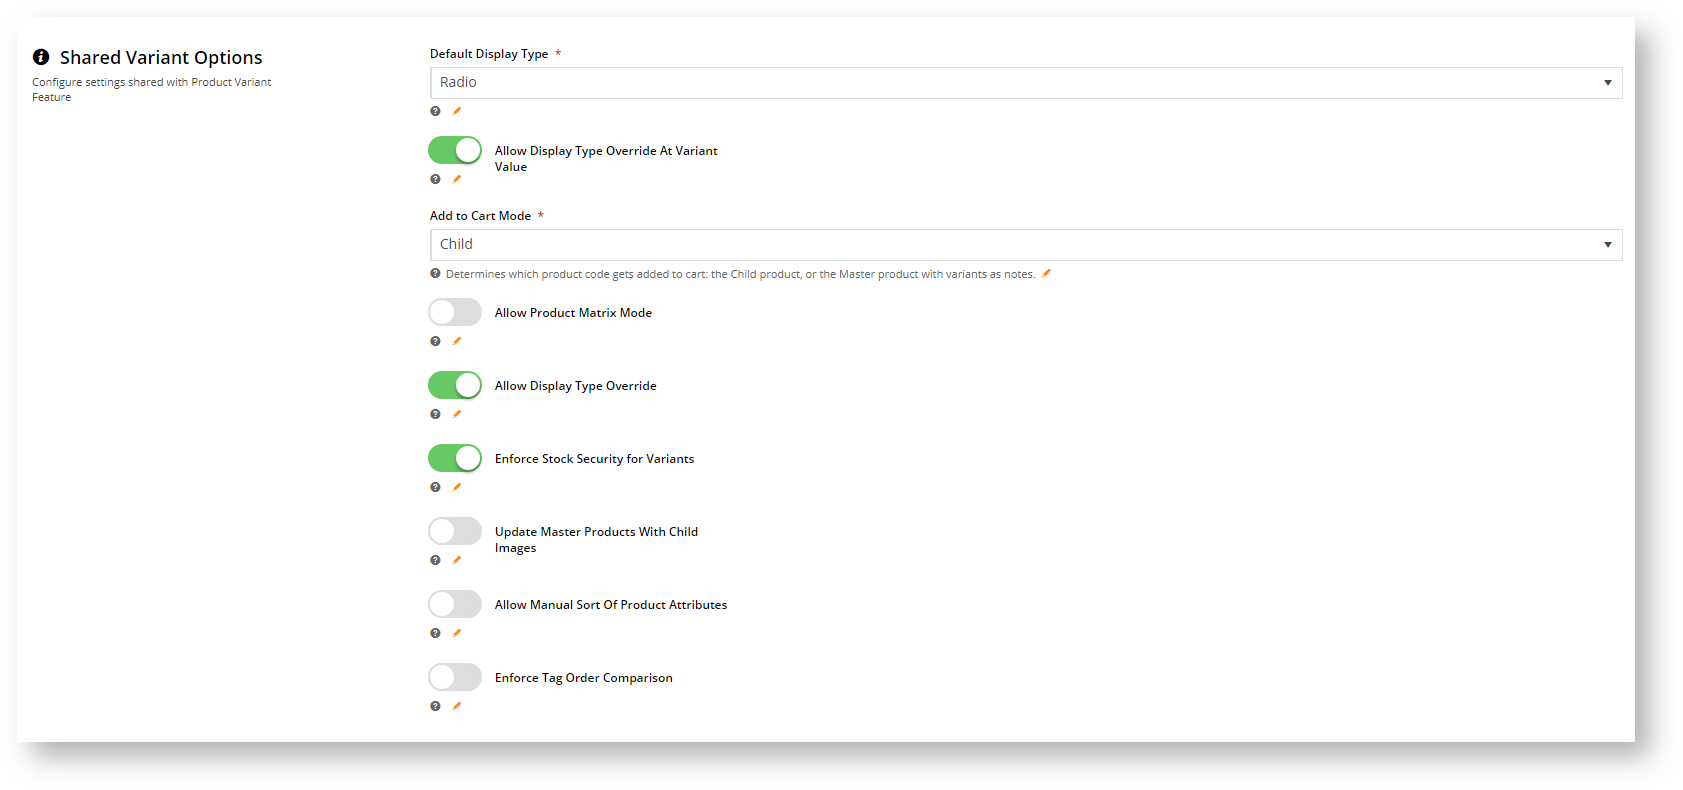
Configure the Shared Variant Options settings. NOTE - These settings are shared with the Product Variants feature. Changing a setting here or in Product Variants settings will automatically apply to both features.
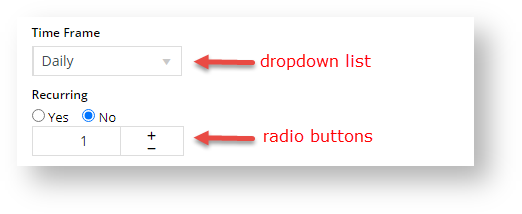
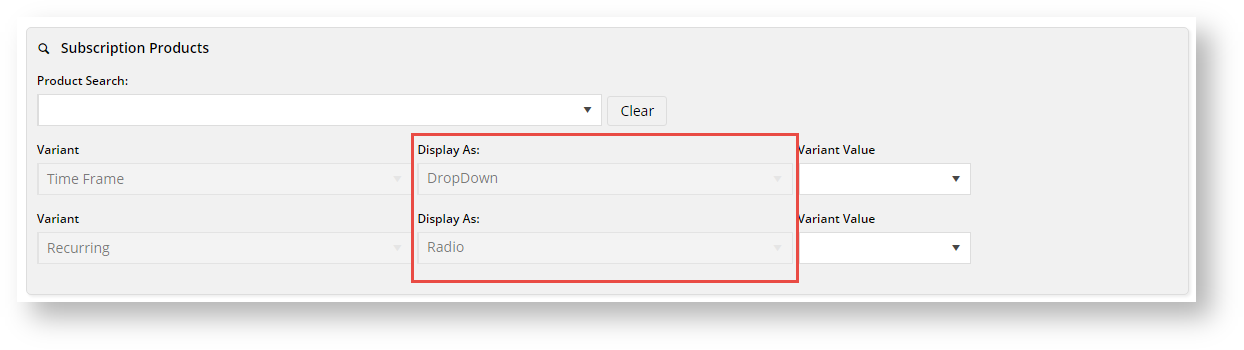
Default Display Type: When a subscription product has more than one purchasing option, each one with its values can be offered in the Master Product's page on your website. Select whether to display selectable values as a dropdown list or radio buttons.
Allow Display Type Override at Variant Value: Toggle ON to allow the default display type to be selected individually when each Variant is being configured.
Add to Cart Mode: Select either Master or Child. This determines whether the Master or Child product's Code is used when a Child product is added to the cart. If Master is used, the Child product will be added as a note in the order line.
Allow Product Matrix Mode: Select whether to allow individual products to be set to matrix display mode, using the Product Variant Grid Widget. Default; OFF
Allow Display Type Override: Select whether to allow the 'Default Display Type' to be overridden on a product-by-product basis. Default: OFF. NOTE - If this setting and 'Allow Display Type Override at Variant Value' are both enabled, the latter will be used.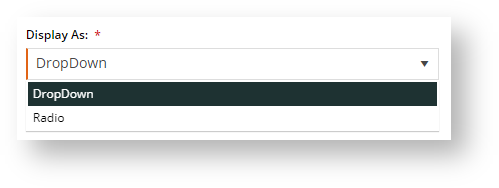
Enforce Stock Security for Variants: Select whether to apply stock security settings for each child product. Default: OFF
Update Master Products With Child Images: Select whether to add Child product images in the Master product gallery automatically. When ON, as the user views each Child product, the image will change to reflect this option. (See our guide on Automatic image tagging for variants for further details.) Default: OFF
Allow Manual Sort of Products Attributes: Select whether to allow re-ordering of products by dragging and dropping. It allows the user to sequence product attributes by drag-and-drop. Toggle on/off as required. Default: OFF.
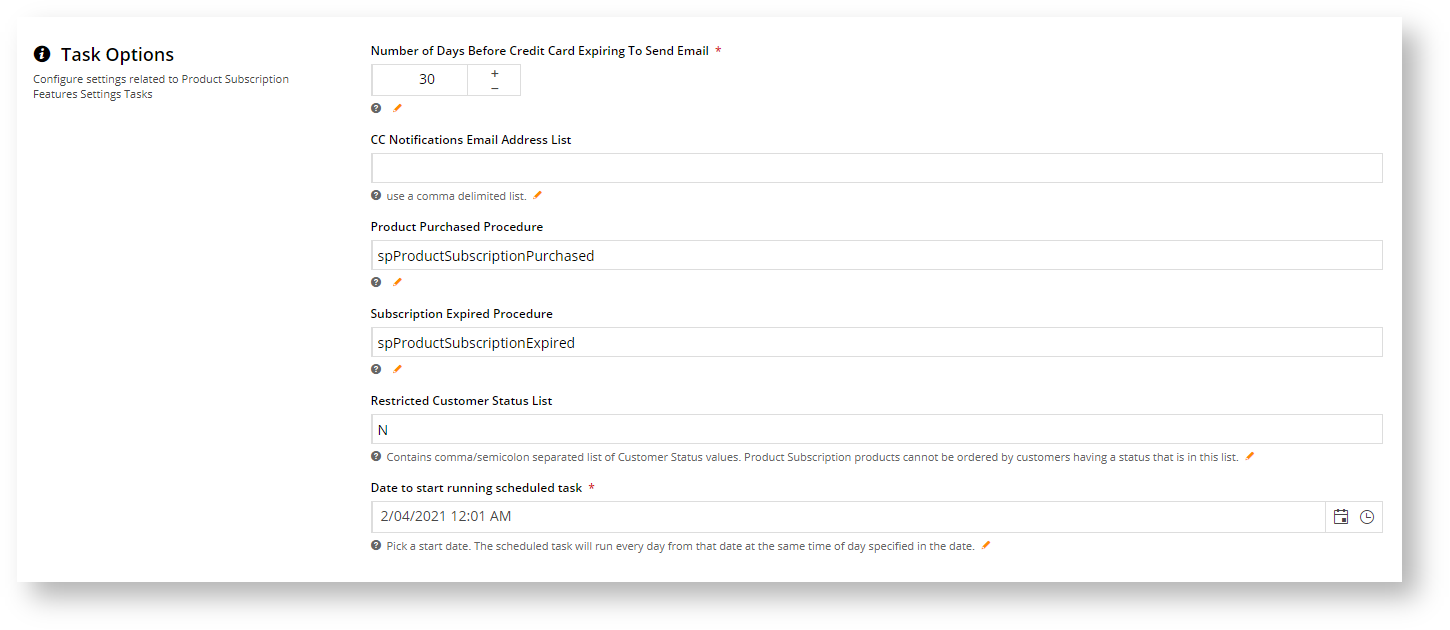
Enforce Tag Order Comparison: Toggle on/off as required. Default: OFF- In Task Options, configure the scheduled tasks that check for new and expiring subscriptions, sends customer notifications about expiring soon/expired credit cards and subscriptions, and to enforce customer restrictions. See: Subscription Scheduled Task.
- Number of Days Before Credit Card Expiring to Send Email: Enter the number of days before the customer's credit card expires to send them an alert email. Default: 45 days
- CC Notifications Email Address List: Enter one or more staff email addresses that will be sent copies of customer notification emails. NOTE - If entering multiple email addresses, each must be comma-separated.
- Product Purchased Procedure: This is the name of automated procedure that checks for newly purchased or auto-renewed subscriptions and provides access. THIS SHOULD NOT BE CHANGED. Default: spProductSubscriptionPurchased
- Subscription Expired Procedure: This is the name of the automated procedure that checks for expired subscriptions and prevents access. THIS SHOULD NOT BE CHANGED. Default: spProductSubscriptionExpired
- Restricted Customer Status List: Customer codes flagged with a status value entered here will be prevented from ordering or renewing subscription products. A popup message will inform the customer they cannot purchase the product. Default: 'N'. NOTE - If entering multiple values, each must be comma or semicolon-separated.
- Date to Start Running Scheduled Task: Enter the date and time for the scheduled task to begin. The task will automatically run daily at the specified time.
- To save your settings, click Save or Save & Exit.

2. Set up Subscription Time Frames
A Time Frame is a subscription period that is applied to subscription products, e.g., 'quarterly' (3-month), 'yearly' (12-month), etc. Each required Time Frame has to be defined and made active so that it can be selected for a subscription Child product. During this process, the schedule for when 'expiring soon' emails are sent to customers is also set.
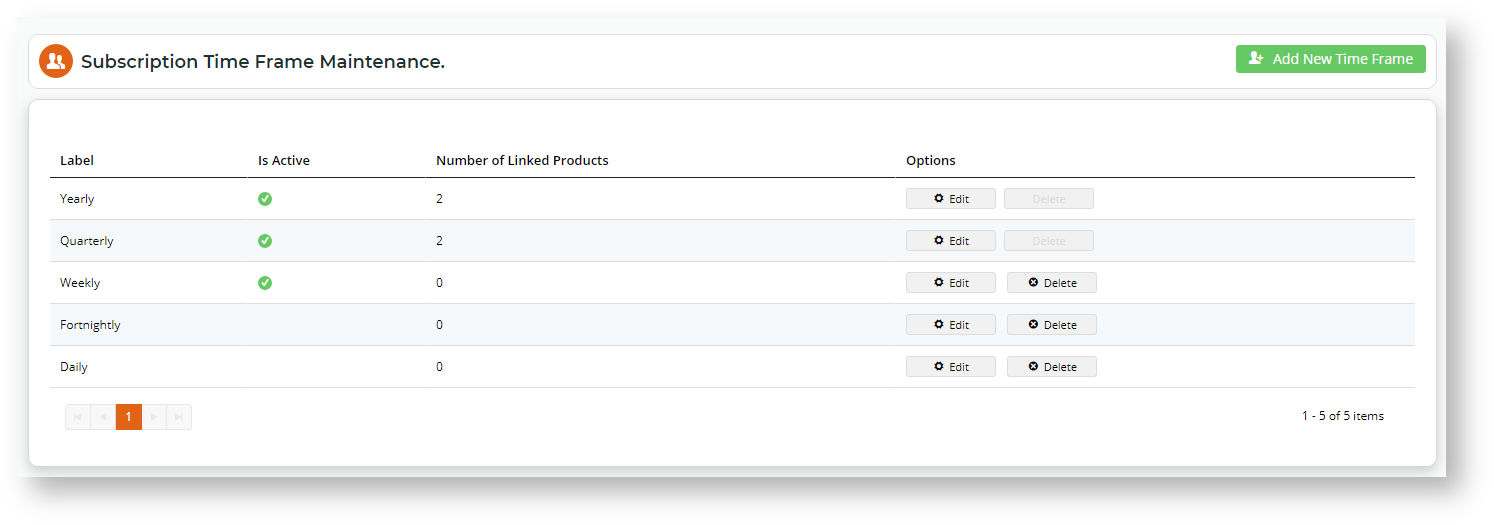
A Time Frame cannot be deleted if it is being used by a subscription product OR has an active subscription.
To add or edit a Time Frame,
- In the CMS, navigate to Product Subscription → Subscription Time Frame Maintenance.
- The Subscription Time Frame Maintenance screen lists all existing Time Frames, indicates whether each one is active (i.e., can be selected to use against a product) and displays the number of products that currently use them. NOTE - A Time Frame cannot be deleted if there are products linked to it.
- To add a new Time Frame, click the Add New Time Frame button OR to edit an existing one, click Edit next to it.
- In Details, add or change field values as required.
- Time Frame: Enter a meaningful name for this subscription period. TIP - The name should describe the subscription period clearly. It will be displayed to customers as a selectable value by and to staff when configuring a Child subscription product. NOTE - If you are editing an existing Time Frame, the name cannot be changed. If a new name is required, the whole Time Frame has to be deleted and re-added.
- Is Active: Tick if the Time Frame is to be usable now for a subscription Child product. Default: unticked.
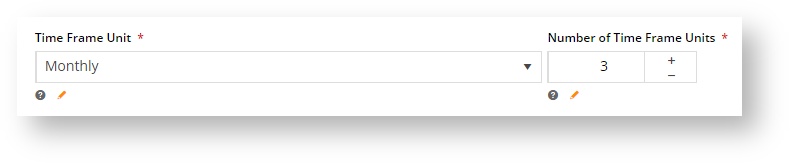
- Time Frame Unit & Number of Time Frame Units: These two fields work together to define the Time Frame (Time Frame = Time Frame Unit x Number of Time Frame Units).
Example: To create a 'Quarterly' (3-month) Time Frame, in Time Frame Unit, we can select 'Monthly' and enter '3' for Number of Time Frame Units. This defines the 'Quarterly' Subscription Period as '3 Months'.
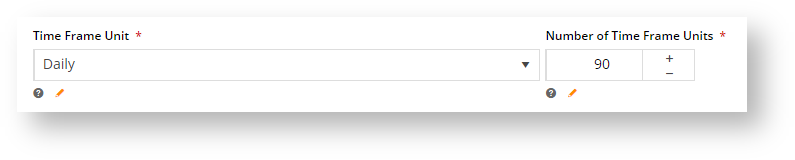
An alternative would be to select 'Daily' and enter the Number of Time Frame Units of '90' to define the 'Quarterly' Time Frame.- Days Before Expiry Date to Send User 'Subscription Expiring' Email: Enter the number of days before this Time Frame expires, for the 'subscription expiring soon' email to be sent to the customer.
- To save your changes, click Save or Save & Exit.
3. Configure Subscription Products
(NOTE - This guide focuses only on maintaining subscription features. Refer to the general Product Maintenance help for other aspects of maintaining a product online.)
Configuring subscription products is done in CMS Product Maintenance. Once the Subscription Products feature has been enabled for your site, individual products can be flagged as subscription products. For maintenance, the Master subscription product and each Child product are treated as unique Products (each with its own Product Code) and are then linked using a Master/Child product relationship. Configuring this relationship is a simple process. Products are just added as Child products in the Master product's Product Detail page.
- The standard Master/Child feature cannot be used with subscription products.
- Time Frames required should have been created before maintaining the product.
1. Set product as Subscription Product
Every subscription product (both Master and Child products) must be individually set as a Subscription Product.
To set a product as a subscription product:
- In the CMS, navigate to Product Maintenance.
- Find the required product by using the Product Search tool. You can enter the Product Code or a relevant keyword.
- Click Edit for the product.
In the 'Maintain Product' page, scroll down to the Product Subscription panel. This is usually at the bottom of the screen. (NOTE - if this panel is not displayed, the Subscription Products feature has not been enabled.)

To set the product as a subscription product, toggle ON Is Subscription Product. Notice that the 'Subscription Products' section will automatically display. This is used to configure subscription purchasing options and is not relevant for this stage.
- To save your changes, click Save or Save and Exit.
- Repeat Steps 2-6 for every product linked to this subscription product.
2. Set up Master/Child Subscription Product relationship
All Child products are linked to the Master product in the Master product's page.
To configure related subscription products in the Master/Child relationship:
- In the CMS, navigate to Product Maintenance.
- Find the Master product by using the Product Search tool. You can enter the Product Code or a relevant keyword.
- Click Edit for the product.
In the 'Maintain Product' page, scroll down to the Product Subscription panel.
- Add a Child product. In Product Search, type in the Child product's Product Code or a relevant keyword and select it from the list.
Select Variant values to define the subscription option. NOTE - A Child subscription product must have a Time Frame value. The 'Recurring' variant is optional. But if the 'Recurring' variant is used for the first Child product, then all other Child products must have a value. Example: if Recurring is left blank (not used) for the first Child product, subsequent Child products must also be left blank.
Time Frame: select a Time Frame value
Recurring: if using this variant, select either 'Yes' or 'No'
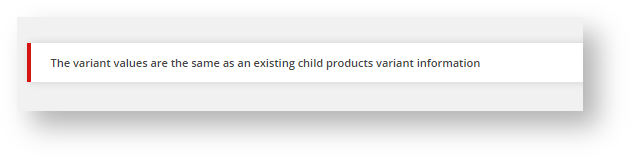
- Each Child product must have a unique subscription Time Frame (or Time Frame + Recurring if both variants are used). For example, the system will not allow you to add two Child products with the combination: 'Quarterly' + 'Yes'.
An error message will display when you attempt to add a duplicate Child product:- To link the Child product to this Master product, click Add Subscription.
- To save this product as a Child product, click the Save button (at the top of the screen). IMPORTANT - Any changes will not be saved without completing this step.
- To add other Child products to this Master product, repeat steps 5-7 for each one. You need only Save the page (step 8) when completely finished with adding Child products.
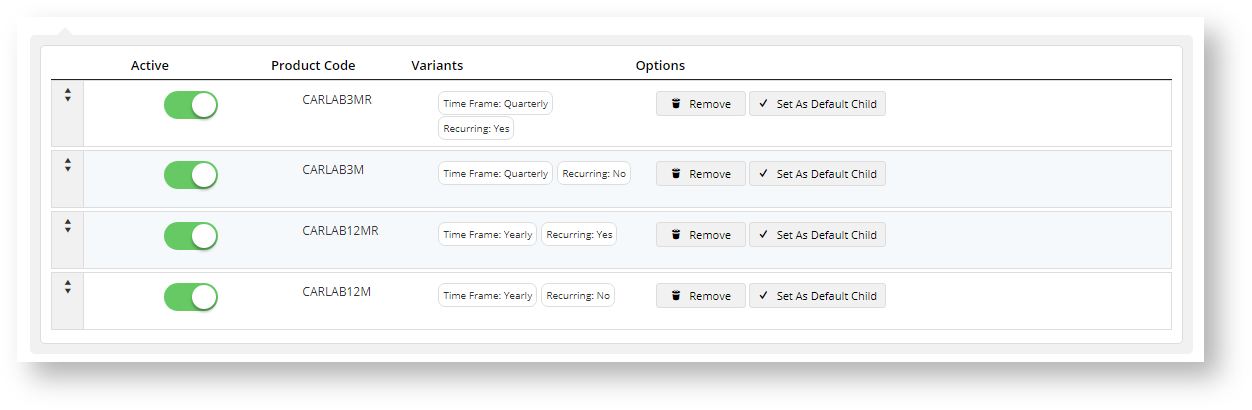
- After all Child products have been added, check that they and their subscription values are correct. To view them, click Show Existing Subscriptions. Each child product will be listed with their variant value combinations.
You can set other options for each Child product when suitable .
Active: Toggle this OFF if you temporarily do not want this child product to be offered to customers.
Remove: Click to permanently unlink this Child product.
Set as Default Child: if you want a specific Child product to default when the customer first views the Master product, click this button for the Child product.


When a product is a Child product, this message appears at the top of its Maintain Product page. The Master product is provided as a clickable link.
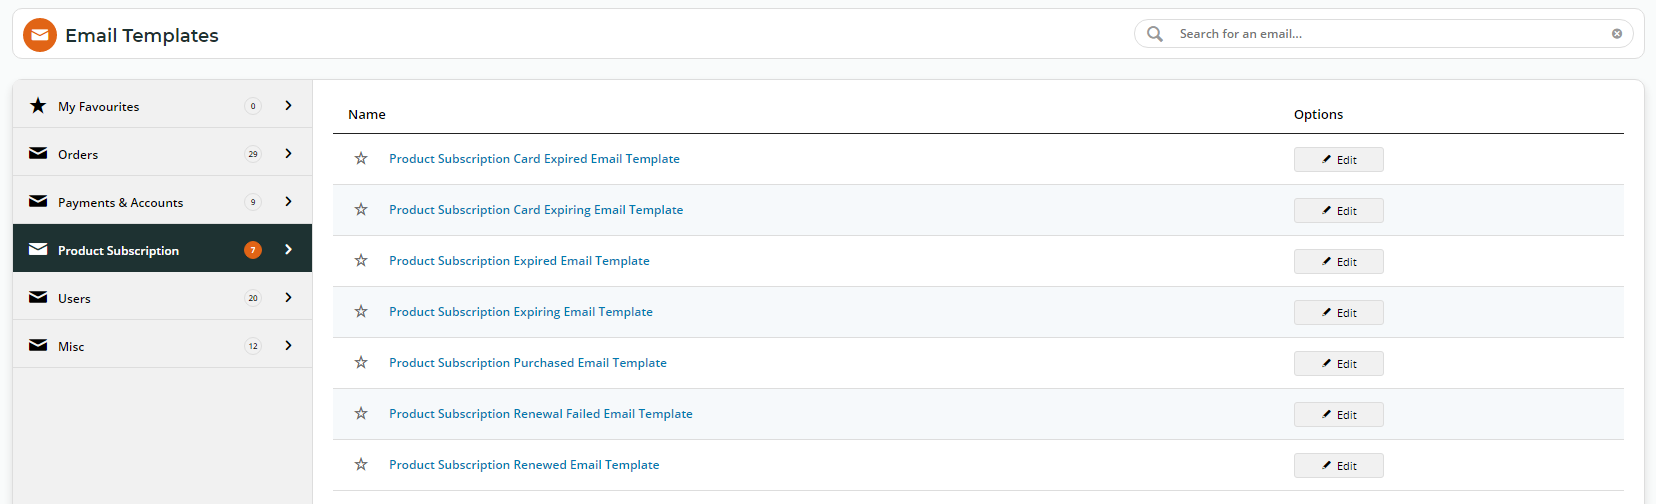
4. Edit Notification Email Content
Email templates for subscription-related notifications are located in Content → Emails → Product Subscription. Default email content is provided. This can be edited in subscription widgets in each email template.
To access the email template, navigate to Content → Emails.
5. Subscription Scheduled Task
When the Subscription Products feature is enabled, the Product Subscription Expiry, Renewals and Creation task is set up to automatically to run daily at a specified time, e.g., 12:01am. This time can be edited in the Product Subscription Features Settings page.
The task will perform the following checks and trigger Subscription emails and events:
| Check | Events |
|---|---|
| Subscription purchased |
|
| Subscription expiring |
|
| Subscription expired |
|
| Subscription renewal |
|
| Credit card expiration |
|
Additional Information
| Minimum Version Requirements | 4.31 |
|---|---|
| Prerequisites | |
| Self Configurable | Yes after initial consultation |
| Business Function | Catalogue |
| BPD Only? | Yes |
| B2B/B2C/Both | B2B |
| Third Party Costs | n/a |
Related help