...
| Multiexcerpt | |||||||||||||
|---|---|---|---|---|---|---|---|---|---|---|---|---|---|
| |||||||||||||
Macro Instructions for carrying Article Information through to Feature List
Instructions for carrying Excerpts through from this page to the Feature List Article Page: Add macro / Multiexcerpt (or copy and existing excerpt and edit) or (Copy existing page and place content into existing excerpt macros) On Features List page: Click in the Cell to be populated / add macro / Multiexcerpt Include / Select the Article page and the excerpt (or copy another feature line and edit the 'Article page' source. |
| Table of Contents | ||||
|---|---|---|---|---|
|
Overview
Use this guide to create and publish a basic non-zoned article or understand the key aspects of Article creation and maintenance. If you are an article creator, note that customising article-related layouts depends on settings configured by your Administrator and site version.
1. Article Types
Articles are grouped into user-defined article types, which can then be selected in article widgets to display. Grouping your articles helps to keep them organised by function or purpose. For example, you might create one article type for FAQs, another for blog posts, and still another for press releases, etc.
...
- In the CMS, navigate to Content → Articles.
- Click Add New Article Type.
- Assign to your new group a Code, a Name, and an optional Icon (for display in the CMS).
- Click Save. Once an article type has been created, you can add articles for it.
2. Articles
Once you've got at least one Article Type set up, you can begin creating the articles themselves. Here's how to create the basic sections of an article.
- In the CMS, navigate to Content → Articles.
- Select the Article Type to group the article in.
- Click Add New Article.
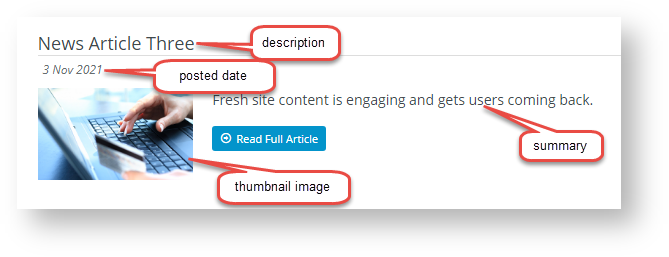
- Enter a Description for your article. This will be the article's title.
- The article's SEO URL, Browser Page Title, and SEO Description will also be auto-populated with the value you enter here. You can change any of these fields if you wish.
- The Posted Date will auto-populate with today's date. If you wish, you can also enter Start & Expiry dates for articles you'd like to display for a set period only.
- Select or upload a thumbnail image for the article. This will be the small image that displays when an article list is viewed.
- Select or upload the main image for the article. This will be the larger image that displays on the article detail page.
- Enter some 'teaser' text in the Summary section. This is displayed when viewing article list.
- In the Content section, enter the main body of the article. Use the WYSIWYG editing tools to update font sizes, formats, and colours based on your site's style guide.
- Toggle ON Customer filters apply to user's current Customer only? if you only want Users currently in the Customer accounts added in Customer Code filters (step 12) to see this article. If OFF, the User will see the article while in all their Customer accounts.
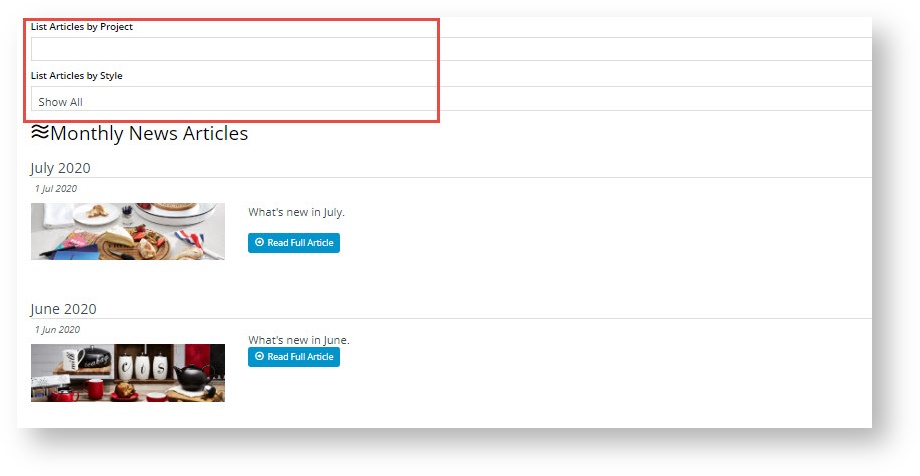
- Article Filters allow articles to be displayed only to a certain segment of site users. You can enter one or more Filter values: Customer Types, Customer Warehouses, Customer Codes, Bill to Customer Codes, Email Addresses or Roles.
NOTE - This function works only with standard article widgets. It will not work with custom widgets. (TIP - If you do not see this function, it has not been enabled by Admin in Article Feature Settings.)- Features are metadata you define for use with article filtering in an article list page, to help website users find relevant articles. Feature and feature values should be meaningful to your article content. Think of a 'feature' as a category and its 'values' as subtypes of the category. As an example, suppose your business sells homewares and produces feature articles on products and designs for different rooms. A 'feature' could be 'room type', and values, 'bathroom', 'bedroom', 'loungeroom', etc. Articles can be tagged with particular features and values. Using the Features functionality, visitors can filter for articles about decorating a particular room type, e.g., 'bathroom' or 'bedroom'.
You can add as many features as you require.
In Feature, enter a name for the category. In Value, enter the subtype of this category. TIP - For the filters to display in an article list, see the how-to guide on Adding a Feature Filter.
How site visitors use feature filters:
13. To save the article, click Save & Exit.
3. Article List Page Layout
An article list page displays a list of grouped articles to your website users, with links to take them to each article's content. A default article list page template comes standard for your website. This 'Article List Page' template is automatically used if the 'Use Zoned Article Template?' is disabled or
...
If the zoned template setting is enabled, the article list page defaults to the Article List Item Zoned template.
4. Article Layout
An, article's layout depends on the template used. The simplest option is to use the default non-zoned layout supplied for an article list. If you don't specify a template, this will be the layout of an article. You do not have to mess around with templates.
...
Depending on your site's requirements and version, you can use customise article templates, edit them, or even override them and use custom article templates. For detailed help with these templates, see Article Templates help.
5. Article Widgets
Each of the above templates uses various widgets to display the article content. For example, your article page zoned template might have the following widgets:
...
| Tip | ||
|---|---|---|
| ||
Want to use the Article system to display your FAQs with a toggle effect? Check out our 'How To' guide here. |
Additional Information
| Multiexcerpt | ||||
|---|---|---|---|---|
| ||||
...
| Minimum Version Requirements |
| |||||
|---|---|---|---|---|---|---|
| Prerequisites |
| |||||
| Self Configurable |
| |||||
| Business Function |
| |||||
| BPD Only? |
| |||||
| B2B/B2C/Both |
| |||||
| Ballpark Hours From CV (if opting for CV to complete self config component) |
| |||||
| Ballpark Hours From CV (in addition to any self config required) |
| |||||
| Third Party Costs |
|
Related help
| Content by Label | ||||||||
|---|---|---|---|---|---|---|---|---|
|
...


