Overview
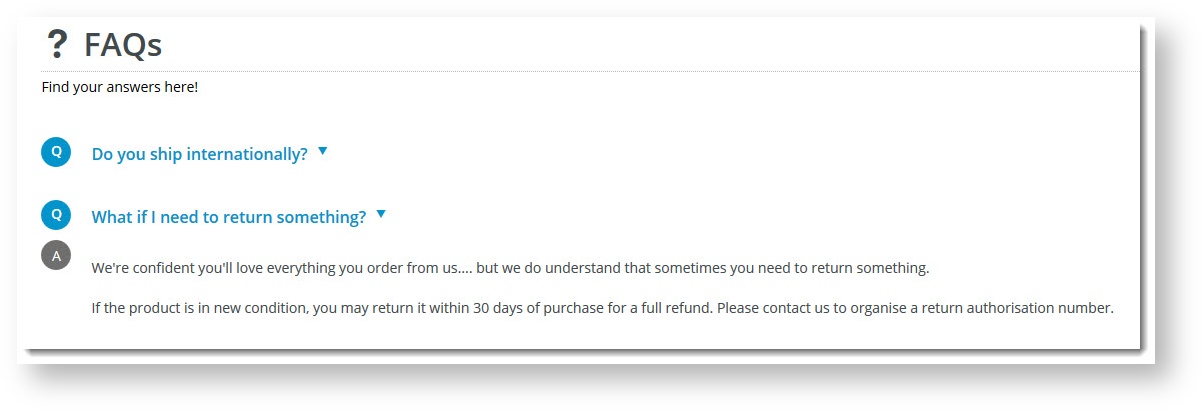
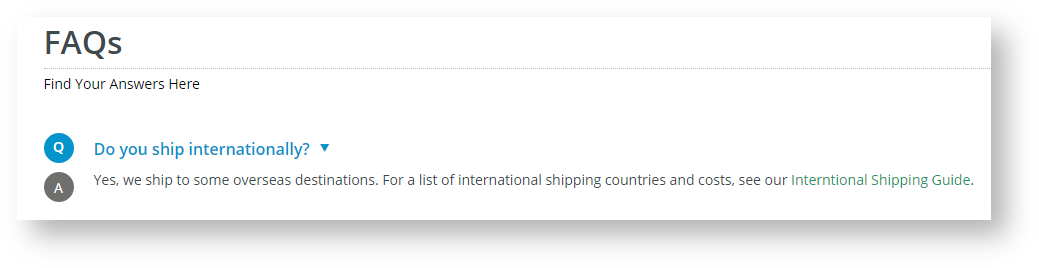
The Article system is great for displaying FAQs on the page. With the user-controlled toggle enabled, questions are displayed with hidden answers. This allows for a clean, streamlined page that doesn't overwhelm the user with a wall of text. They just have to click on a question to see the answer.
Step-by-step
1. Create an Article Type
Articles are grouped into article types, and each type can be displayed by a widget. Before you begin creating questions and answers, you'll need an FAQ article type to group together your FAQ content.
To add the FAQ article type:
- In the CMS, navigate to Content → Articles.
- Any existing article types will be listed. To add a new article type, click the Add New Article Type button.
- In the Add Article Type screen, enter a Code for the new article type. It must be one continuous string with no more than 10 characters.
- In Name, enter a suitable description. TIP - Remember, this name will be used to identity the article type, e.g., when selecting an article type for an article list page.
- (Optional) In Icon, select a suitable icon. This is for display only in the CMS.
- Click Save. Once the FAQ article type has been added, it appears in the article type list.


2. Add a Question
Once you have a dedicated Article Type for your FAQs, you can begin adding questions.
- In the CMS, navigate to Content → Articles.
- Select Edit for your 'FAQs' Article Type.

- Click the Add New Article button.

- In the Description field, enter the Question exactly as you want it displayed on the page.
NOTE - The SEO URL, Browser Page Title, and SEO Description will be auto-populated based on the value you enter here. These are not likely relevant to FAQs. But keep the defaults or override them if you wish.- The Posted Date will auto-populate with today's date. TIP - The posted date is not usually displayed to viewers of FAQs. However it can be enabled when setting article list widget options later. Here, they can let team members know when the FAQ question was entered.
- If you want to set a date for this FAQ to be visible on your website, enter a Start Date. NOTE - This date may be different from the Posted Date.
- If you want the article to be removed from your website on a certain date, enter an Expiry Date.
- Leave the images fields blank.
- In the Summary section, enter the answer for the FAQ.
- The Content section should be left blank.
- If this particular question is to be shown only to a certain subgroup of your website users, enter Filter values based on the Customer, User, or Role. Only users who meet this criteria will see the question. For more details on article filters, see Create and Publish an Article - the basics.
- Feature filters are available for versions 4.23+. They can be used to tag each FAQ question with values that can then be used to help readers find relevant FAQs more quickly. For example, Shipping may be a Feature and relevant FAQs are tagged with values such as 'local' or 'international'. Your readers can use the Feature filter to quickly find relevant questions. TIP - This is useful if your site has many FAQs.
- To save this FAQ, click Save & Exit. You can see your FAQ in the Article list.
- Continue adding more FAQs by repeating the above steps.


3. Display FAQs page on your site
Now that you've got your FAQs loaded as Articles, you can display them on an Article List page with a widget.
- If you already have a dedicated FAQ page, navigate to it in the CMS. Otherwise, create a new widget-based custom page and add it to a menu so it can be accessed.
Here is an example where we have added a link on the Feature Navigation Bar.- Add an Article List widget to the page template.
- In the Article List widget pop-up, set the Article Type Filter to the FAQ type you created earlier.
- Ensure the following toggles are set for FAQs as shown:
- Show Read Article Button: OFF
- Enable Article Toggle: ON
- Enable Article Hyperlink: OFF

Optional:- Show Read Article Button
- Configure the other widget options as you require. See Article List Widget. TIP - Also, work with the Page Title Widget to get the heading look you're after.
- Save your changes. Check the FAQs page to make sure the content displays as expected.


If you've refreshed your web browser and your content is not displaying, you may need to refresh the Template cache. See our tips for Cache Refreshing.
Additional Information
You may require some style sheet updates in order to keep consistent with your website's style guide. If this is the case, please contact us for assistance.
| Minimum Version Requirements |
|
|---|---|
| Prerequisites |
|
| Self Configurable |
|
| Business Function |
|
| BPD Only? |
|
| B2B/B2C/Both |
|
| Ballpark Hours From CV (if opting for CV to complete self config component) |
|
| Ballpark Hours From CV (in addition to any self config required) |
|
| Third Party Costs |
|
Related help
Related widgets