Overview
From version 3.82+, websites using BPD are able to implement country-based geocoding and multi-currency support. This enables the display of region-specific information (product prices in $USD, for example).This guide covers the implementation of the Country Select widget, and provides information on the geolocation service.
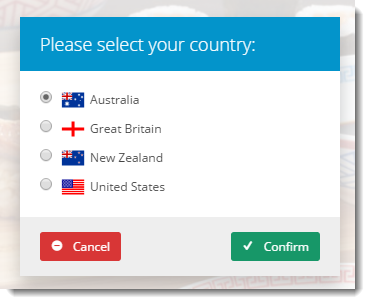
| Country Select Widget in Theme Layout | Modal Window for Country Selection |
|---|---|
Geolocation
When a user lands on your site, Customer Self Service makes an API call to the geolocation provider - this retrieves the user's IP address and associated location details.
With this information, the user's default country can be automatically set by the website, without the user having to do anything. Prices will be displayed in the correct currency, checkout address formats will be relevant, and so forth.
MaxMind GeoIP is a subscription-based service. You'll need an account with this provider in order to utilise geocoding in BPD.
Once you have your MaxMind account, set them as the Geolocation Provider for your site:
- Login to the CMS.
- Navigate to Settings --> Settings.
- Scroll to the Geolocation Settings section.
- Set the Geolocation Provider to MaxMind.
- Enter your credentials:
- Username - your MaxMind username
- Password - your MaxMind password
- Click 'Update' to save changes.
Country Selector
Even though the user's default country is set via the geolocation service, the user is still free to select a different country while on the website. To do this, they simply select a country from the list displayed by the Country Select widget.
The Country Select widget draws its data from your site's CV Language table. This table stores the supported countries, along with their date and currency formats.
Your site may have a default language already hard coded, which would need to be removed in order to use this feature. Please contact CV Support if you're interested in this functionality, and we can check your site's configuration.
To add records to your CV Language table:
- Login to the CMS.
- Navigate to Settings --> Dictionary.
- Search for 'cvlanguage' and click 'Open'.
- Click 'New'.
- Enter values for the first country, we'll presume it's Australia:
- Language Code - AU
- Language Description - Australia
- Default Date Format - dd-MMM-yyyy
- Default Currency Format - $0.00
- Active - Ticked / Yes
- All other fields can be left blank / as default.
- Click 'OK' to save.
Repeat steps 4 - 7 for other countries and currencies your site will support.
If your site supports an extensive list of countries and currencies, we can import this data on your behalf. Contact Commerce Vision to enquire about a bulk update if required.
- Still on the same page, refresh the Dictionary by ticking System Control and clicking 'Refresh Cache'.
Once your active records are in the table, you can add the Country Selector Widget to your site:
- Login to the CMS.
- Navigate to Content --> Theme Layout.
- In the zone Top Bar, add the Country Select widget.
- Load your website in another browser / incognito tab to verify the widget displays as expected. (You can adjust the widget's position by dragging and dropping it within the zone in CMS as required.)
- Click the country name to launch the selector window.
- You should see the list of countries from the CV Language table. Each country name is paired with its flag.
Related articles


