Using Commerce Vision's Data Import module, site administrators can import a variety of data to selected tables of the web database. Existing data can also be exported for review.
Prerequisites
Before you begin, Commerce Vision will need to grant import access to the tables you wish to edit. This is to ensure data integrity between your ERP and the website.
Importing Data
- Login to the CMS.
- Navigate to Advanced Settings → Data Import.
- Existing import profiles will be displayed here.
- To create a new profile, select 'New Import Profile':
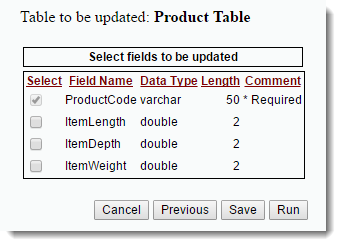
- Select the Table to be updated.
- Select the Fields to be updated. Note that the key to the table will automatically be selected.
- Click 'Save' to save the profile, or 'Run' to run without saving.
- If you selected 'Save', enter a name for your profile.
- Click 'Save' or 'Save and Run'.
- To run an existing import profile:
- Locate the profile you wish to run (use Search if required).
- Click 'Run'.
- The Required Fields are listed at the top of the page. Your CSV import file must be in this format.
- Click 'Download Blank CSV File' if you wish to download a template with the correct format and column headings.
- If your site is on version 3.87 or higher, you can export the existing data for this profile (see below).
- Select optional functions:
- Replace Table - this will delete ALL records in the table and replace it with the data in the CSV file.
- Ignore headings on first line - this will skip the first line in the file.
- Either click 'Select' to browse for the import file, or (if your browser supports it), drag and drop the file into the dialogue box.
- Click 'Import Now'.
- Your file will be imported and any errors will be displayed.
Exporting Data
For sites on version 3.87+, the existing data can also be exported, allowing for easy manipulation prior to re-importing.
- Login to the CMS.
- Navigate to Advanced Content → Data Import.
- Click 'Run' against the required profile.
- When the import page loads, click 'Export Existing Data'.
- Your data will download to a .csv file, or if more processing time is required, will be emailed to you as a link (to protect your site's speed and performance).
- Modify your data as required, then follow the steps for 'Importing Data' above.
Related articles


