Overview
![]()
zip is a popular Buy Now, Pay Later option that Commerce Vision supports for BPD. Your customers can get their goods now, and pay for them over time in manageable instalments. Configuring the latest API version (v2) of zip for your website is quick and easy, provided you have already established a merchant account with zip. For further information, visit zip at https://zip.co/.
Prerequisite alert!
Before you can begin offering zip payment options to your customers:
- your website must be running version 3.99+, and you'll need a merchant account with zip.
- you should request display configuration from Zip for your website.
If a payment requires referral (which happens when the user signs up when making a payment but their credit check is 'pending'), the order will go to the 'pay ok' page with a 'Pending Approval' message. The user will get an email from Zip once their credit has been approved or rejected. The email will have links to decline or approve the order. Clicking on those links will take the user to your 'pay return' page where they can either decline or complete the order.
Step-by-step guide
- Gather your zip account credentials (i.e. your base and handover URLs and Authorisation Token).
- In the CMS, navigate to Settings → Feature Management → Payment & Checkout.
- Select Buy Now, Pay Later.
- Ensure 'Available in CMS' is toggled ON.
- Click Configure.
- Click the Zip tab.
- In Provider Selection, select either zipPay or zipMoney from the dropdown.

- For API Version , select V2. Note -If your site is already using V1, this option will remain after any CSS upgrade unless requested.
- Set the Mode based on whether you're configuring zip for your Live site (Production), or Stage site (Sandbox).
- Enter the API keys and URL for either Production or Sandbox:
Zip V2 Production API Key = private key in Live
Zip V2 Production URL = https://api.zipmoney.com.au/merchant/v1/
Zip V2 Sandbox API Key = private key in Sandbox
Zip V2 Sandbox URL = https://api.sandbox.zipmoney.com.au/merchant/v1/- Set the following options:
Event Logging - toggle this ON (activating this on is recommended as any issues can be more readily tracked)
Auto-Integrate Pending Orders - integrates orders to the ERP prior to receiving a response from the payment provider.- Surname Override (when blank): this should not be left blank as Zip requires a surname. Please check with zip if you wish to leave it blank.
- Click Save.
- Test the settings by clicking the Test Settings button. A popup message will tell you whether the current settings are correct.

Set Display Options
Display Options determine where and how zip appears on your site.
- Set the Display Options as you require:
Display Content in Product Detail - toggle ON to show the zip logo, tag line & link in the product detail page.
Disable Further Checkout Attempts with Provider for an Order if Declined - toggle ON/OFF as required.
Min Price of Products to Show Content - the value of a product must meet this minimum in order for zip content to show in the detail page.
Max Price of Products to Show Content - the value of a product must not exceed this maximum in order for zip content to show in the detail page.
Min Order Total to be Available - the order total must meet this minimum in order for the customer to checkout with zip.
Max Order Total to be Available - the order total must not exceed this maximum in order for the customer to checkout with zip.
Use CV Zip Content - the default is OFF. When off, zip-related content in the Product Details page and the Payment panel in Checkout is supplied directly from zip. This option is recommended so that zip's latest information is always displayed. Note - please contact zip to ensure this is set up for your site.
Toggle ON if you want the default Zip content stored in BPD to display. Note: the BPD Zip message in the Product Details page can be edited in the Product Purchase Details Widget.

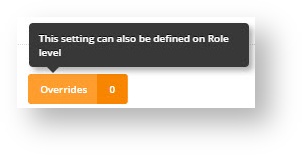
Adding Overrides
You can override any of the display feature settings based on the user's Role.
For example, you may wish to display the zip info box on the Product Detail page for B2C users, but not for B2B. In this case, you could set an override.
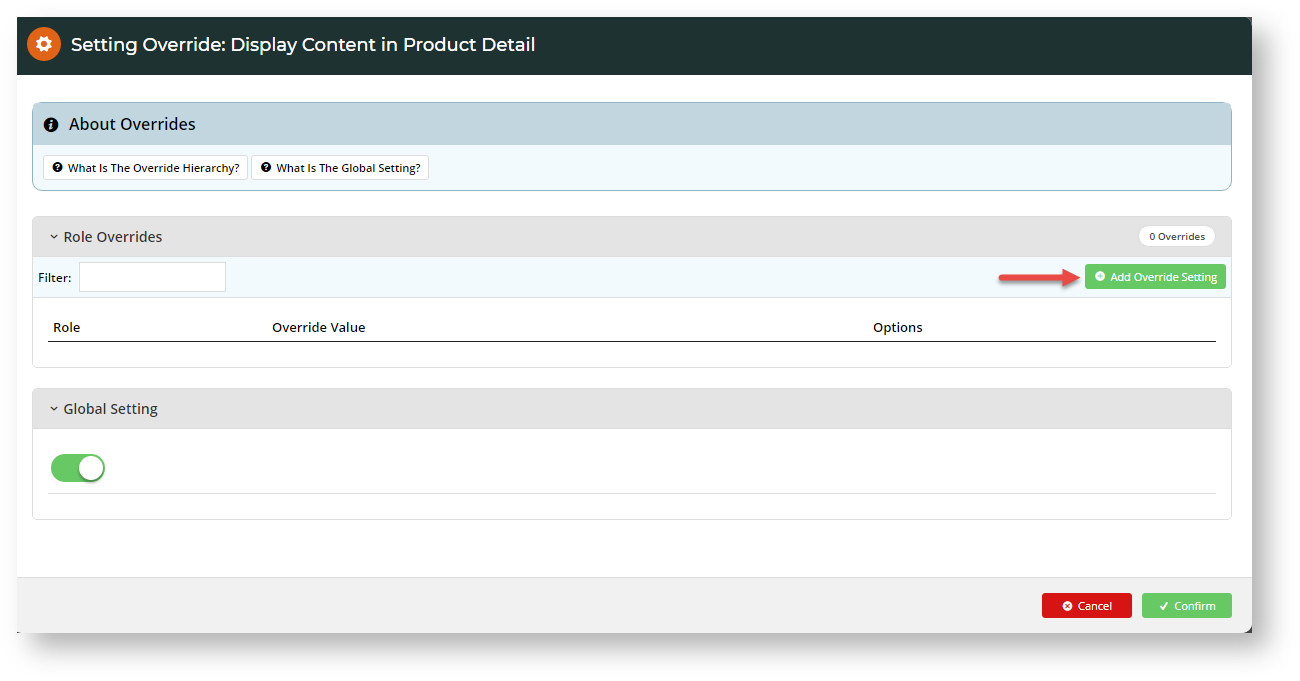
- Select the 'Overrides' icon next to the setting you want to customise.
- A popup will open, with your current Global setting displayed at the bottom. Click Add Override Setting in the Role Overrides section.
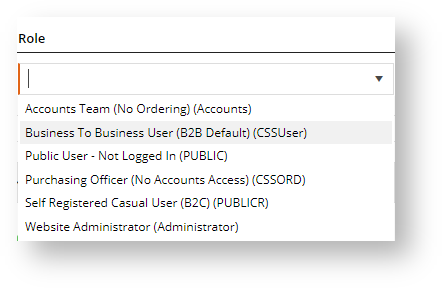
- Enter the role name into the lookup and select the role from the options presented.
- Toggle Override Value on.
- Set Global Setting to ON or OFF.
- Click Confirm to close the window.
- Don't forget to click Save on the feature settings page to save your changes!
Additional Information
| Minimum Version Requirements |
|
|---|---|
| Prerequisites |
|
| Self Configurable |
|
| Business Function |
|
| BPD Only? |
|
| B2B/B2C/Both |
|
| Ballpark Hours From CV (if opting for CV to complete self config component) |
|
| Ballpark Hours From CV (in addition to any self config required) |
|
| Third Party Costs |
|
| CMS Category |
|
Related help