Overview
Prerequisite alert!
Before Braintree Payments can be offered to your customers, your website must be running version 4.30+, and you'll need a merchant account with Braintree. Contact Commerce Vision to request a site version upgrade.
Once Braintree Payments has been implemented and enabled for your site by Commerce Vision, settings for the Braintree feature, available payment options, vaulting (saving a payment for future use) and fraud protection can be configured.
Step by Step Guide
1. Configure General Settings
NOTE - You will need your Sandbox or Production credentials (API keys and Merchant ID) for this step. You can retrieve these from your Braintree Sandbox or actual account.
To configure Braintree Payment Settings:
- Navigate to Settings → Payment & Checkout → Braintree Payment.
- If the Available in CMS toggle is not enabled, toggle it ON.
- Click Configure.
- Configure General Settings for Braintree Payments. NOTE - the Overrides feature can be used instead of global settings when offered.
- To enable Braintree for all Users on your site, toggle ON Enable Braintree Payment. TIP - Leave this global toggle off and add Role Overrides if Braintree is to be offered only to specific roles, e.g., B2C customers.
In Mode, select 'Sandbox' if you are on the testing Stage site or 'Production' on the live site.
The sandbox is an entirely separate environment from your production account. Nothing created in the sandbox (e.g. processing options, recurring billing settings) will transfer to production. Your login information, merchant ID, and API keys will also be different.
- Enter credentials for either 'Sandbox' or 'Production'. You will need the following from your Braintree account:
- Merchant ID - this is the default ID used to verify the account. If your business has several Merchant Account IDs and you want to specify one of them, enter it in the Merchant Account ID field.
- Public Key
- Private Key
- Merchant Account ID - leave blank if the ID in Merchant ID is to be used.If you want to allow Users to be able to delete a saved (vaulted) payment, toggle ON Allow Vault Management. When this setting is enabled, in the Payments panel, an Edit link displays on the top right side.

When the User clicks on Edit, the delete option appears for each payment. The User can click it to remove the saved payment.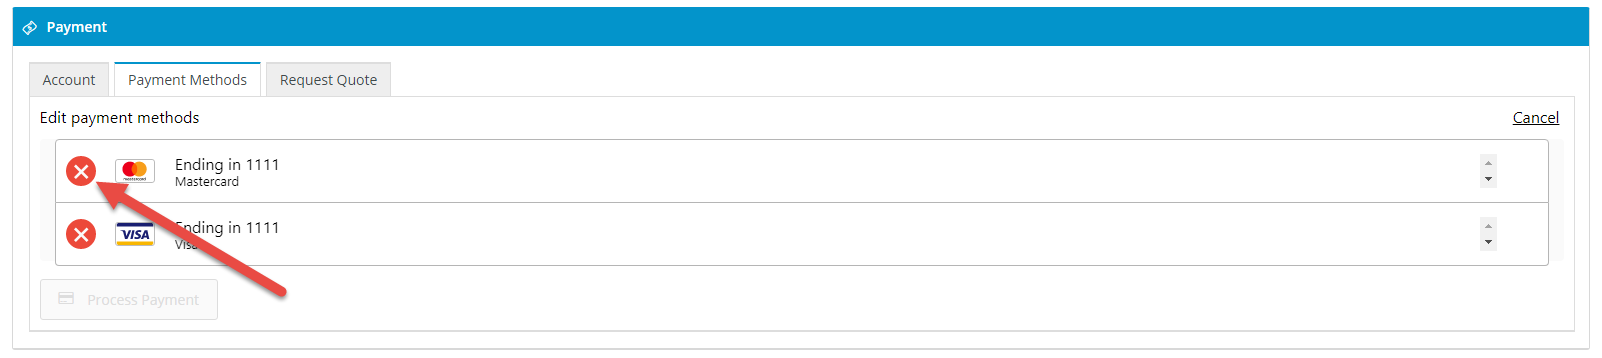
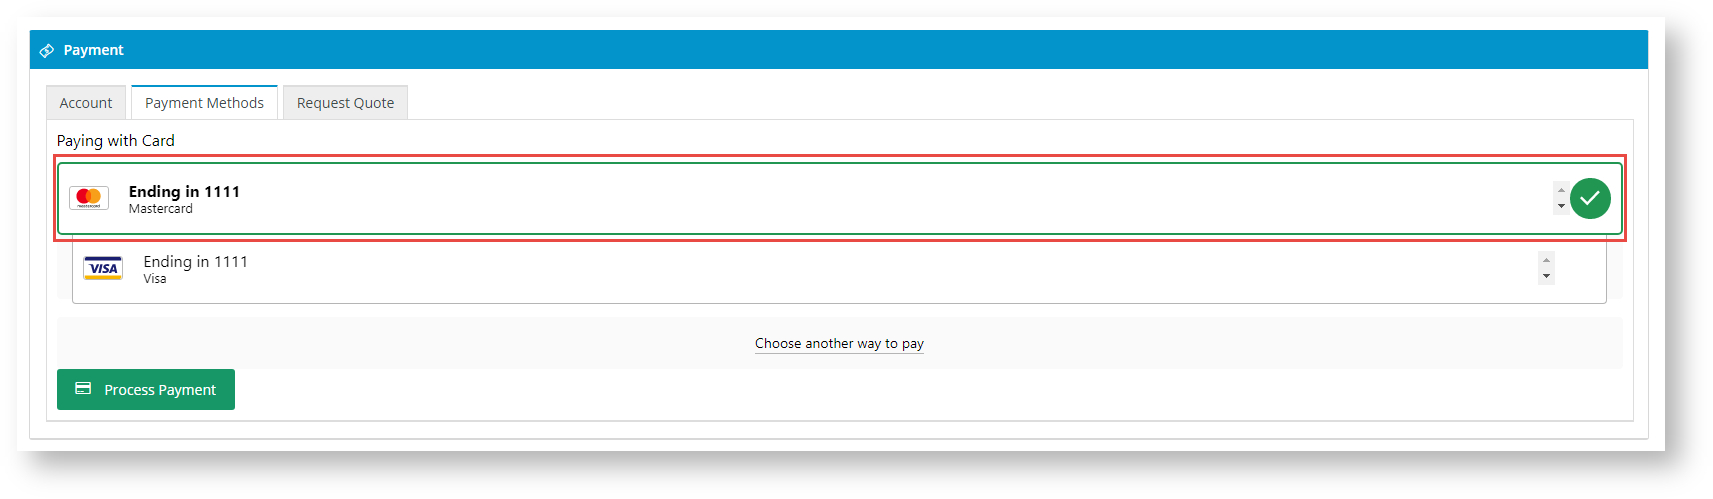
- If the saved payment at the top of the list is to be preselected when the User pays during checkout, toggle ON Preselect Vaulted Payment Method. A preselected payment is foregrounded and has a tick
next to it. If OFF, the last saved payment will be preselected.
- If you want the default payment option set in Braintree to be displayed first payment, toggle ON Show Default Payment Method First.

2. Configure payment options
The next step is to configure each payment option your site will offer. Notice there are a number of payment options available, each of which can be individually enabled or disabled at any time to suit your business requirements. Each option you enable must also be turned on in your Braintree account.
Your Braintree account will allow you to automatically offer credit card payments. To include PayPal, Google Pay or Apple Pay, your business must also have accounts with each respective provider.
All enabled Braintree payment methods will display under a common Payment Methods tab during checkout. TIP - you can change the tab name 'Payment Methods' in the Checkout Payments Options Widget.

Credit Card Settings
Braintree Payments is currently set up to accept Visa, Mastercard and American Express. Specific settings are not required for each credit card type as that is managed by Braintree. You can decide whether the following vaulting options occur or not at checkout:
- automatically save a credit card for future purchases when it is first successfully used, and
- allow the User to override the default setting.

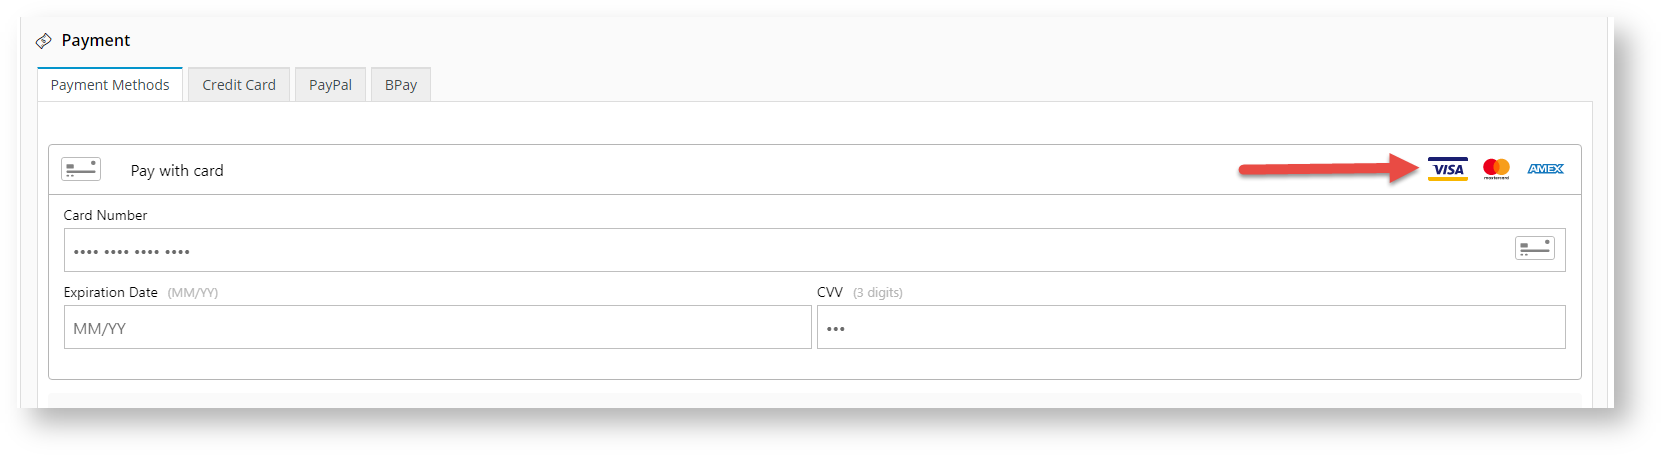
- Enable Credit Card - toggle ON to offer payment by credit card on your site. In the Payments panel during checkout, 'Pay with card' displays as an option, and the logos of the credit cards currently accepted are automatically listed.
- Allow Vault Credit Card and Allow Vault Credit Card Override work together to determine the default vaulting setting and whether Users are permitted to override it.
- Allow Vault Credit Card sets the default vaulting option when a credit card is used successfully.
Allow Vault Credit Card Override allows the User to override the default option set in Allow Vault Credit Card. If this setting is toggled ON, a Save card checkbox is displayed for the User to override the default. Whether the checkbox is preselected or not depends on the default settings.
This table summarises the four vaulting configurations:
Allow Vault Credit Card Allow Vault Credit Card Override ON OFF ON Default vaulting: yes
Checkbox: displayed, not ticked
- A card will be saved by default unless the User unticks the checkbox.
Default vaulting: no
Checkbox: displayed, ticked
- A card will not be saved by default unless the User ticks the checkbox.
OFF Default vaulting: yes
Checkbox: not displayed
- A card will be saved by default. The User cannot override this.
Default vaulting: no
Checkbox: not displayed
- A card will be not be saved. The User cannot override this.
- Require Credit Card Holder Name - toggle ON if you want the cardholder's name to be entered during the payment process. TIP - If this setting is OFF, the Cardholder Name in the transaction record in Braintree will be left blank.


PayPal Settings
Braintree Payments is set up to accept PayPal payments, including the Buy Now, Pay Later option - Pay in 4. Your business must have a PayPal account set up and PayPal enabled in your Braintree account.
To configure PayPal on your website:
Toggle ON Enable PayPal to enable PayPal on your site.
When PayPal is enabled on your site...
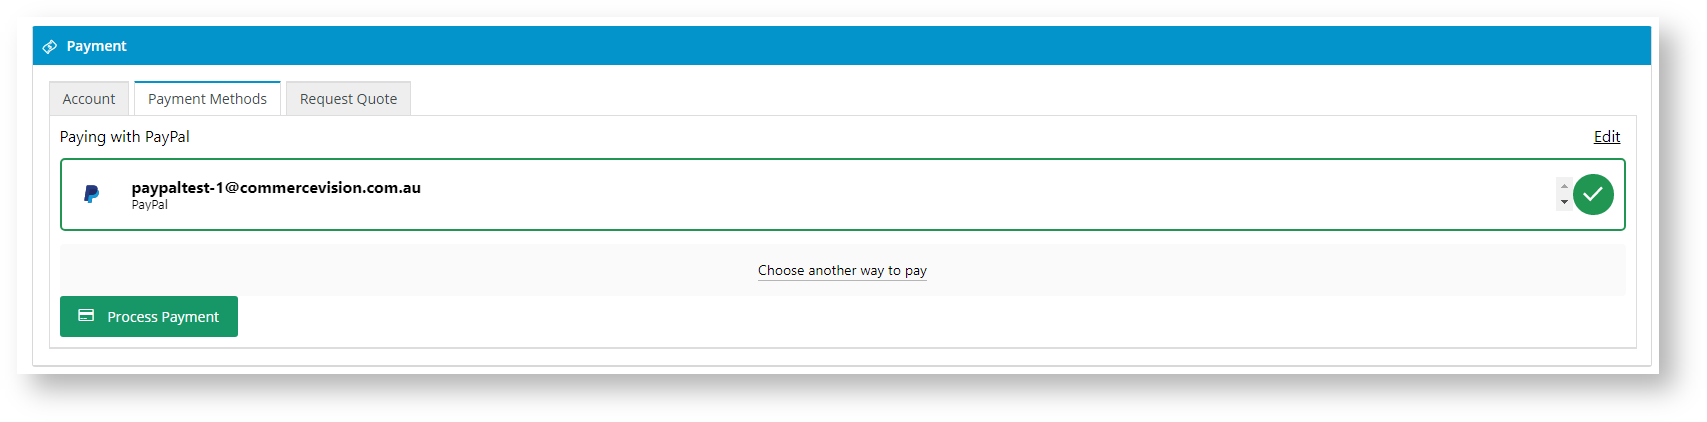
In the Payments panel during checkout, 'PayPal' displays as an option under Payment Methods.
The User clicks on PayPal and a PayPal button is displayed.
The User clicks the PayPal button. The secure PayPal login popup is displayed.
The User can log into their PayPal account and select from available payment options in PayPal. After selecting the option, the User is returned to your website. The PayPal account with login ID is displayed.
The User clicks Process Payment to complete payment for the order. If 'Allow Vault PayPal' is enabled, a successful PayPal account will be saved for future purchases.
- Allow Vault PayPal: toggle ON to automatically save a successful PayPal payment for future use.
- To save your settings, click Save.


Google Pay Settings
Braintree Payments is set up to accept Google Pay. Google Pay allows users to make contactless payments online and with Android phones, tablets or watches. Your business must have a Google Merchant Centre account set up and Google Pay enabled in your Braintree account.
Sandbox testing
For Sandbox testing, Google Pay requires a real credit card. However, no funds will be taken from the card during processing and the card is not saved.
To configure Google Pay on your website:
Toggle ON Enable Google Pay.
- In Google Pay Merchant ID, enter your Google Merchant ID from your Google Merchant Centre account.
- To save your settings, click Save.

When Google Pay is enabled on your site...
In the Payments panel during checkout, 'Google Pay' displays as an option under Payment Methods.
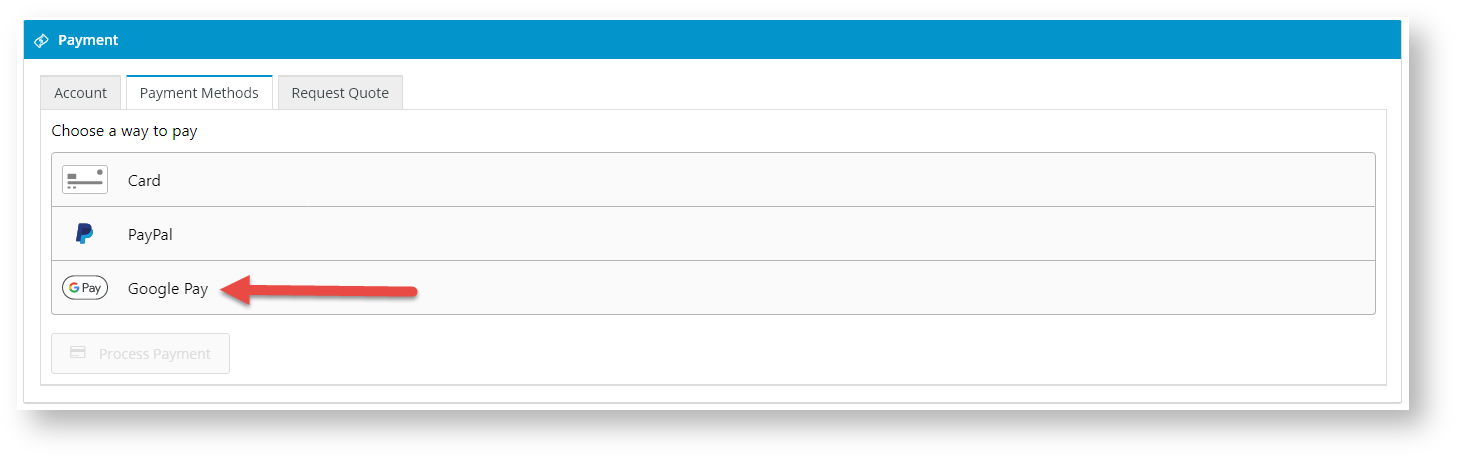
The User clicks on Google Pay and a Google Pay button is displayed. 
The User clicks the Google Pay button to login to their Google account.

Once logged in, the secure Google Pay popup is displayed. The User selects an existing payment option or enter a new credit card.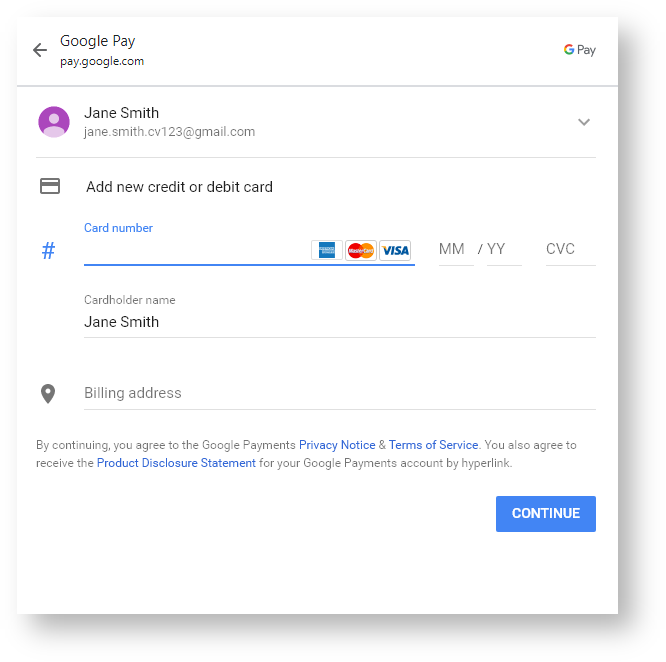
Once saved, the User is returned to the Payment panel on your website with the Google Pay option selected. The User clicks Process Payment to complete payment for the order.

Apple Pay Settings
to do
3. Fraud Protection Settings for Order Payment
Braintree Payments has three fraud protection modes, and one must be selected. Information provided here is limited to setting up an option for your website. Details about fraud protection options are available from the Braintree website. (NOTE - Advanced and Kount are options that incur additional fees.) In addition, 3D Secure, which provides an extra layer of security by prompting a User to authenticate card ownership by entering a PIN, can be enabled.
- In Braintree Payment Settings, scroll down to the Fraud Protection Settings for Order Payment section.
- In Fraud Protection Mode, select Basic, Advanced or Kount. NOTE - The mode enabled her must be the same as the mode enabled in your Braintree account.
Basic - all fraud protection is handled by Braintree and no further configuration is required here.- (For 'Advanced' or 'Knout' only.) In Treat Decision 'Not Evaluated' As, select 'Review' or 'Approve'.
Review: the transaction with this status is treated as suspicious and put on hold subject to further verification
Approve: the transaction with this status is treated as a successful one and the order is released.- (For 'Knout' only.) In Treat Decision 'Escalate' As, select 'Review' or 'Approve'.
Review: the transaction with this status is treated as suspicious and put on hold subject to further verification
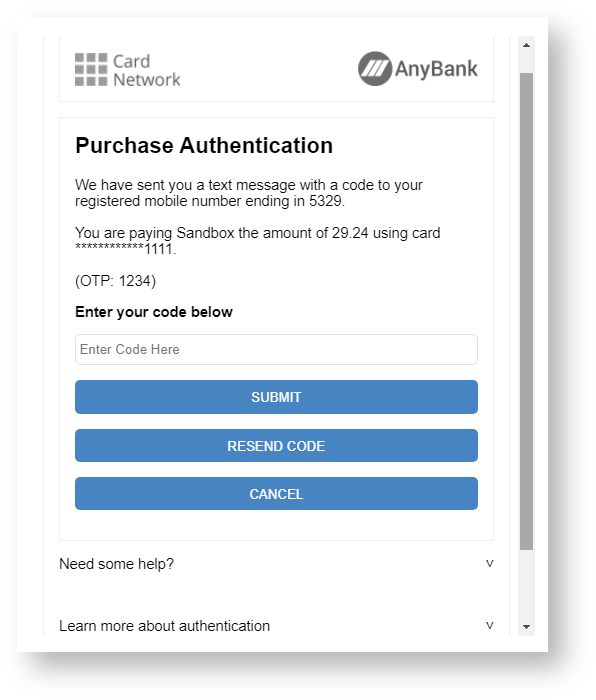
Approve: the transaction with this status is treated as a successful one and the order is releasedTo use 3D Secure, toggle ON Enable 3D Secure. NOTE - This is applicable only to cardholders who have enrolled in 3D Secure with their issuer.
Example of 3D Secure popup:
If the credit card payment passes 3D Secure, the order will be completed. If the payment is 3D-rejected, the User will see a 'Rejected by Gateway' popup error message on your site: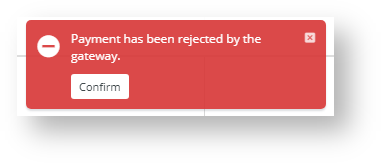
This status is also recorded in the Braintree account.- (For use with 3D Secure only). The 3D Secure Review Status List provides all 3D Secure statuses that will not reject the order if 3D is not required. it allows you to put such orders on hold for further verification. For instance, 'authenticate_attempt_successful' means that the card brand passed the attempt because the issuer's authentication server was unavailable. You can add one or more such statuses. NOTE - For a list of what each of the statuses mean, refer to the Braintree website.
Click on the list, then click to select all required statuses. These statuses will populate the field.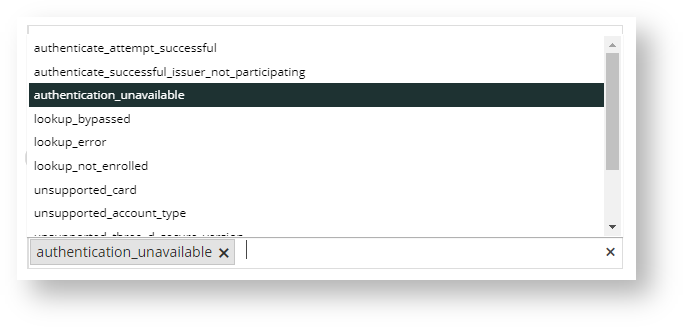

Additional Information
| Minimum Version Requirements |
|
|---|---|
| Prerequisites |
|
| Self Configurable |
|
| Business Function |
|
| BPD Only? |
|
| B2B/B2C/Both |
|
| Ballpark Hours From CV (if opting for CV to complete self config component) |
|
| Ballpark Hours From CV (in addition to any self config required) |
|
| Third Party Costs |
|
| CMS Category |
|
Related help