Overview
If you maintain your product & category structure in the CMS, there are 2 ways you can add products to categories: This article will outline method 2.
For information on method 1, see this article - Adding Products to Categories via Product Maintenance.
Contents
Prerequisites
This method is best for adding many products to a single category.
Prerequisite alert!
In order to use this method, you'll need to
- 'Enable Maintenance of Product Categories' in your Product Maintenance feature settings (https://cms.commercevision.biz/Catalogues/ProductMaintenanceSettings/OnlineProductMaintenanceFeatureSettings).
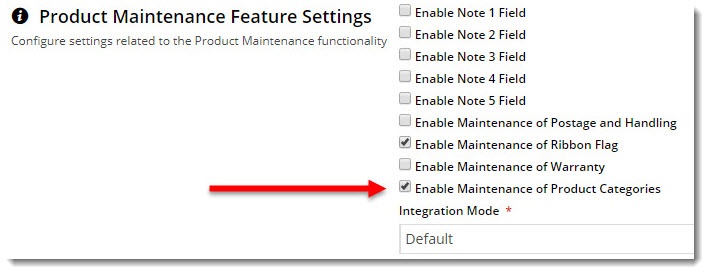
- 'Disable Product Category Integration' in your system settings (https://cms.commercevision.biz/AdminPages/CssPage/View?pageName=zSettings.aspx).

Adding products to the category
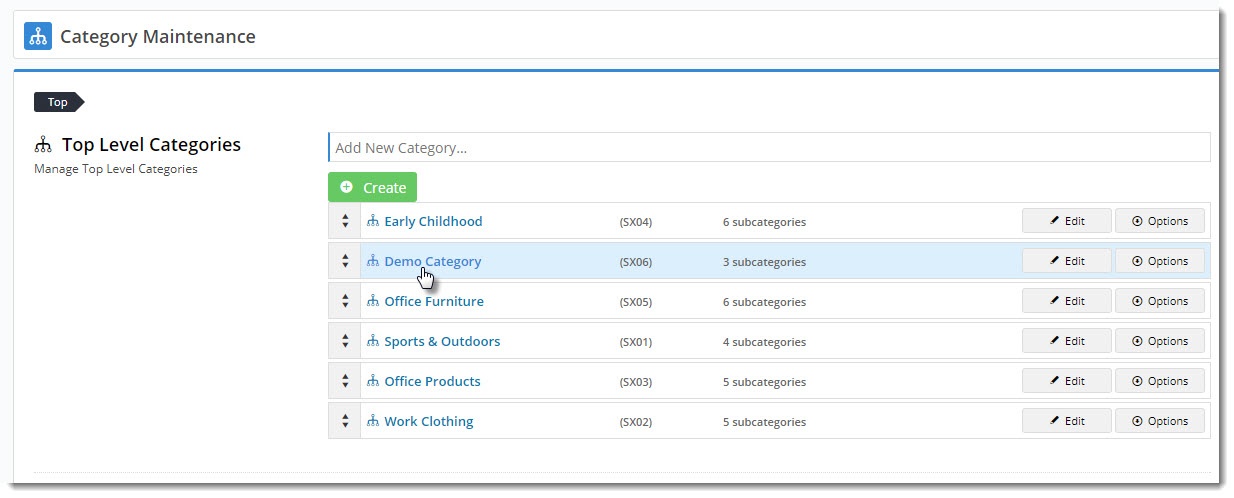
In the CMS, navigate to Products & Categories→ Category Maintenance.
- Click the top level category name to drill down to the category level you wish to add products to.
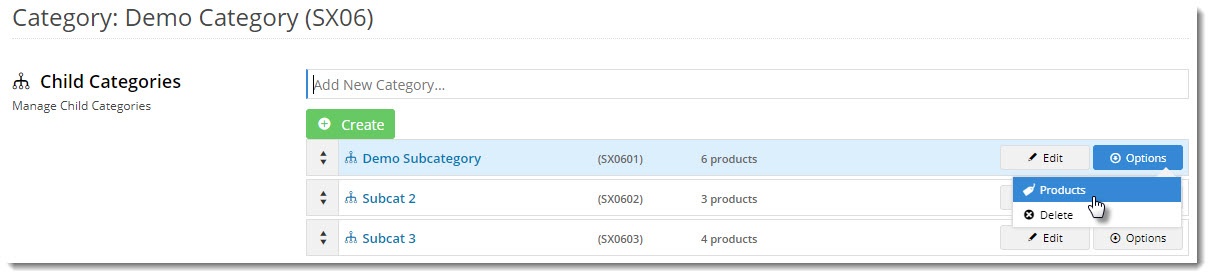
- Hover on Options and select Products from the menu.
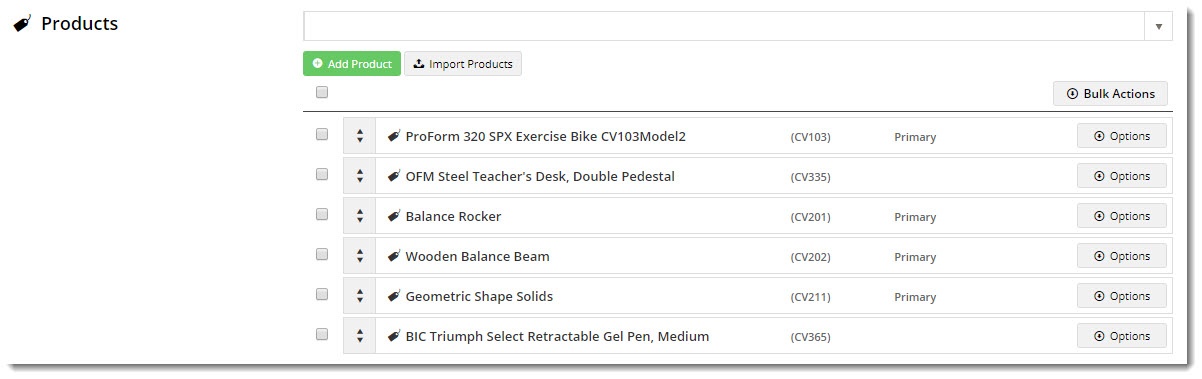
- The category's products will be displayed, with an indicator to show whether this category is the product's primary location (for SEO & breadcrumb purposes).
- To add a product, enter the code or description in the lookup, then select it from the suggestions. Hit Enter or click 'Add Product' to add it to the list.
(If you prefer to import products in bulk, skip ahead to the next section.)- Repeat step 5 to add more products to the category if required.
- Click Save or Save and Exit.
Here's an example:

Uploading products in bulk
If you've got a huge list of products to upload, consider using our import function.
Here's how:
5. Follow the steps above, but at step 5, click Import Products.
6. Click 'Download Example Template' to generate a sample .csv file.
7. Paste your own product data into the sheet.
- All you need is the product code, but you can also nominate whether this category should be the product's primary category (true/false or yes/no).
- A blank entry in the 'Primary' column will be treated as false, but if the product has no other category locations, this category will become its primary by default.
- The primary category determines the breadcrumb on the product detail page and related product SEO data will link to this category.
8. Save the .csv file somewhere.
9. Select your Import Type:
Append (default) - adds the products in your .csv to any products already in the category
Overwrite - deletes any products in the category and replaces them with the ones in your .csv
10. Click Select files to browse to your saved .csv. The moment you select your file, the import will begin.
The import log will advise of success or warn you of errors. Duplicate and invalid products will be skipped.11. Click Back to return to the category product list.
12. Click Save or Save and Exit.
Here's an example:


Once you've added products to a category, you'll need to clear the Product Cache in order for the products to show on the web. This is done in the CMS via Settings → Cache Management. 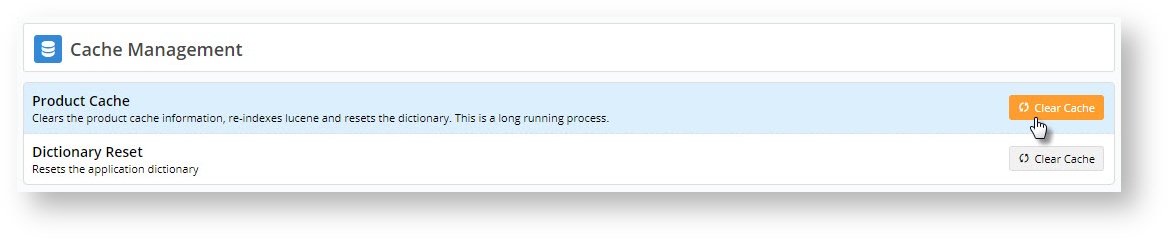
Additional options
If you hover over the Options button for a product, you'll see 3 choices:
- Edit Product Categories
- Product Maintenance
- Remove
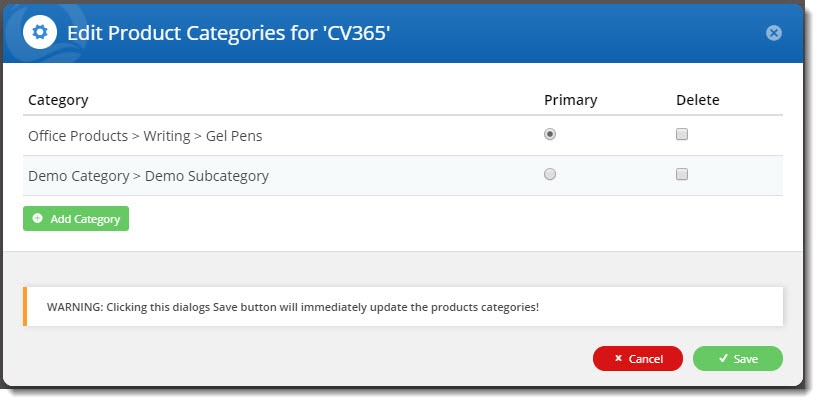
Edit Product Categories
- Opens a popup containing all the categories this product is found in.
- Here you can change the product's primary category assignment (radio buttons), or add/remove categories.
- Note that once you click Save on this popup, the product's categories will be saved (regardless of whether you click save on the Category Product page behind it).
Product Maintenance
- Opens the Product Maintenance page for this product so that other information can be edited.
Remove
- Deletes the product from this category.
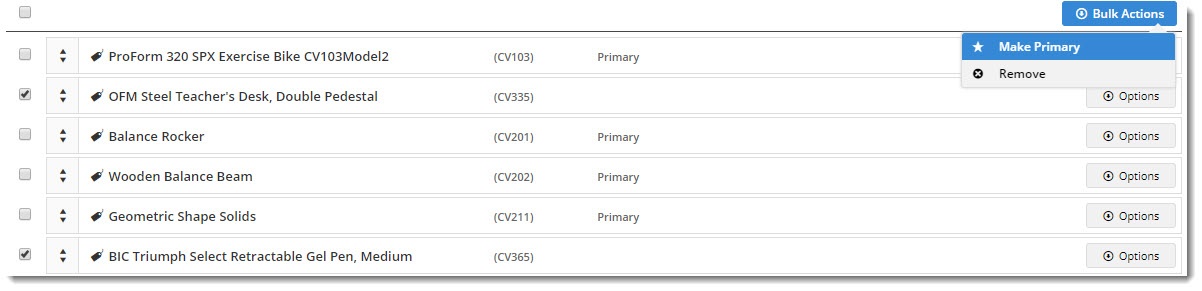
Bulk Actions
You can also tick multiple products (or all) in the list and either:
- remove them from the category, or
- mark this category as primary.

Product Sequencing / Sorting
The order in which your products appear within each category can also be set here. Simply drag and drop the products into any sequence you wish (or have them sequenced as required in your .csv file), and click Save.
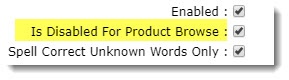
Please note: if your site uses Lucene search, you may want to check the setting for Product Browse. If Lucene is enabled for product browse (as well as search), the product sequence you set in the CMS via drag & drop will be overridden.
Recommended configuration is that Lucene "Is Disabled For Product Browse", meaning your products can be ordered any way you like in the CMS!
To check your site's setting in the CMS:
- Navigate to Advanced Settings → Lucene Search Settings.
- Select the Index Settings tab.
- Check the status of the 'Is Disabled For Product Browse' tickbox and edit if required.
- Click the Update button to save changes.
Related Articles
Additional Information
--
| Minimum Version Requirements | **.**.** |
|---|---|
| Prerequisites | In order to use this method, you'll need to |
| Self Configurable | Yes |
| Business Function | Products & Categories |
| BPD Only? | Yes |
| B2B/B2C/Both | Both |
| Ballpark Hours From CV (if opting for CV to complete self config component) | Contact CV Support |
| Ballpark Hours From CV (in addition to any self config required) | Contact CV Support |
| Third Party Costs | n/a |
| CMS Category | CMS Category |