Overview
Ever wanted to edit one of your website pages and see what your changes look like BEFORE you hit publish? Our new CMS Page Preview functionality means that now you can! Page Preview is feature-based, meaning it will not automatically be enabled for your site. You can elect to turn it on for just your Stage site, your Live site, or both.
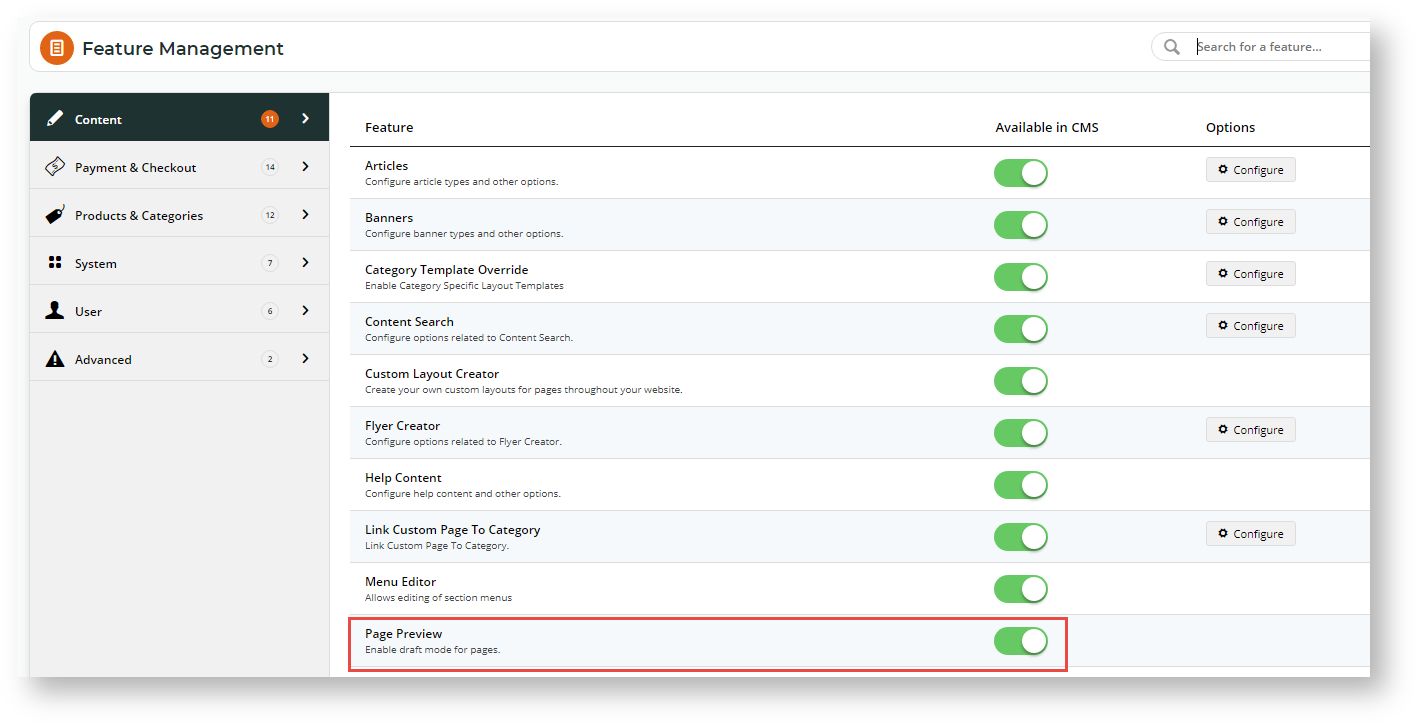
Enable Page Preview
To turn on Page Preview on for your site, go to Settings → Feature Management → Content, then toggle on Page Preview.
Draft mode
Once you enable Page Preview, here's what you'll notice:
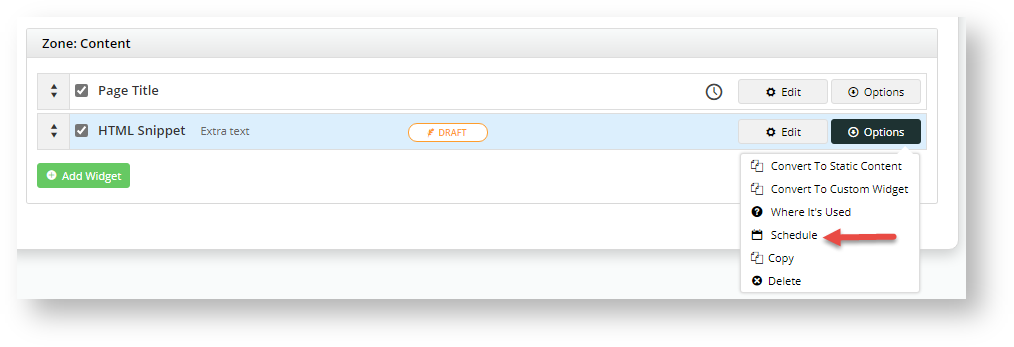
When you make a change to a page (adding or editing a widget, for example), it's instantly put into draft mode and you'll see some new options at the top right.
- Options
- Copy Preview Link - copies the page preview link to your clipboard so you can send it to a colleague
- Changes - brings up a detailed list of all the changes that have been made to that page
- Delete Disabled Widgets - bulk removes all widgets from the page which are currently in a disabled state
- Delete All Widgets - bulk removes ALL widgets from the page
- Revert - undoes the changes you made to the page since the last publish
- Preview - opens the site in a new tab so you can see your changes. You may need to login or navigate to the relevant page.
- Publish - essentially like hitting 'Save', this pushes your changes live!

Draft counter
You'll also see a Draft counter up in the CMS header (with the little quill icon).
It keeps a tally of how many pages you currently have in draft mode. Click it to open a pop-up displaying a list of each page you've not yet published changes for.
From here, you can publish a single page, toggle several on and 'Publish Selected' (or schedule for later), or click on a page name to go directly back to edit mode for that page.
See it in action below:


Check your changes
A list of changes for each draft page is accessible in a few different ways:
- When you click on the Draft counter in the top right of the CMS header, the popup will open. There you'll find a button against each draft page called 'Changes'.
Click that to open up a summary of all the changes awaiting publish for that particular draft.
You'll see the zone the widget is in, the name and description of the widget that was changed, the actual change made, and the user and date.- When viewing a list of templates via Content → Pages & Templates, any pages that are in Draft mode will have an indicator, as well as the 'Changes' option to display exactly what's different.
- When actually editing a template, hover on the Options button and select 'Changes' from dropdown menu.


Schedule Drafts for publishing
A page is actually a page of widgets. Suppose you have one or more widgets in draft mode on a page. They have been edited and preparation is finished. But the time isn't yet right yet to send live. You can schedule publishing to a later date/time.
Example: Say you're running a seasonal promotion on camping gear, starting next week. You plan to promote it with an eye-catching banner on the home page, and want to get your images loaded and ready. On the Home Page template, you can update your Banner Slider widget but leave it in Draft. Then, schedule the new version of the widget to go live bright and early Monday morning!
You can schedule publishing of a single widget or all draft widgets on a page.
Schedule to publish a single widget
To schedule the publishing of a single widget:
In the template containing the widget, make changes to the widget and save them.
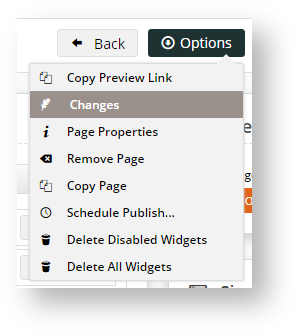
For the widget, hover over Options and select Schedule.
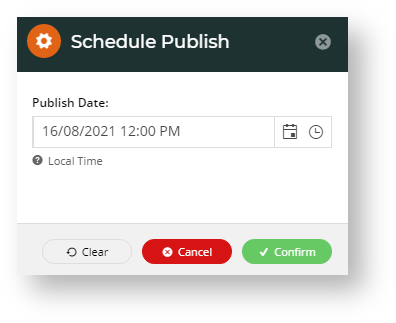
- In the Schedule popup, enter the date and time the widget contents should be published. You can also enter an end date/time if the changes are for a specific period.
- Click Confirm.
- The Schedule icon indicating a future publishing date/time exists for this widget is displayed.

Schedule to publish all draft widgets on a page
You can also schedule all draft widgets on the page to publish in one go. NOTE - if this is a new page on your website and you schedule all widgets to publish at a later date and time, the page will be live and display without content rendered by those widgets until then.
To schedule the publishing of all draft widgets on a page:
In the template, make changes to all widgets as required and save the changes.
To see a summary of changes for this page, scroll to the top of the page, hover over Options and select Changes.
To schedule publishing of all widgets, on the top of the page, hover over Options and select Schedule Publishing....
- In the Schedule Publish popup, enter the date and time using the calendar and clock icons.
- To save the schedule, click Confirm.
- Notice the Schedule icon on the top right corner of the page.


That's it! The changes made to the widgets will now go live on the date and time set. No further action needed.
Additional Information
| Minimum Version Requirements |
|
|---|---|
| Prerequisites |
|
| Self Configurable |
|
| Business Function |
|
| BPD Only? |
|
| B2B/B2C/Both |
|
| Ballpark Hours From CV (if opting for CV to complete self config component) |
|
| Ballpark Hours From CV (in addition to any self config required) |
|
| Third Party Costs |
|
| CMS Category |
|
Related help