The "Customer Self Service eCommerce Platform" now supports eWAY's Token Payment for a Customer (Customer Code). This means the Customer does not have to enter the stored card's details each time it is used on your website to pay account invoices. The stored credit card can also be used to maintain a charge authority against the Customer, e.g., to settle outstanding amounts in your ERP. Please consult with Commerce Vision to explore this option.
Overview
Once Customer Payment Token is enabled for your site, a Customer account user with the relevant access level can add a credit card to be saved by eWAY for future use. eWAY issues a Token ID for the card, and this is stored in your eWAY account. The token allows your site to recharge the card without a user having to re-enter card details. Token Payments can also be used in the "Customer Self Service eCommerce Platform" for payment of account invoices.
For implementation
- Customer Token Payments need to be enabled by Commerce Vision and is only available for sites on version 4.21 and higher.
- Availability of this feature assumes that eWAY's services have been purchased and you have eWAY set up for credit card processing on your website.
- Customer Token Payments is distinct from User level eWAY Token Payments. (Refer to eWAY payment gateway help for more details about User Token payments.)
Step-by-step guide
NOTE - This feature must first be enabled on your site by Commerce Vision.
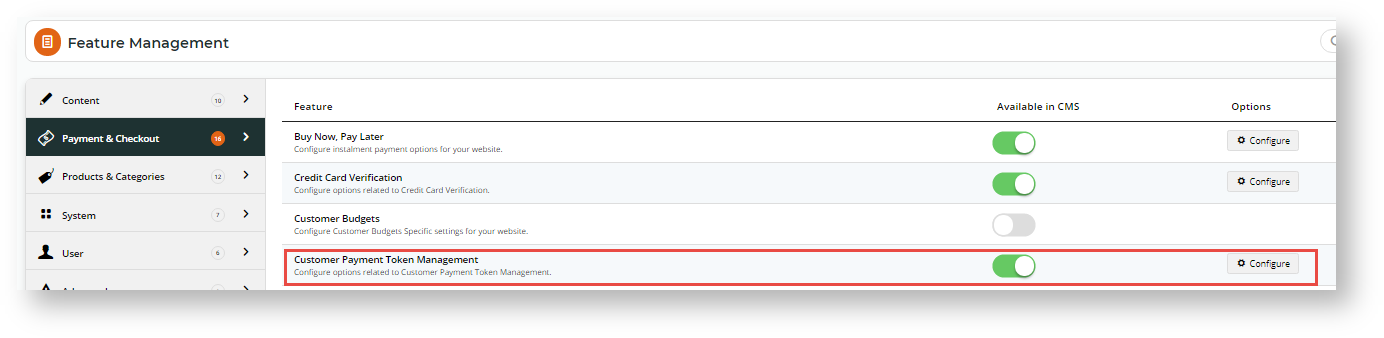
1. Enable Customer Payment Token Management
- In the CMS, navigate to Settings → Feature Management → Payment & Checkout.
- Toggle on Customer Payment Token Management.
- Click Configure.
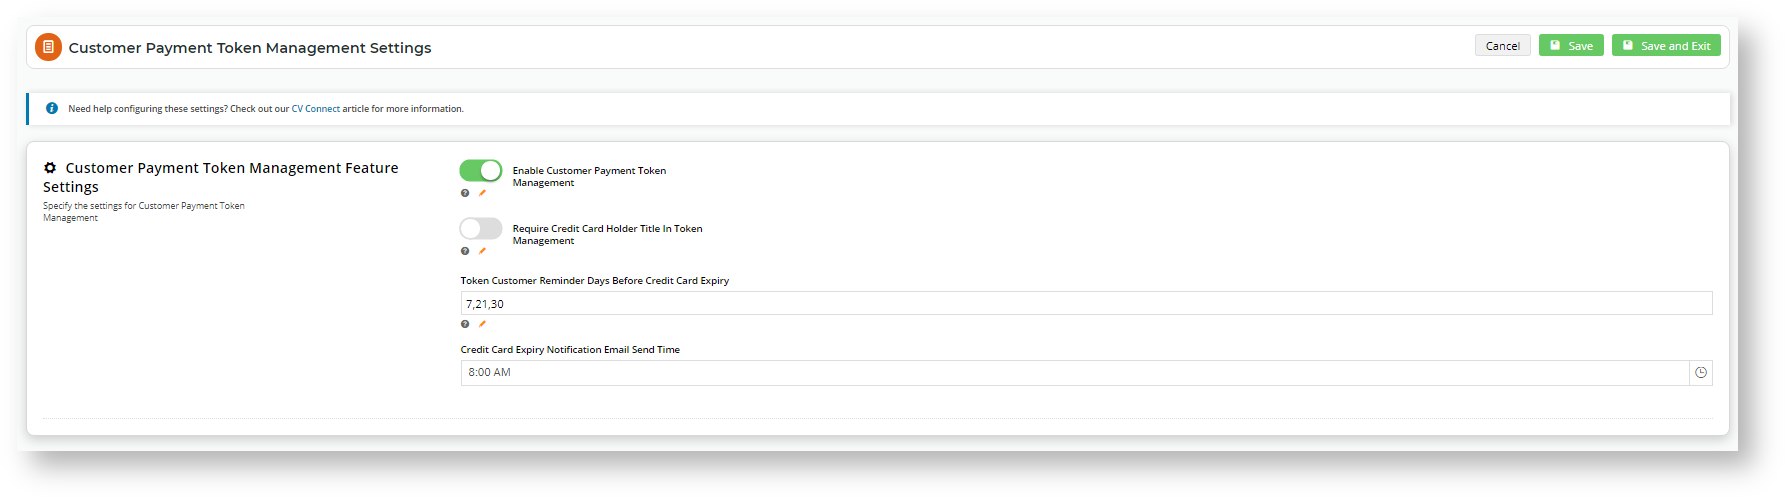
- In the 'Customer Payment Token Management Settings' screen, configure settings for the feature.
Enable Customer Payment Token Management: Toggle ON
Require Credit Card Holder Title in Token Management: (optional but recommended). Toggle ON if the user must enter a title for the credit card holder, e.g., Mr, Ms, Mrs, etc. eWAY requires titles to be included in credit card details. If this is disabled, the system will use 'Mr' as a placeholder default.
Token Customer Reminder Days Before Credit Card Expiry: (optional) If you want the system to email the Customer to remind them their stored credit card is approaching its expiry date, enter the number of days before the expiry date to send the notification. If more than one number is entered, separate each one with a comma.
Credit Card Expiry Notification Email Send Time: If the expiry date notification is used, enter a time for the email to be sent.- To save the settings and close the screen, click Save and Exit. The feature is now enabled. Depending on Role, a Customer account User will see the 'Customer Payment Token Management' in their Dashboard menu.
2. Configure the Customer Payment Token Management Template and Widget
This template and widget allows you to edit various displayed text and items in this feature, including the Terms and Conditions of Use the Customer has to agree to.
- In the CMS, navigate to Content → Pages & Templates.
- Find the Customer Payment Token Management Template and click Edit.
- Click Edit for the 'Customer Payment Token Management Widget.
- Edit each field as you require. Click here to view the help page for this widget.
- Once you have finished editing the widget, click Publish to effect the changes on your website.
3. Edit the Token Customer Credit Card Info widget
If you have entered values in Token Customer Reminder Days Before Credit Card Expiry in Step 1, then you can edit the message sent to the customer. The widget is located in the Emails → Credit Card Expiry Notification Email.
See Token Customer Credit Card Info Widget help.
4. View Customer Tokens and payment history in eWAY
You can log in to your eWAY account to manage existing Customer Tokens and view payment activity for a specific Customer Token. For more information, see eWAY Token Payments on the eWAY website.
Your Customer and Customer Token Payments
Add a Credit Card in Payment Token Management
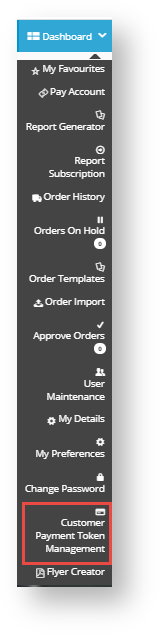
Each Customer (Code) is limited to one Token (one credit card). The credit card is added in the 'Customer Payment Token Management' screen (Dashboard → Customer Payment Token Management). Before the Customer can add a card, they are prompted to agree to the Terms and Conditions your site has set in the Customer Payment Token Management Widget.
Once a card has been added successfully, its details (with credit card number masked) are displayed on the screen. The Customer can always replace it with another card by clicking the 'Update Credit Card' button, or delete it by selecting 'Delete Credit Card'.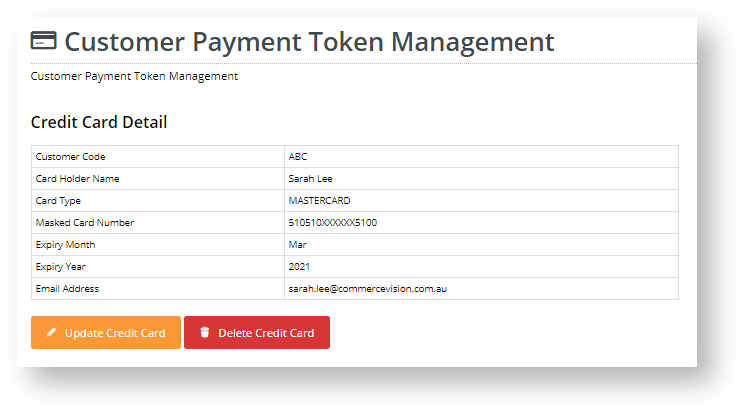
If you have access to your site's eWAY's account, you will be able to see your Customer's token in 'Token Payments'.
Pay Account Invoice with Token Payment
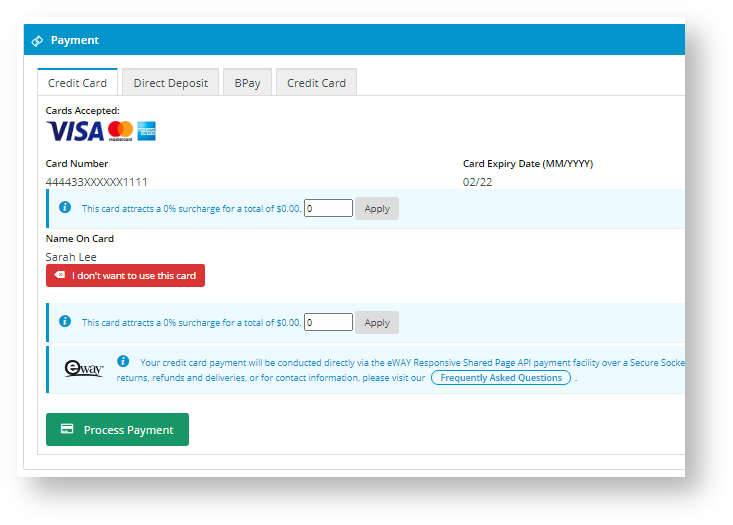
Once a Customer has a Token Payment saved in the system, it can be used to pay outstanding invoices on their account. (See Account Payment.) During the account payment process, an option box will ask the user if they want to use the saved credit card. They can select Yes or No.

If the user selects Yes, the credit card fields will be pre-filled with the card details (with the numbers masked). They simply have to click Process Payment.
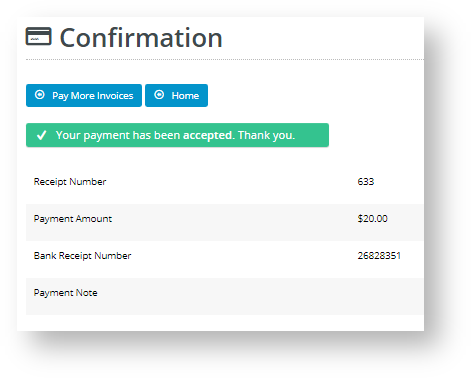
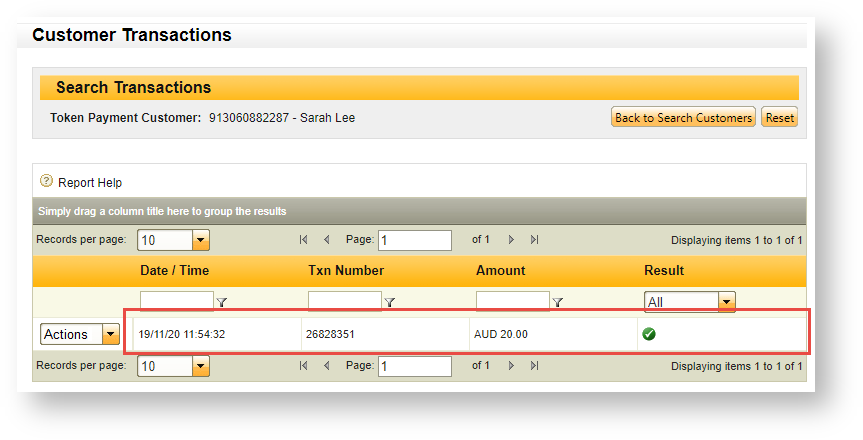
If payment is successful, the Payment Confirmation page displays the payment details, including the Receipt Number. This transaction will appear in your eWAY account as a Token Payment for the Customer.
Payment Confirmation on your site
| Token Payment transaction in your eWAY account
|
Additional Information
| Minimum Version Requirements |
|
|---|---|
| Prerequisites |
|
| Self Configurable |
|
| Business Function |
|
| BPD Only? |
|
| B2B/B2C/Both |
|
| Ballpark Hours From CV (if opting for CV to complete self config component) |
|
| Ballpark Hours From CV (in addition to any self config required) |
|
| Third Party Costs |
|
| CMS Category |
|